How to build a restaurant website: a beginner’s guide + tips on promoting it

- Benefits of building a website for your restaurant
- How to build a website for your restaurant
- 1. Select a website builder
- 2. Sign up and select a template
- 3. Customize your website
- 4. Publish your restaurant website
- 5. Add your website link to your restaurant’s social media
- Tips on promoting your restaurant website
- Be active on social media
- Get listed in restaurant apps
- Use targeted advertising
- FAQ
- Do I need to buy a domain for my Taplink restaurant site?
- My restaurant already has social media. Why do I need a website?
- Do I need to connect an SSL certificate for my restaurant’s website?
- What are the most common mistakes when building a website?
- The bottom line
Running a restaurant website comes with the following benefits:
- All info in one place: A website allows you to keep all important details in one convenient spot. You can list everything customers need to know: your restaurant’s concept, menu, location, business hours, contact info, and options to make reservations or place orders. It saves customers from searching all over for details, making it easier for them to choose your place.
- Simplified reservations and orders: Research shows that online food orders are on the rise, expected to reach 192.62 million people by 2028. Plus, over 70% of people prefer to make table reservations online, while only 19% do it in person. If you make a restaurant website with these features, you’re more likely to catch people who prefer the online option, which will increase your revenue as a result.
- Easy access to the menu: By having your menu on your restaurant website with photos and ingredients, customers can see exactly what you offer. It helps them decide what to order for delivery, takeout, or in the restaurant before they visit it. A digital menu is also easy to update, for example, with new prices or dishes.
- Building customer trust: A website creates a more trustworthy image of your restaurant. It allows you to share the story behind your restaurant, show photos of the interior and dishes, introduce your team, and share customer reviews. These details make your business feel transparent, which builds loyalty.
In short, a website is a must-have for all restaurants. So now, let’s explore how to make and design a website for your restaurant, cafe, or any other food business you run.
This section gives instructions on how to create a website for your restaurant. Here’s what it will cover:
- Selecting a website builder.
- Choosing a template for your restaurant website.
- Customizing the site to fit your needs.
- Publishing your site.
- Adding your website link to your social media profiles.
Let’s start with the first step.
There are two ways to make and design your website: do it yourself or use a website builder. Building a website on your own requires web design and coding skills. If you’re considering outsourcing the site development, it can be quite expensive, and the process might take several months. On the other hand, a website builder lets you create a website quickly and affordably, even if you’ve never designed one before.
There are many website builders on the market. However, some of them can be pricey for smaller projects, while others require technical skills. That’s why we recommend you use Taplink to make your restaurant site. Taplink doesn’t require tech expertise and offers the following benefits:
- Fast creation: Using Taplink’s ready-made templates, you can build a website for your food business in 15 to 20 minutes.
- Mobile-first design: Over half of users of the internet access it from mobile devices. That’s why Taplink designs its websites specifically for smartphones to ensure ease of use.
- Affordable pricing: Taplink offers three pricing plans: the free Basic plan, the Pro plan, and the Business plan. Paid plans are affordable, starting at $3 per month.
- Full customization: You can adjust every element of your site to suit your needs. Full customization includes general design changes, like colors or fonts, as well as finer details like border weight or line spacing.
For this article, we’ve built the following restaurant website using Taplink:
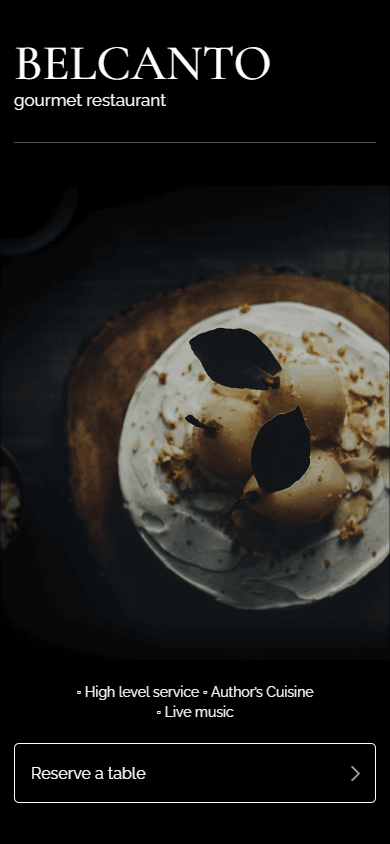
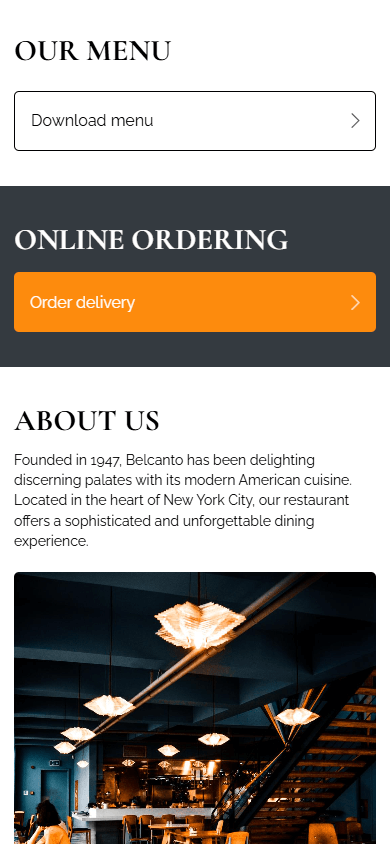
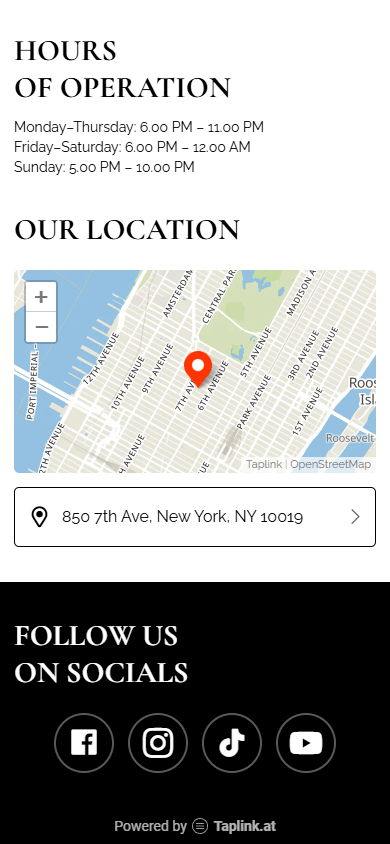
See the live version of the website here.
In this guide, we’ll show you how to build such a website using Taplink, as this site is perfect for food businesses.
To start building a restaurant website on Taplink, you need to sign up. Taplink offers three plans, but we chose the Business plan because it lets you:
- Add images.
- Add videos.
- Place call and delivery order buttons.
- Build a digital menu.
- Include opt-in and table reservation forms.
- Run email campaigns.
- Use a map to show the restaurant’s location.
- Add a link to buy a gift card.
- Link to the restaurant’s social media.
And much more.
After signing up and choosing a plan, it’s time to pick a template. For the website shown above, we used this template. It includes all the essential parts needed to build a website for a restaurant or cafe.
Below, we show how each part looks on our site and explain how each one can benefit your restaurant. Please note, that you can add more parts or delete ones you don’t need. Later on, we’ll go over how to add or delete them.
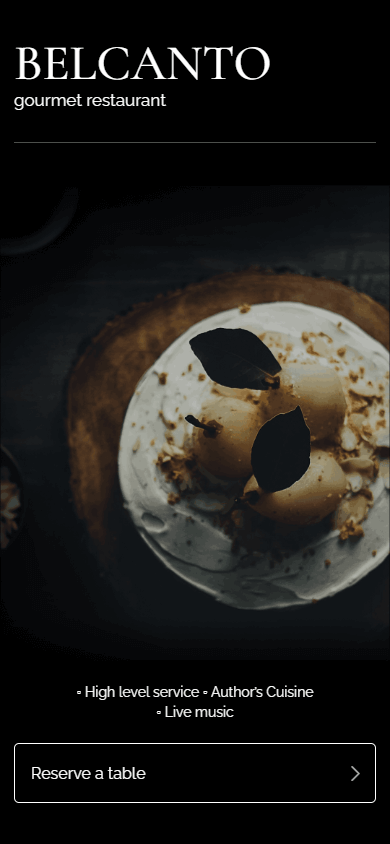
- Headline: This is the first thing customers see when they visit your site. A clear headline tells them the name of your restaurant, the type of cuisine, and what you offer.
- Table reservation button: Located at the top of the page, this button lets customers quickly reserve a table. It’s especially useful for those who came to your site just to make a reservation.
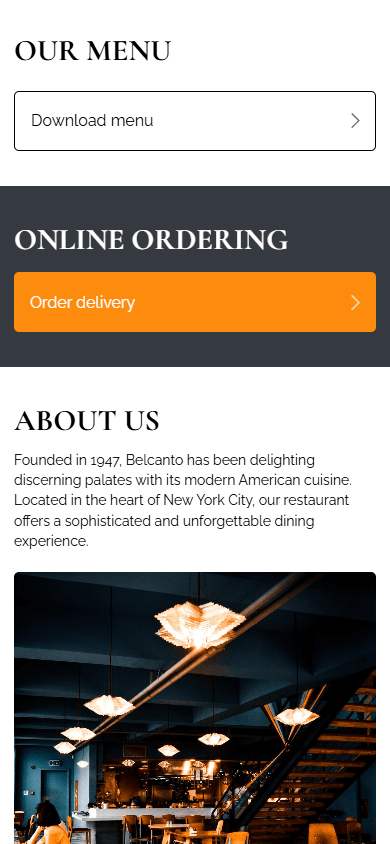
- Menu: The menu lets customers pick dishes for delivery or takeout. Your customers can also use the menu during their stay in your restaurant or check out options before arriving to order quickly.
- Order delivery button: If your restaurant delivers food, adding an order delivery button helps you reach customers who prefer to eat at home, boosting your profits. Tapping this button can either open a third-party delivery site or go to a page on your site with an order form and payment option.
- About us: Sharing your restaurant’s story, interior and staff photos will help build customer trust and add a sense of transparency to your business.
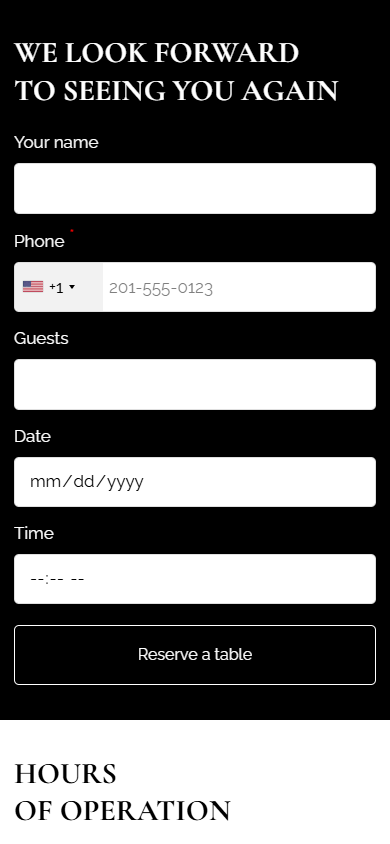
- Table reservation form: The table reservation form lets you get all the info you need from customers without calls or numerous messages.
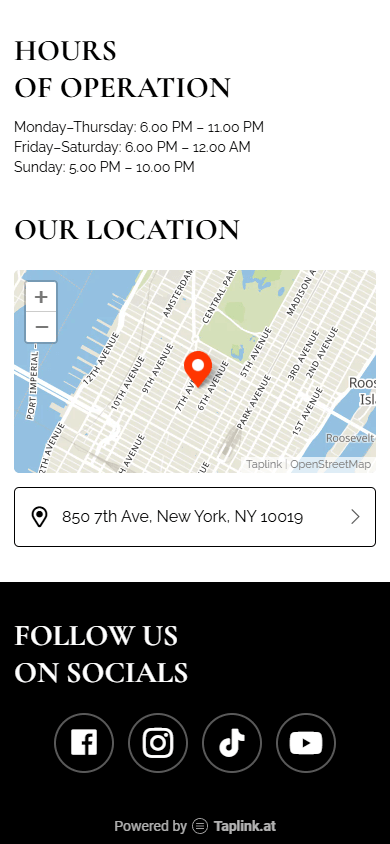
- Hours of operation: Listing your hours helps visitors plan their visit and avoid any confusion.
- Location map: The map makes it easy for customers to find your restaurant, saving them time.
- Social media links: Links to social media let your audience follow your content in different formats, building loyalty and keeping interest in your restaurant.
Check out the full website at this link.
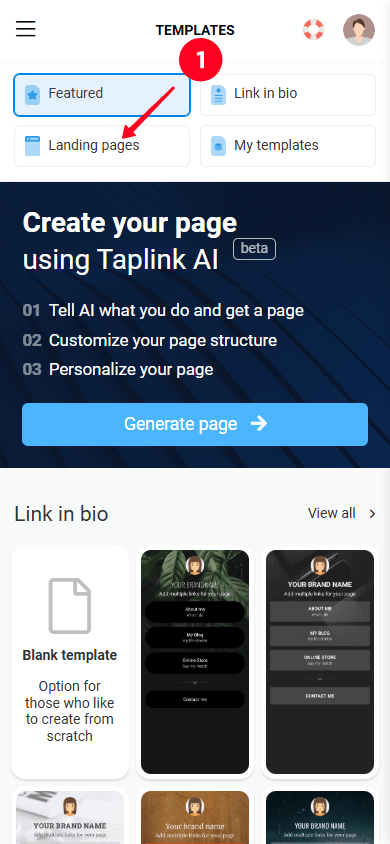
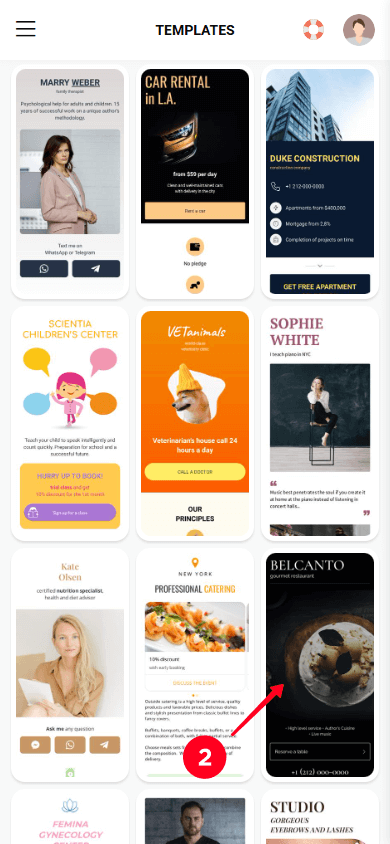
If you’d like to use a different template, you can find and pick it up in Taplink’s library. Here’s how:
01. Tap the Landing pages tab.
02. Select a template you like.
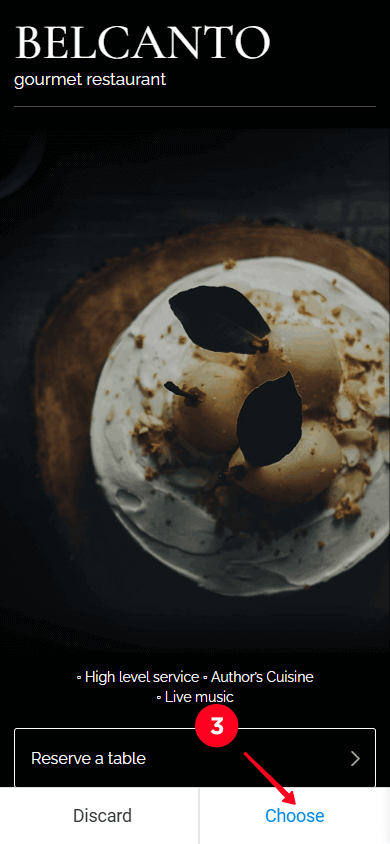
03. Tap Choose.
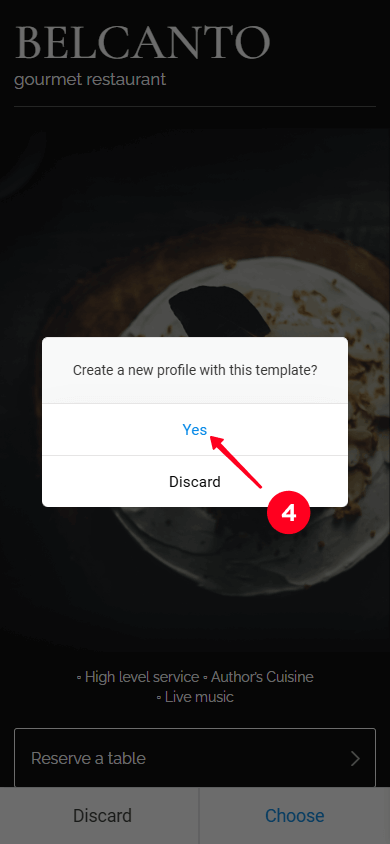
04. Select Yes.
After choosing a template, you’ll see that it already has some blocks. These can be text blocks, image blocks, buttons, forms, and so on.
Check the screenshot below to see what blocks look like in Taplink. We’ll explain them in more detail next.
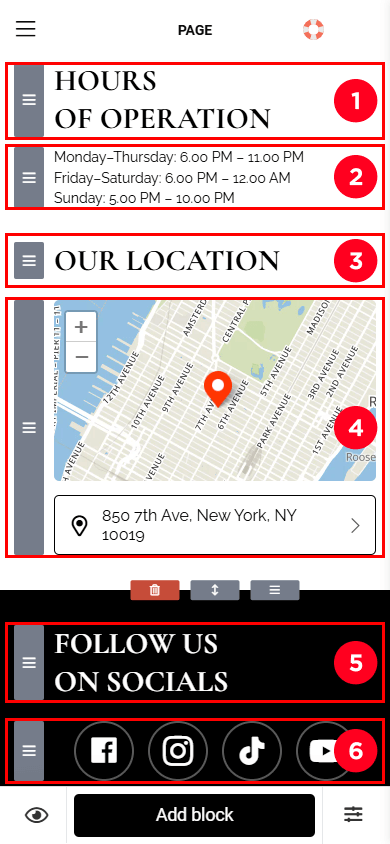
In the screenshot above, you can see the following 6 blocks:
- A text block with a headline.
- A text block with body text.
- A text block with a headline.
- A map block.
- A text block with a headline.
- A block with social media links.
To make the website fit your business, you need to customize it. This means changing the content in blocks, adding new blocks, deleting blocks, and rearranging them. We’ll explain how to do all of this below.
We'll show you how to edit content on Taplink using the map block as an example. To customize the map block, follow these steps:
- Tap the block.
- Tap the trash icon to delete the pre-made address.
- Enter your restaurant’s address.
- Tap Add marker.
- Use the zoom controls to adjust the map view.
- Tap Save changes.
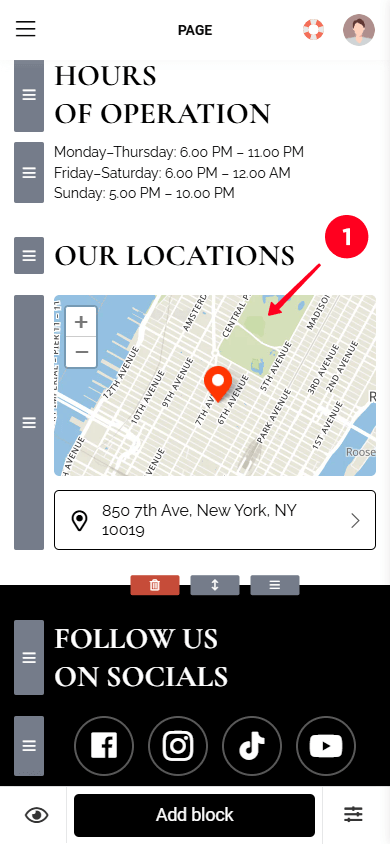
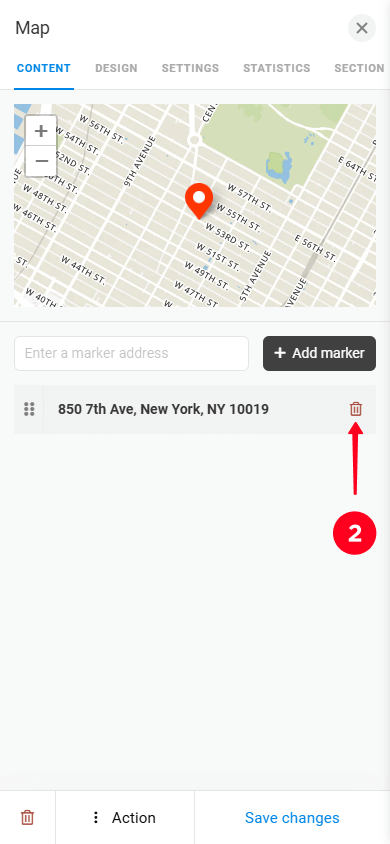
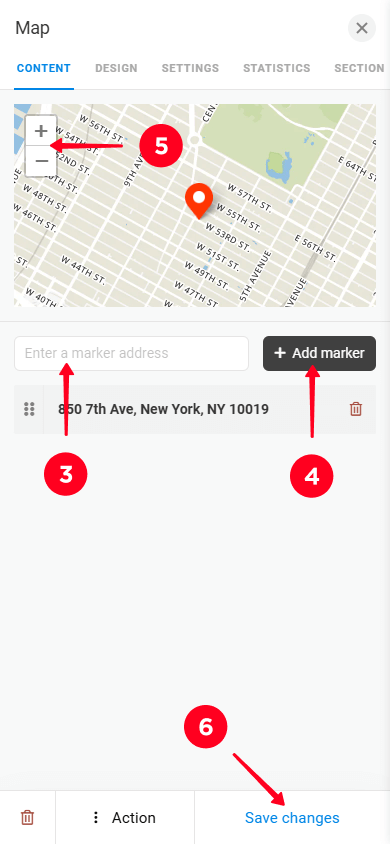
You can also add new blocks to the ones you already have. Taplink offers more than 20 blocks to choose from, including options like image carousel, video, price list, timer, and more. In the screenshot below, you can see all the blocks available on Taplink.
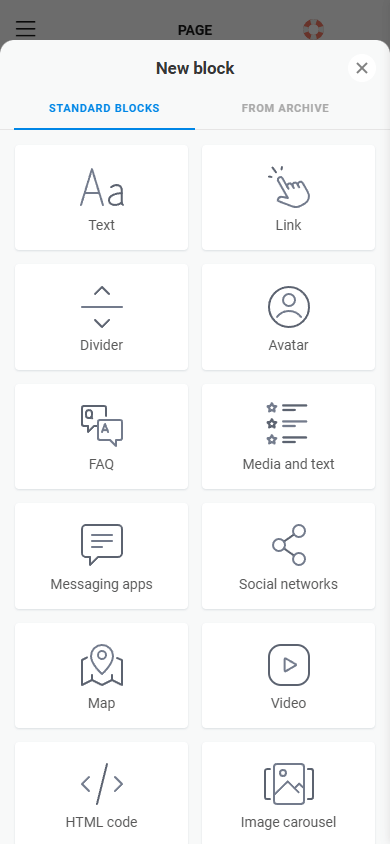
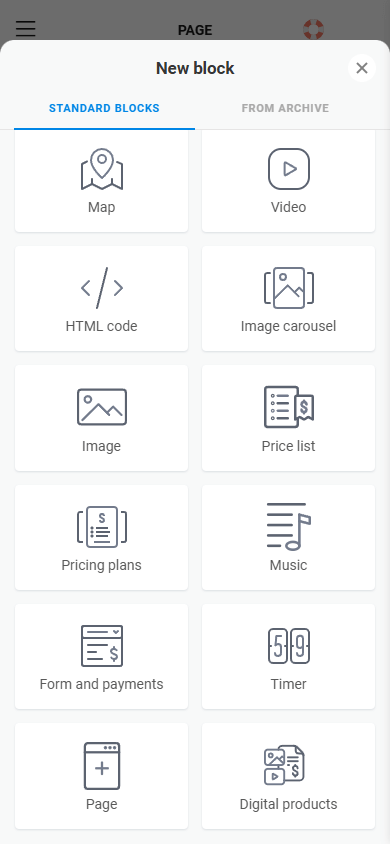
To add a new block, follow these steps:
- Tap Add block.
- Select the block you want to add. We picked the Price list block to use as our restaurant menu.
- Add content to the block. For the Price list block, enter the names of your dishes and the prices for each.
- To add more dishes, tap Add new item and fill out the fields.
- Tap Save changes.
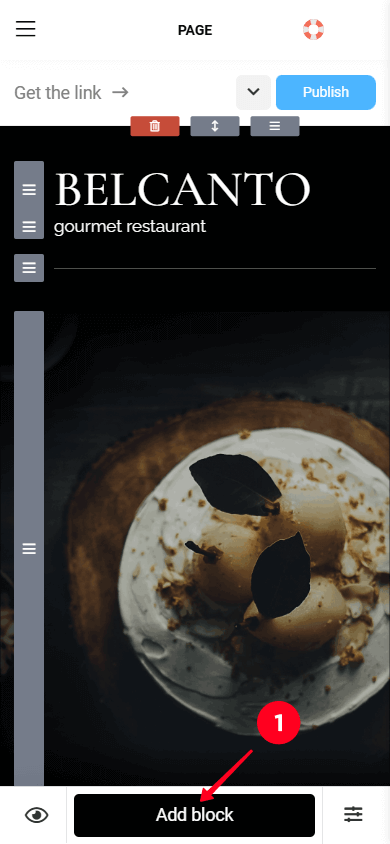
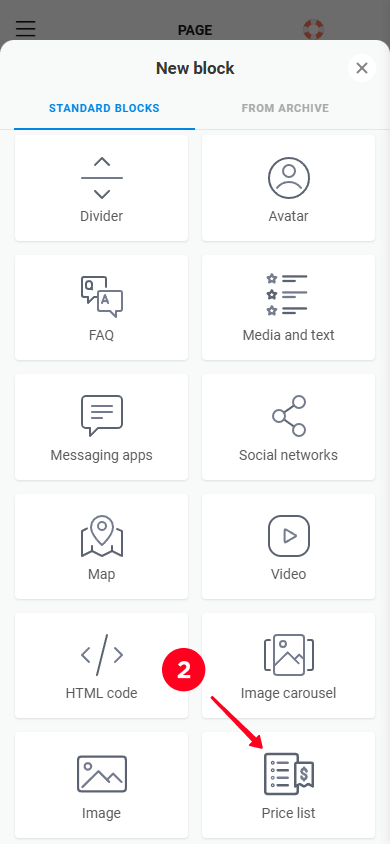
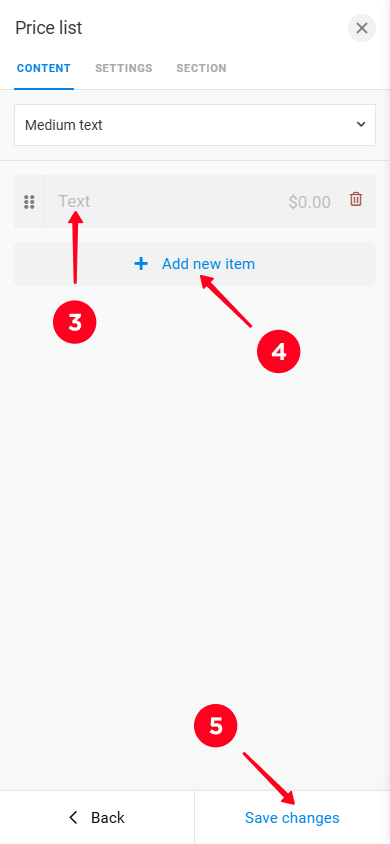
You can also delete any blocks on your site if you don’t need them. To do this:
- Tap the block you want to delete.
- Tap the trash icon.
- Select Delete to confirm.
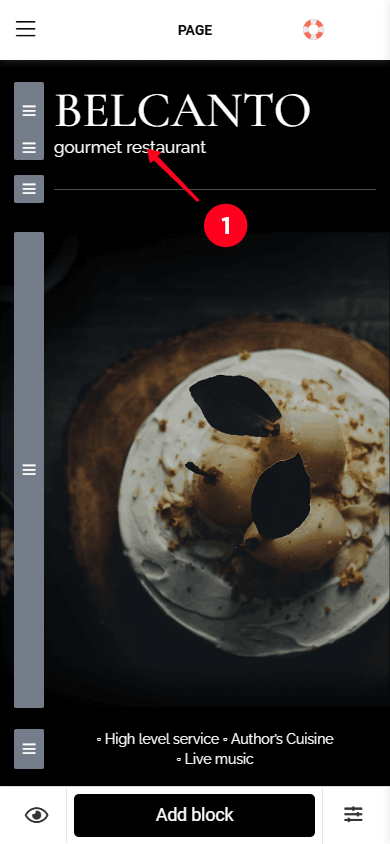
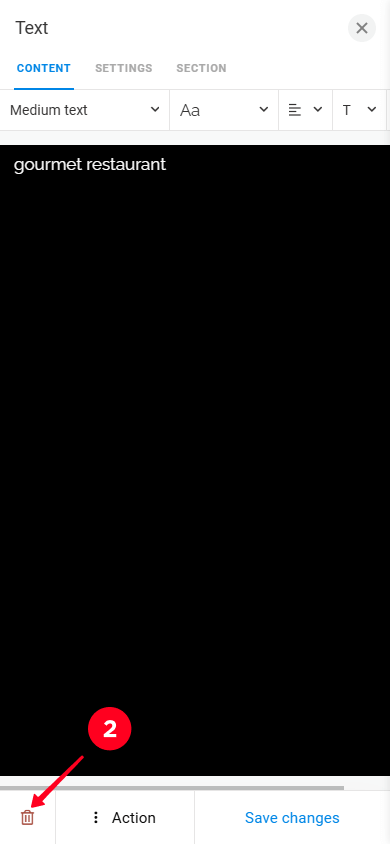
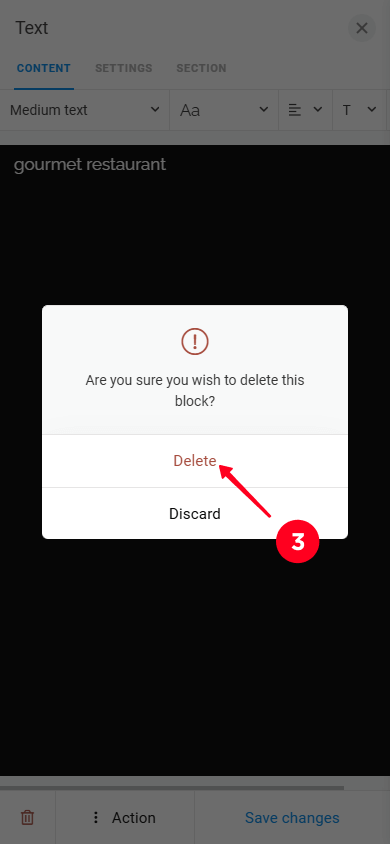
After editing the content in the blocks, adding new blocks, and deleting the ones you don’t need, you can change the order of the blocks.
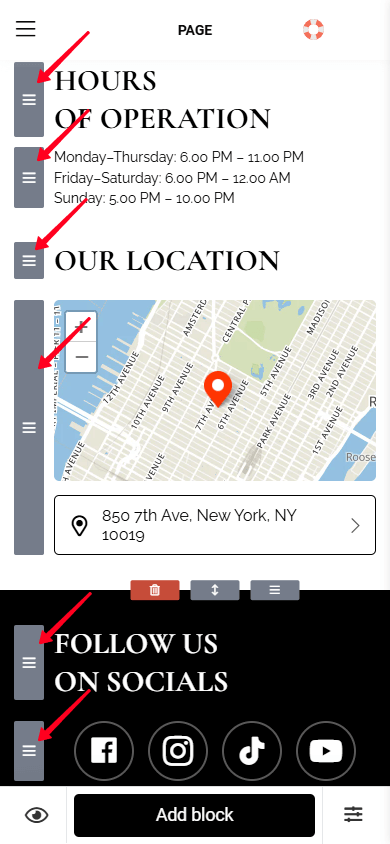
Move the blocks using the drag icon, which is on the left side of each block. Hold the drag icon and drag it up or down, depending on where you want the block to appear on the site.
In the screenshot below, we’ve pointed out the drag icons next to each block.
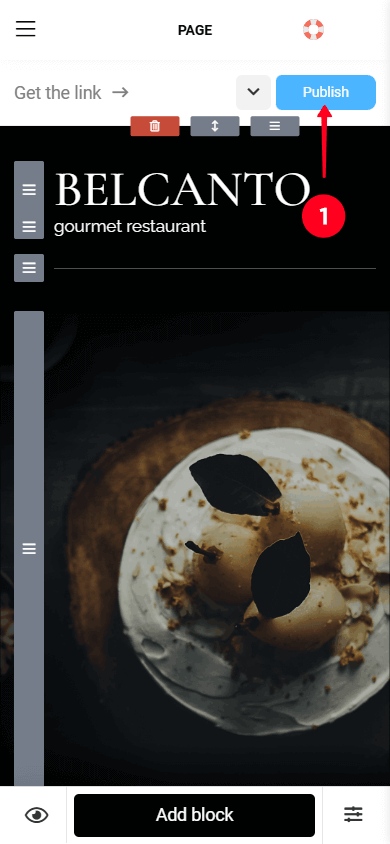
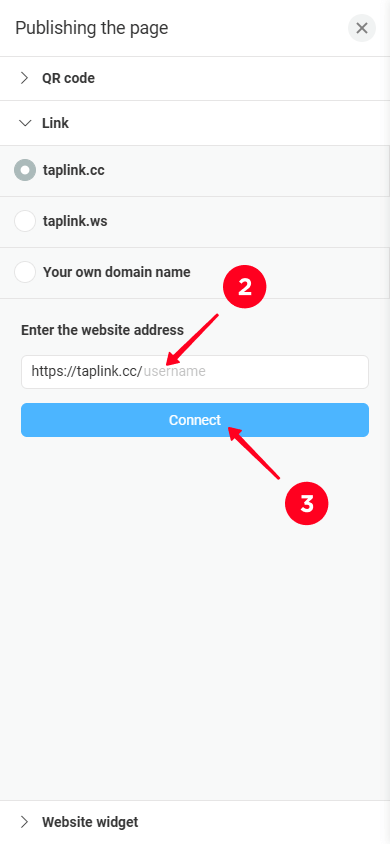
Congratulations, you’ve built a full-fledged website for your food business! Now, you need to publish your site. To do so:
- Tap the Publish button.
- Enter a username. You can use your restaurant’s name or the username you use on social media, or you can choose any other one.
- Tap Connect.
It’s time to make sure your customers know about your website and start using it. For your website to go live, add the link to all your restaurant’s social media profiles, including Instagram, Facebook, TikTok, and others.
Remember, your restaurant’s profile description should also be well-written. It should include engaging text, a call to action, and a link to your website.
If you don’t want to write your restaurant’s bio yourself, check out our articles with 100+ ready-made Instagram bios for restaurants or 35 Instagram bios for food bloggers. These are created with all the best tips for writing an effective bio. Just copy the one you like and paste it into your restaurant’s Instagram profile.
Great! We’ve completed all the steps to build a website for your restaurant. Next, we’ll dive into promoting your new site. Read on to find out how to do this.
You’ve learned how to make a website for your restaurant and how to add its link to social media. Adding the link to social profiles can bring in some traffic, although you can increase it even more with the tips we’ve listed below.
Managing your restaurant’s social media helps you interact directly with your audience and build their loyalty. If your restaurant doesn’t have social media profiles, you should create them and post content regularly. Here’s what you can share on your restaurant’s social media:
- Photos and videos of your interior.
- Photos and videos of your dishes.
- Behind-the-scenes content from your kitchen.
- Stories about your staff.
- Contests.
- Polls.
For more details, read our article on content ideas and social media marketing tips for restaurants.
Spice up your social media content with captions that grab attention at first glance. Save time by using our ready-made restaurant captions for Instagram and other social media.
List your restaurant on food delivery sites (DoorDash, UberEats, GrubHub) or review platforms (Google Maps, TripAdvisor, Yelp). Listing your food business on these platforms means your restaurant will become visible to potential customers who are ready to place an order or visit.
These food delivery sites and review platforms allow users to filter restaurants by many criteria. So, when filling out your restaurant’s profile, make sure to add as much information as possible. This includes:
- Cuisine type.
- Link to your restaurant’s website.
- Hours of operation.
- Location.
- Phone number.
- Price range.
- Attractive photos of your interior and dishes.
- Special features, like a vegan menu, outdoor patio, etc.
Set up targeted ads on search engines, social media, and food delivery or review sites. Examples of the latter include TripAdvisor, Yelp, or UberEats. As we mentioned earlier, food delivery or review sites often have an audience that is already ready to order food or visit a restaurant, so advertising your food business on these platforms can increase your conversion rate.
When running online ads, make sure to set up geotargeting to show ads only to people in your city. This ensures your ads are shown to the right audience and saves your budget.
Also, try different ad formats: text ads, ads with images and text, or video ads. Track which format works best for your audience and the platforms you’re advertising on.
Remember to add a call to action in every ad, like “Book a table on our website,” “Try new vegan dishes on our website,” or simply “Visit our site to learn more.” Calls to action make it clear what you want your audience to do and encourage them to take action.
No, you don’t need to buy a custom domain for your site. Taplink lets you create a link for your site for free when you publish it. All you need to do is enter a username to create your link.
However, if you already have a custom domain, you can use it. Read our tutorial to learn more about how to use a custom domain for your restaurant website.
A website for your food business helps gather all the necessary information for customers in one place and makes booking and ordering easier.
While social media is effective for promoting a restaurant, it doesn’t provide many features for customers. Often, important information is scattered across different sections of the profile. For example, the restaurant’s hours might be in the highlights, the location in the bio, the menu in a post, and delivery orders through direct messages. This scattered information forces customers to search for details and take extra steps.
A website lets you gather all the information on one page. Customers can see your location, hours, menu, and order delivery right away, without jumping between different sections.
No, you don’t. Taplink automatically generates a secure HTTPS link when you create a username for your site during publication.
If you’re using a custom domain, you also don’t need to connect or pay for the SSL certificate. Taplink will generate an SSL certificate for your site on its own once you’ve done setting up your own domain.
To make your restaurant’s website effective, avoid the following mistakes:
- Too much text: People find it hard to focus on important information if there’s too much text. Keep only the most important information and remove the rest. Use bullet points or numbered lists when listing things.
- Unclear instructions: If users don’t understand what you want them to do, they’ll leave your site. Make sure to use calls to action, such as “Book a table,” “Place an order,” or “Order takeout.”
- A negative first impression: People judge websites in the first few seconds. Make sure your site gives a positive impression and quickly shows users they’ve landed on a restaurant site. Use clear headings, attractive images of food and the interior, and place important buttons at the top.
To avoid these mistakes, use Taplink’s ready-made templates. They are designed by professionals and help you present your restaurant appealingly. All you need to do is replace the existing content with your own restaurant content.
Your restaurant or cafe website will become an important spot for your visitors, where they can view the menu, book a table, order delivery, and learn more about your restaurant. Key steps to building a restaurant website include:
- Choosing a website builder.
- Selecting a template.
- Customizing the website.
- Publishing the website.
- Adding the website link to your social media profiles.
Use Taplink to build your food business website. With ready-made templates, you can have a website up and running in 15 to 20 minutes and build a strong foundation for your business.