How to make a Reel on Instagram

- How to create a Reel on IG
- Open Instagram camera
- How to upload a Reel from your phone gallery
- Record a new video for your Instagram Reel
- Edit photos and videos for your Instagram Reel
- How do you edit Reels on Instagram
- How to post a Reel in your Insta account
- How to promote Instagram accounts with Reels
- The bottom line
You can create a Reel from scratch using Instagram camera or upload files from your phone gallery. Whatever way is good for you, you start by opening the Instagram camera. Let’s see an example of how to make a video.
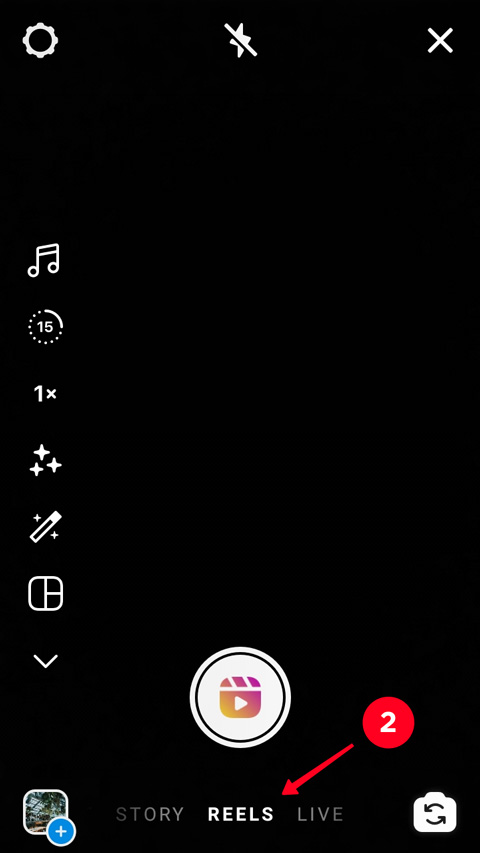
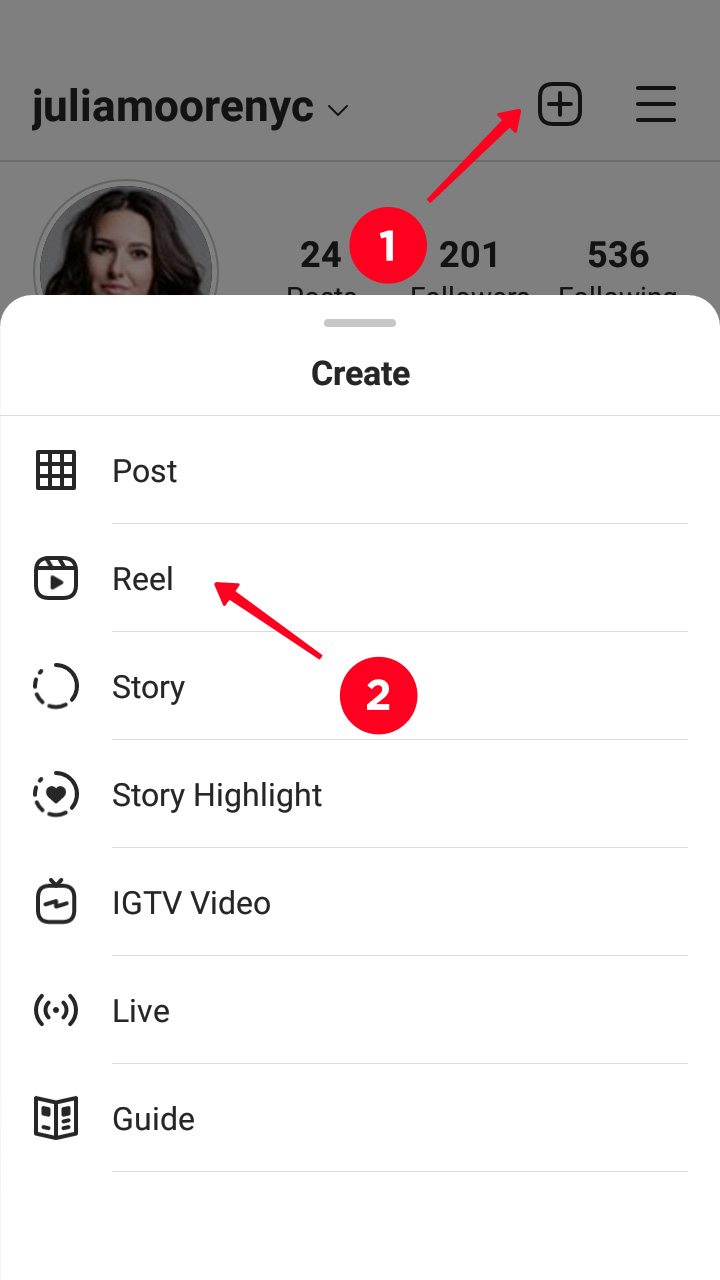
Whether you want to upload a photo or video from your phone, or create a Reel from scratch, you need to open Instagram camera first. You can get to the camera interface both from the homepage or your profile page.
From the homepage, you:
- Tap the plus.
- Choose Reels.
From your IG profile page, you:
- Tap the plus.
- Choose Reels.
One video can include both files uploaded from your phone gallery and made in the Instagram camera. Both photos and videos can be added in a Reel.
Let’s add photos from the phone and record a video using the Instagram camera for our example.
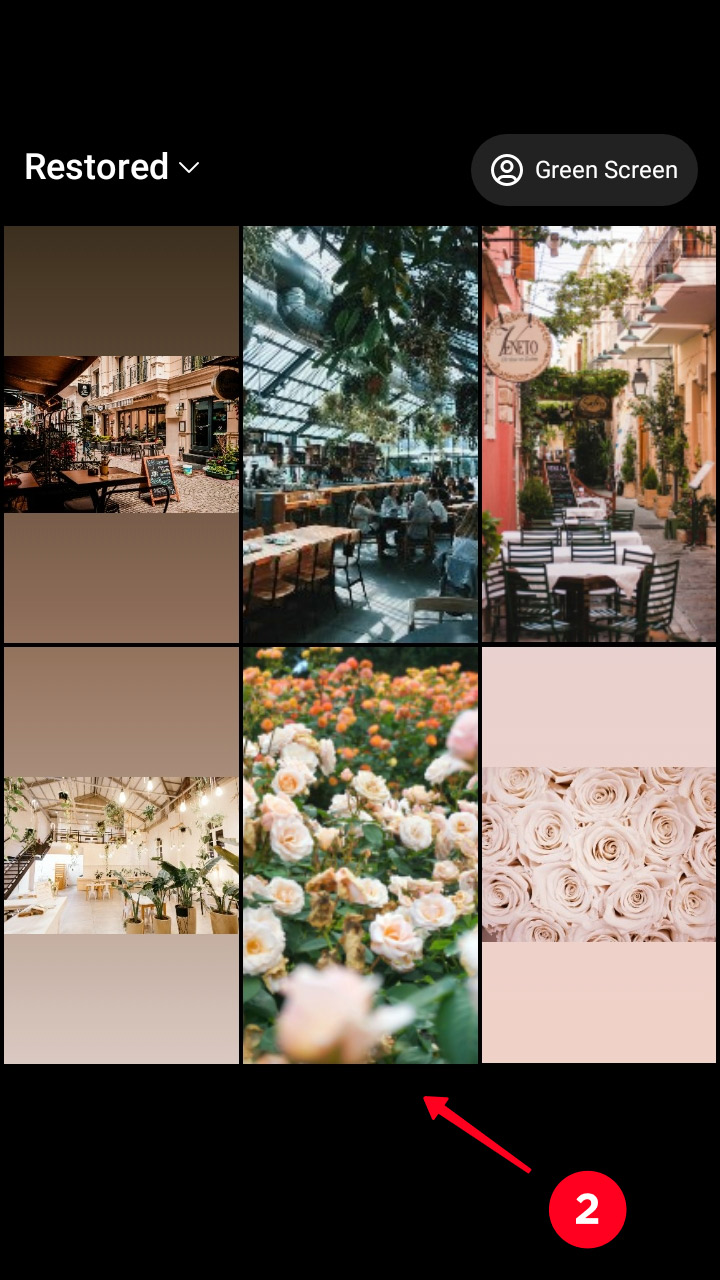
You can make photos and videos ahead for your Reel and then upload them to Instagram from your phone. You better take pictures and record videos from your phone camera. Then, the image will be displayed fully on the whole screen. Otherwise, you should remember that Instagram Stories are vertical videos with 9:16 proportions.
You can add several files in one Reel, you add them one by one.
- Tap camera roll.
- Tap a file.
- Move sides of the frame to change the duration of an image or video.
- Tap Add to continue.


In the Instagram camera, you can only record a video for Reel. Photos are added only from Camera roll.
Tap the button in the center of the screen to make an IG Reel. You don’t need to hold it. Tap the button once again to stop the recording.

You can record more clips to the same Reel. Tap the button again to record another piece of Instagram video. Then tap it again to finish.
When you’ve recorded a video of 15 or 30 second length, the red line at the top reaches the right side of the screen and the circle around the button turns gray. It means you can’t add more photos and videos to this Reel.
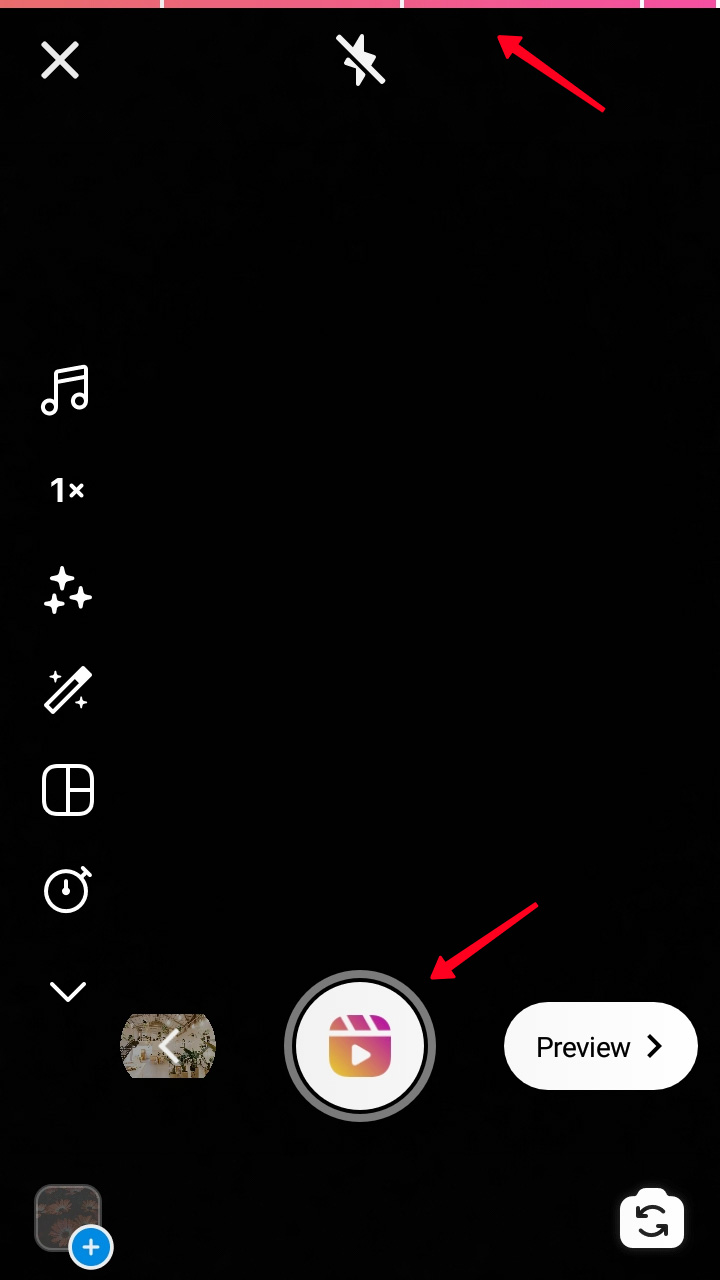
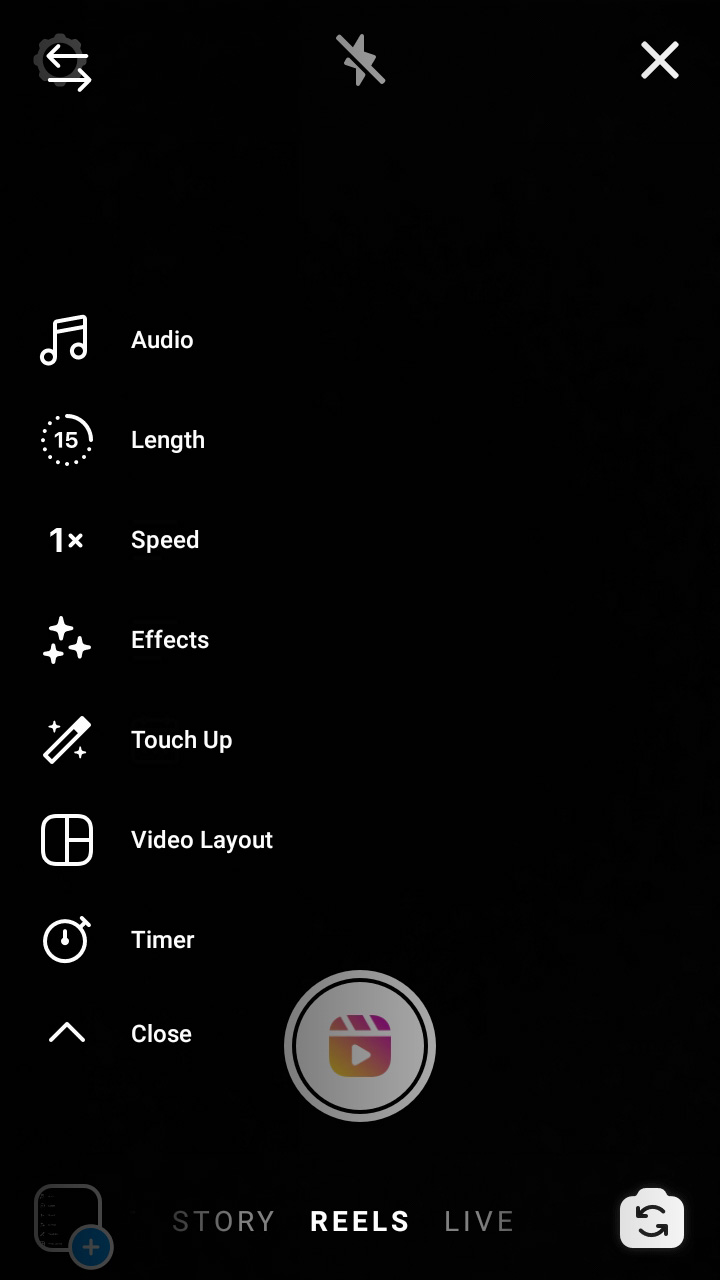
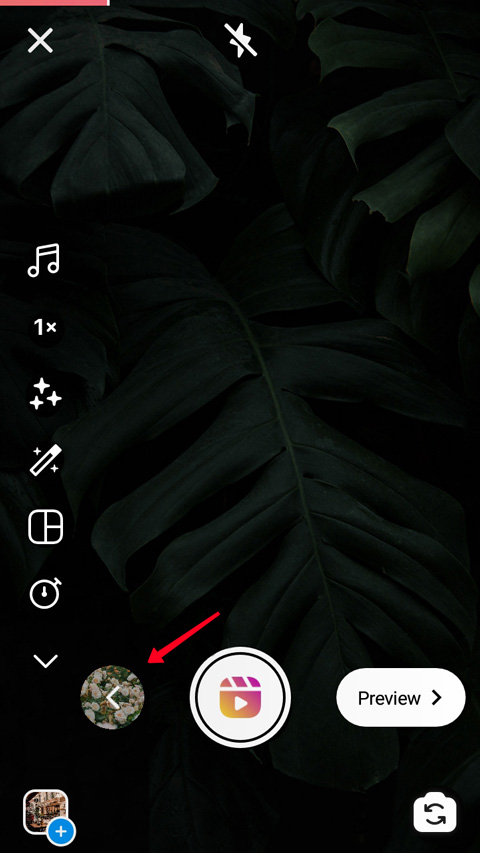
When you create a Reel using the Instagram camera, you can use its features to make your video more interesting and beautiful.
You can see Reel camera features on the left. We described them comprehensively in the article How to make a video on Instagram. You can use one, several, or all of them.
You can choose different features for different videos, except Length. Its options are chosen only once before you start recording the first video part.
- Audio. Add songs, and audios of other Instagram users.
- Length. Choose the length, it can be 15 or 30 seconds.
- Speed. Change the speed for playing the video.
- Effects. Put masks and effects on your videos.
- Touch Up. The Reel feature is used for portrait Instagram videos, it makes the skin more smooth, and it evens its tone.
- Video Layout. You can add several videos on one screen.
- Timer. Set the timer, then the recording will start in several seconds after you tap the recording button.
You can open and close the menu by tapping the arrow under the features.
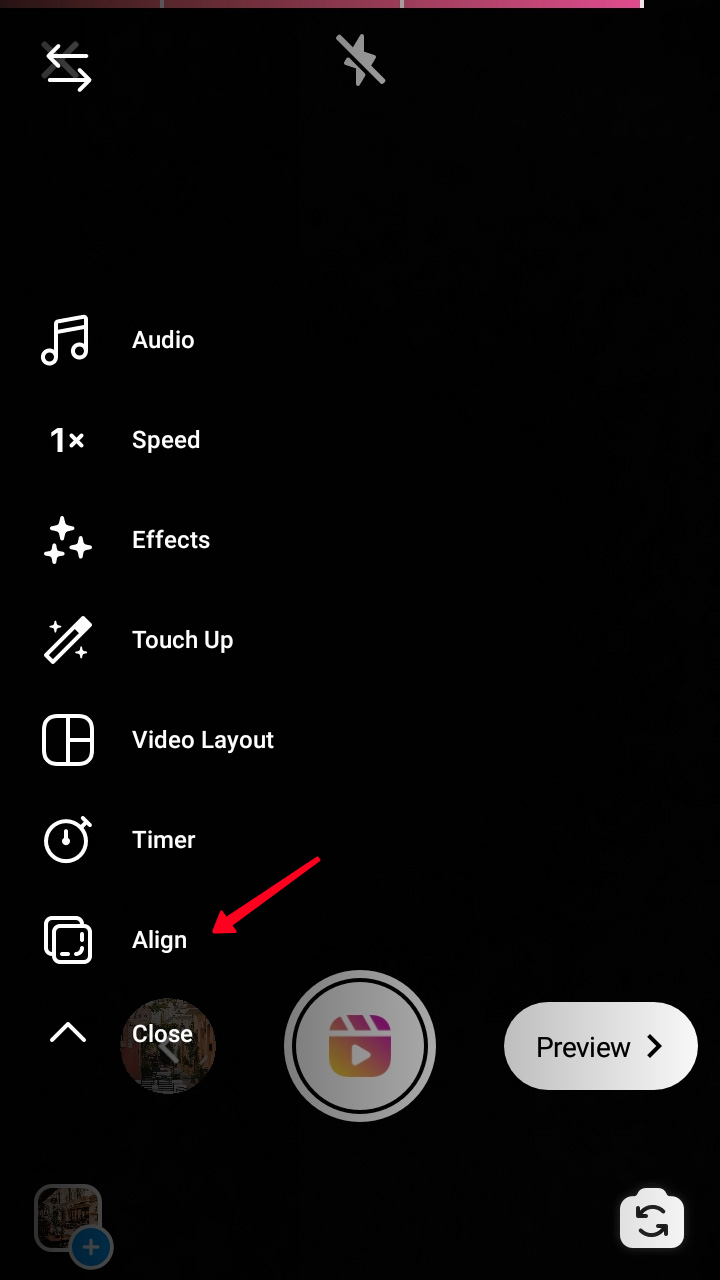
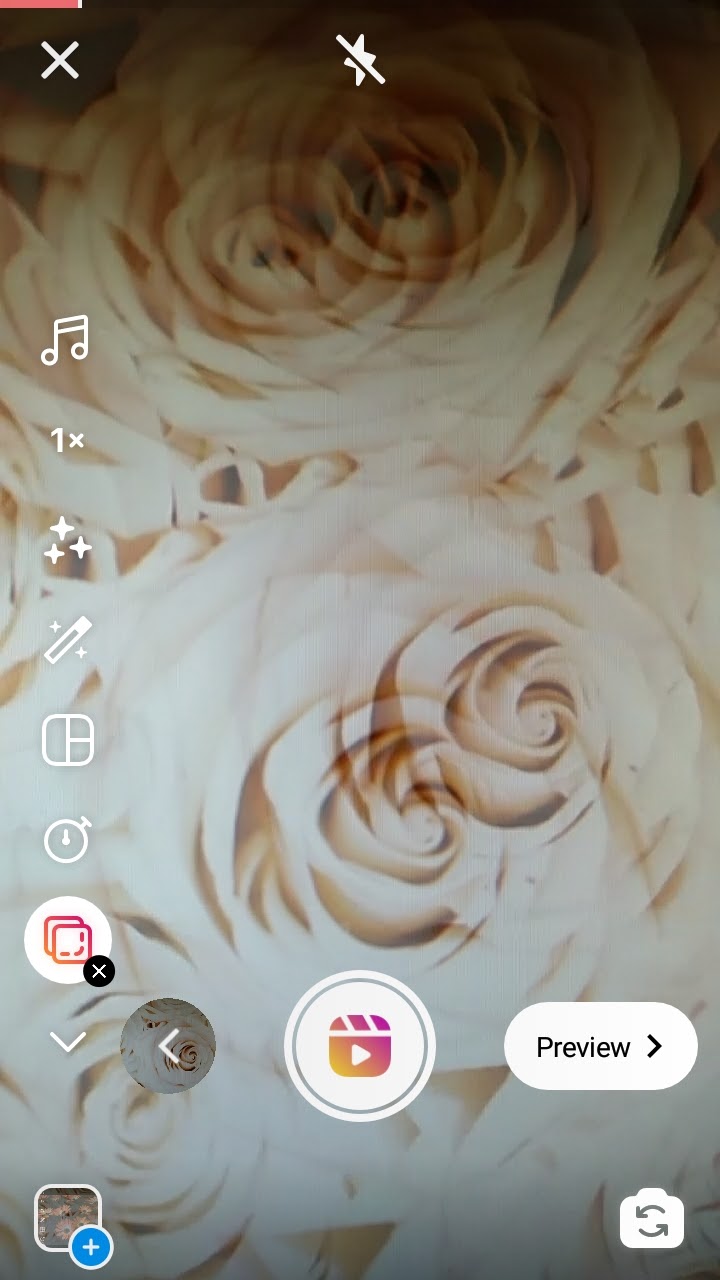
After you add photos and videos to your Instagram Reel, you will see the Align feature. Tap it to make sure you will record from the same perspective. The current image will be put on the previous. Both of them will be half-transparent.
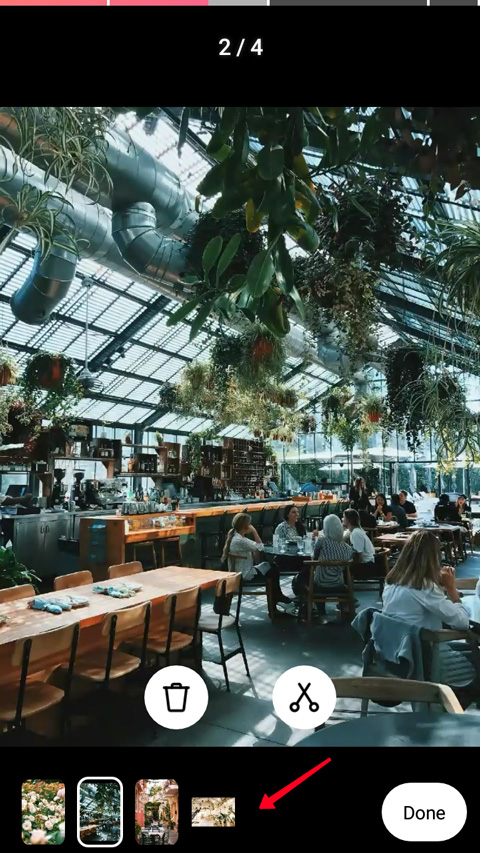
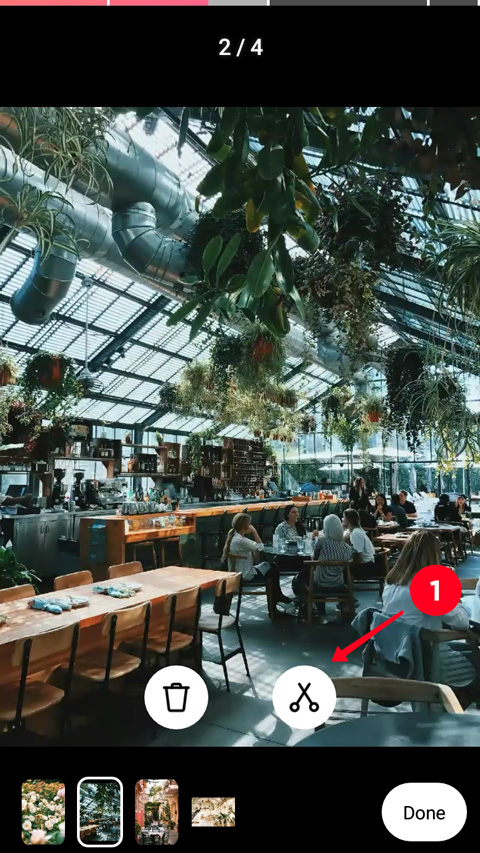
After adding images and videos, you can cut and delete them to add another. Tap the arrow on the left of the button. Then you choose a clip you want to edit at the bottom.
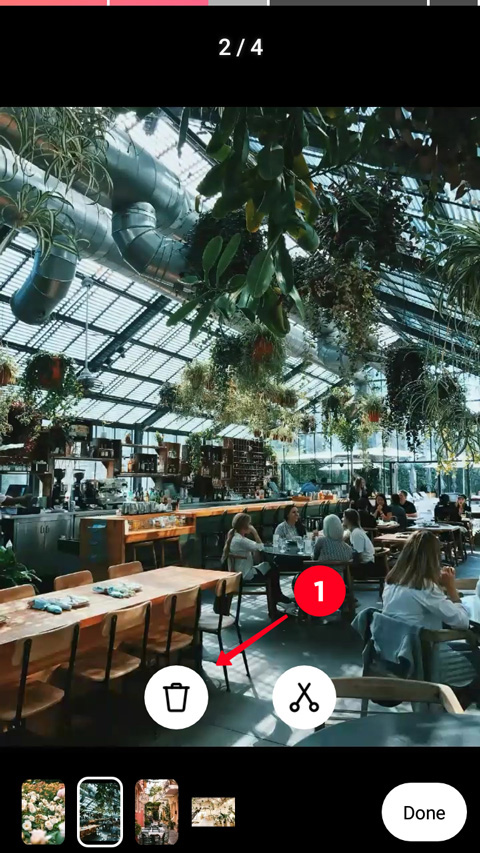
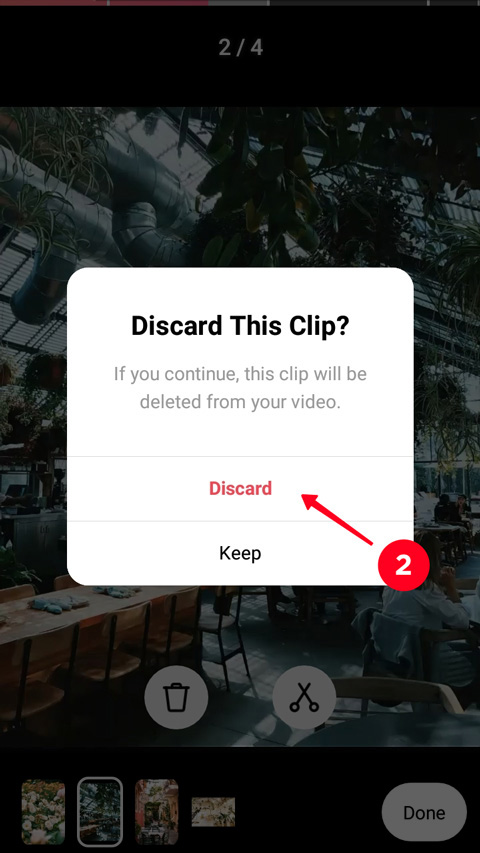
To delete a part of your Instagram Reel, you:
- Tap the trash icon.
- Confirm deleting by tapping Discard.
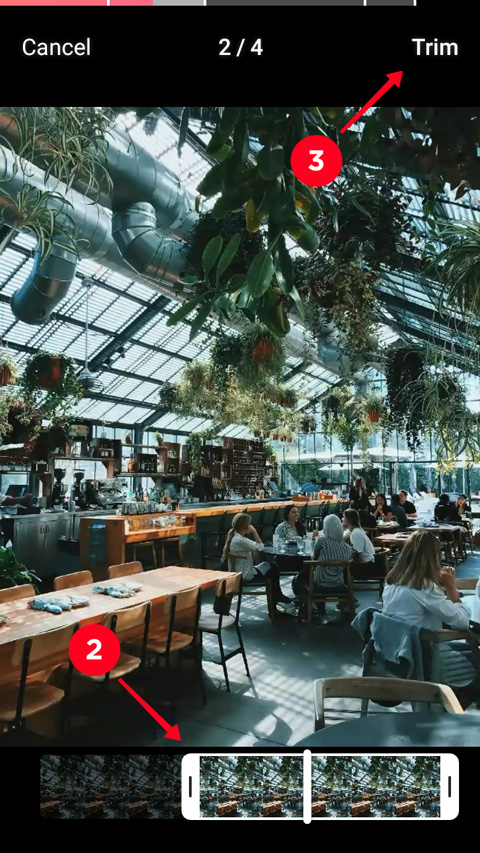
To change a duration of a clip or its played part, you:
- Tap the scissors icon.
- Move the ends of the left and right frame sides.
- Tap Trim.
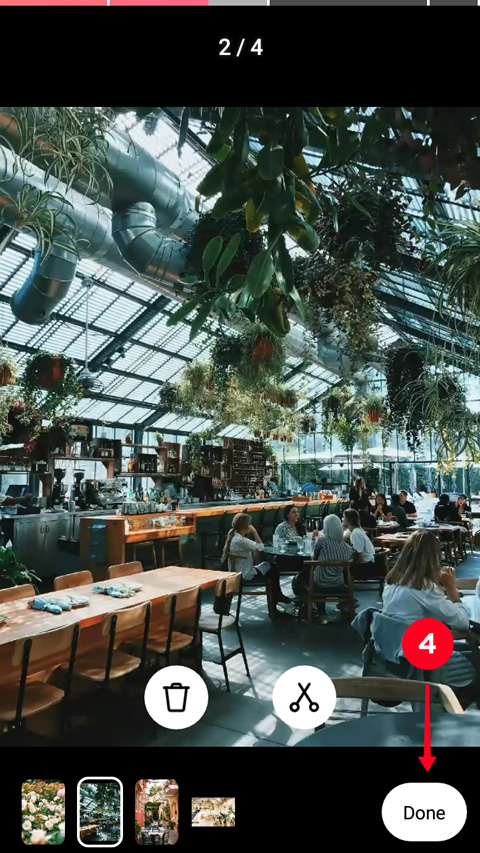
- Tap Done. You’ll get to the camera interface.
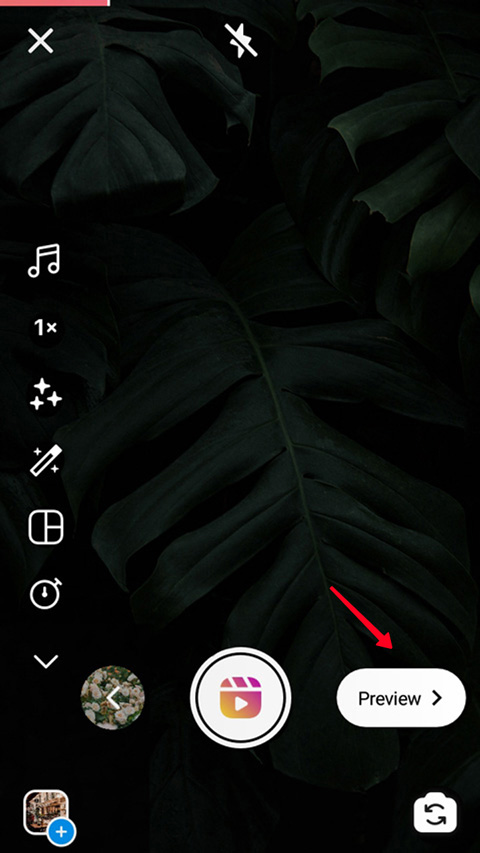
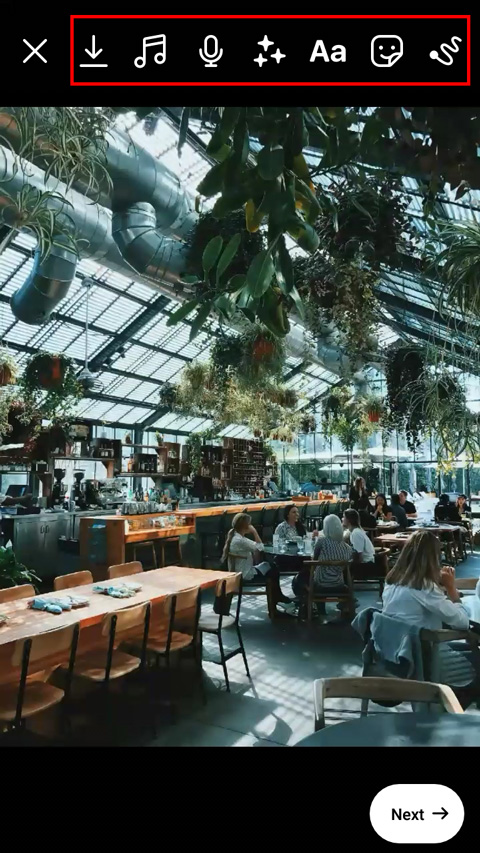
When you are sure you’ve made the Reel you wanted to add to Instagram, you can edit it. Tap Preview from the camera interface, you get to the editing menu.
There you can add pictures and sounds, save your Reel. Choosing the buttons as they are ordered on the screenshot, you can:
- Download your Reel from Instagram.
- Add audio, change its volume or the volume of the original audio.
- Record an audio in addition to the existing.
- Add effects and masks.
- Type text.
- Add stickers and emoji.
- Paint.
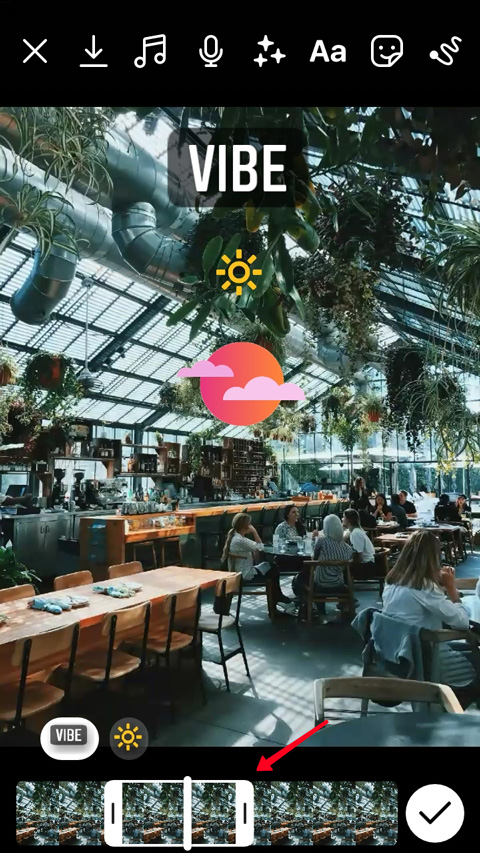
For text and emoji, you can choose a time interval making your Insta Reel, when they will be displayed. To change the interval, you need to tap a text or emoji at the bottom and move the frame ends on the appeared timeline.
Audio, effects, and stickers are applied to the whole Reel video.
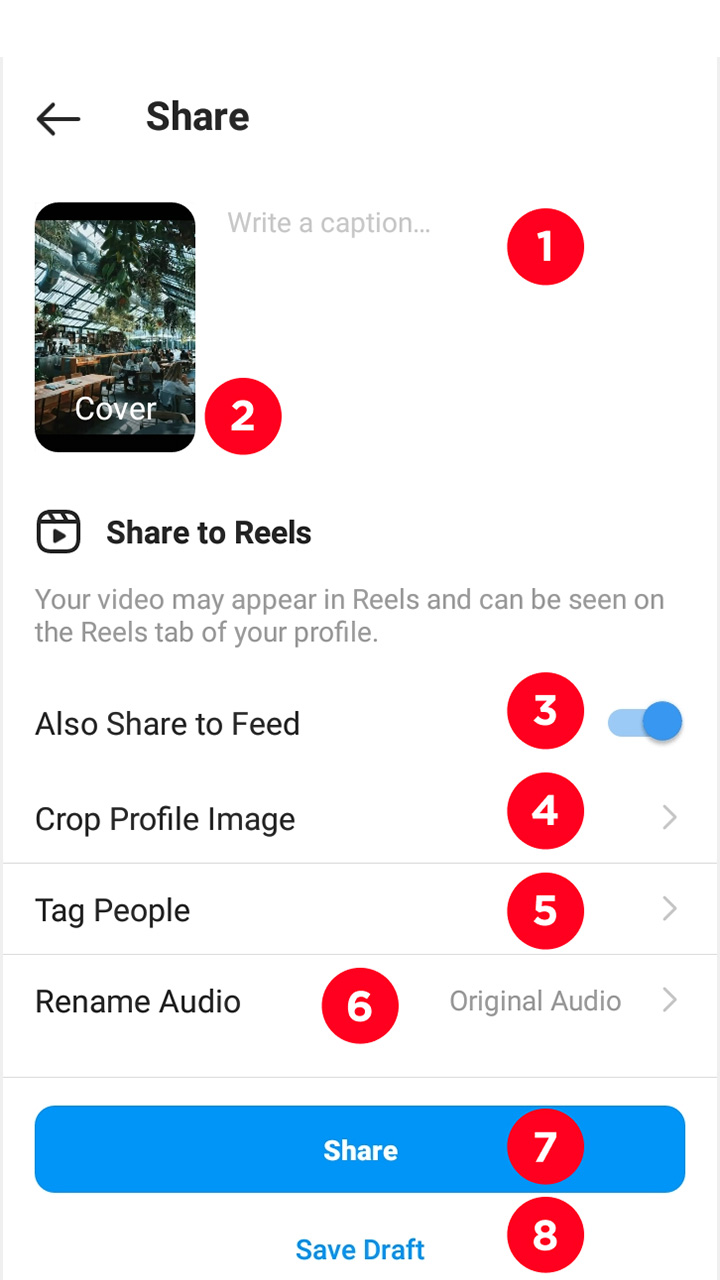
Tap Next after you edited your Reel, just a few steps before the video is added to your Instagram. In the opened menu, you can:
- Write a description.
- Choose a Cover.
- Set sharing to your profile page. If the button is active, the video will appear in the Post tab in your account and your subscribers feed.
- Choose a part of the cover displayed in your profile, if you share the video to the feed.
- Tag Instagram users.
- Rename the audio. Your audio is saved as Original Audio by default. If you give it a unique name, it will be easier to find your Reel videos in the future.
- Post a Reel.
- Save to drafts.
Any user may see your Reel if your Instagram account is public. It’s a good way to gain reach and get more followers.
If a video catches attention, users will watch it till the end and may go to your profile. And if they like the content they see, they will subscribe. Here is how to make a Reel for an account promotion on Instagram.
- Make a high-quality Reel video. It’s far more pleasant to look at a sharp picture than at a blurred or pixelated one.
- Make a dynamic Instagram video to grab users’ attention completely.
- Think about an idea and show it in the video right away. Avoid long introductions, you have no more than 3 seconds to interest a user on Instagram.
- Stick to the principle "one video — one idea". Too obvious? For a personal blog may be. So the advice is more for a business page on Instagram: make a Reel for each product or company advantage separately. A video should have a clear and distinctive topic.
- Record a video as long as you need. The maximum Reel duration is 30 seconds, but it doesn’t mean you must use all this time. If you said and showed everything you wanted, turn off the camera. If 30 seconds is not enough, upload an IGTV or start a Live.
- Add text. Users, who watch videos with sound off, skip videos without a text because they more likely won't understand it anyway. And there are a lot of them on Instagram. Make a Reel with subtitles, you do it by adding text in time to your speech.
Use the features of Instagram camera and the editing menu to create a Reel video that will engage users.
Now you know how to make a Reel on Instagram and you have more opportunities to express yourself and share a cool idea with friends. These videos help in promoting your account. If your profile is public, both users who are subscribed to you and not will see it.