Manage multiple profiles
You can create multiple profiles on Taplink. In this guide we explain how to:
Let's make the terms clear from the very beginning:
- An account is your identity on Taplink. It was created when you signed up, and you have only one account.
- A profile is a website that you can design in your Taplink account. You can have as many profiles as you want.
So, you have one Taplink account and you can create multiple profiles in it. Let's see how to work with the profiles.
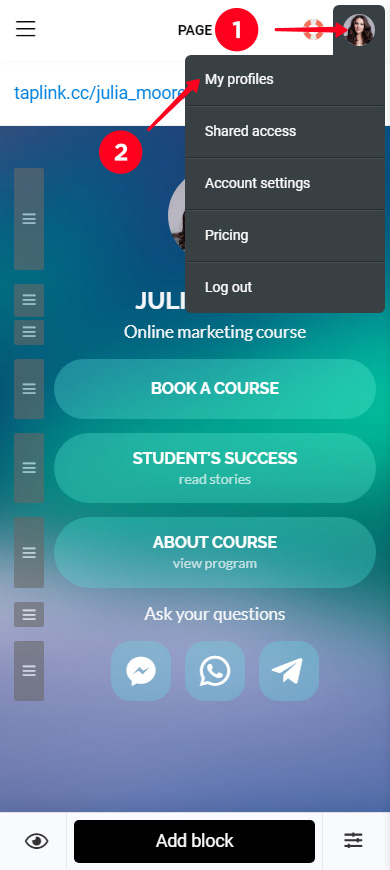
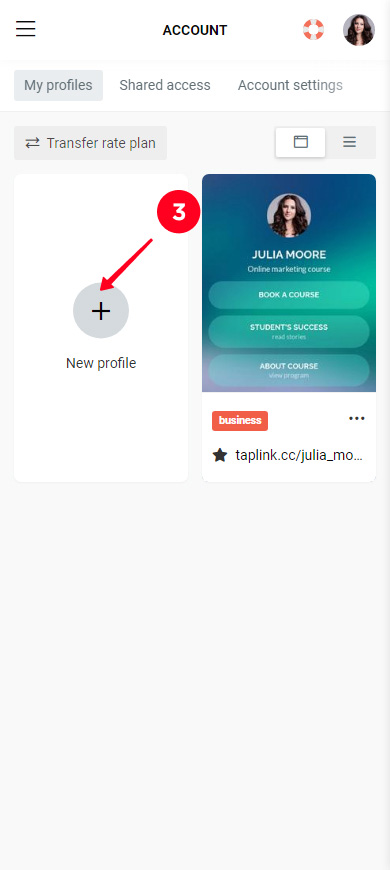
When you want to create a new profile, go to your account and follow the steps:
- Tap your profile photo.
- Select My profiles.
- Tap New profile.
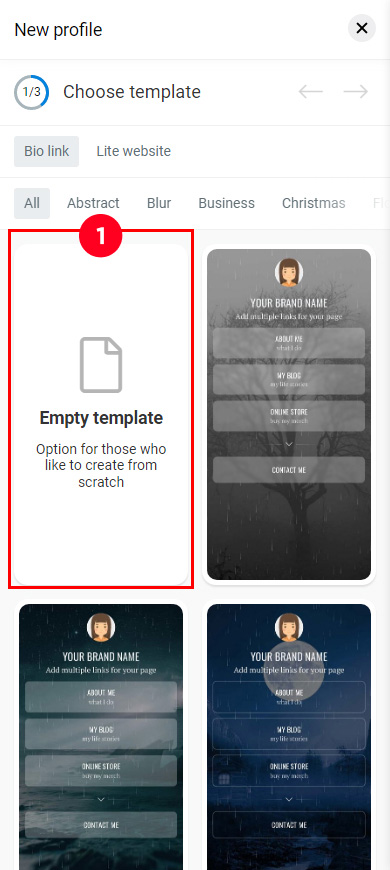
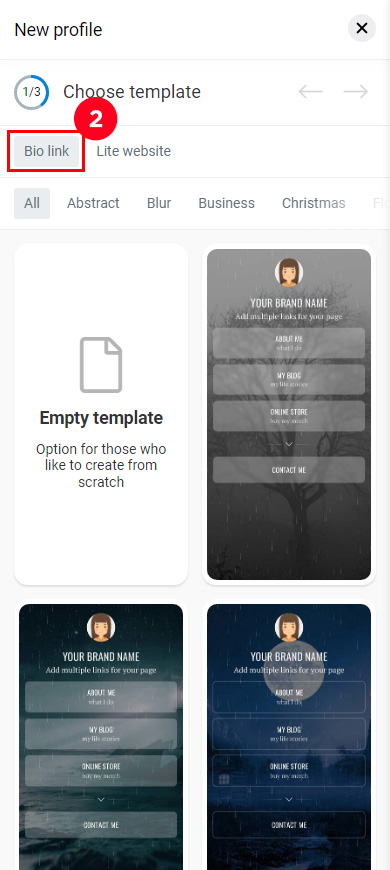
Then you get to a page with profile templates. Choose Empty template (1) to create a profile with a custom design. Or choose a ready-made template in the Bio link (2) or Lite website (3) tabs to create a stylish profile quickly.
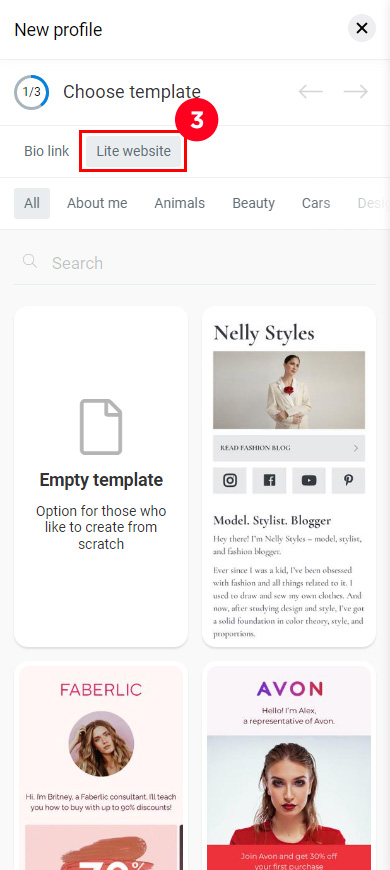
We choose a ready-made template as an example:
- Tap a template.
- Tap Choose.
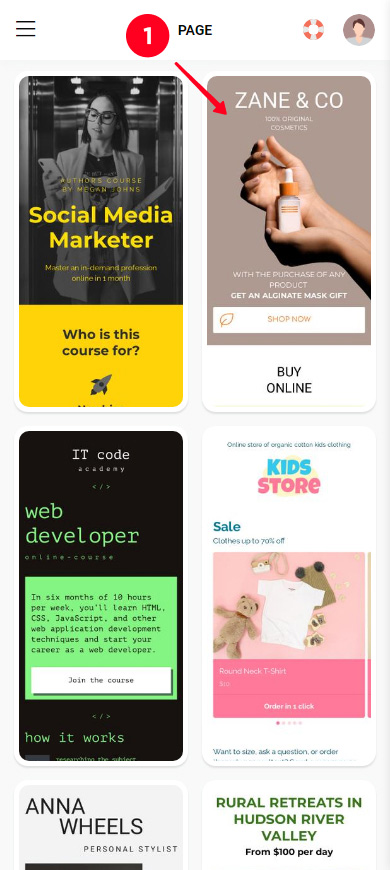

That's it, a new profile has appeared in your account. Now you should edit it. Here we explain how to do this in detail. After that, get the profile link and share it with your followers.
You can switch between your profiles. When you want to work with another profile, switch to it in your account:
- Tap the profile photo.
- Select My profiles.
- Select the profile you need.
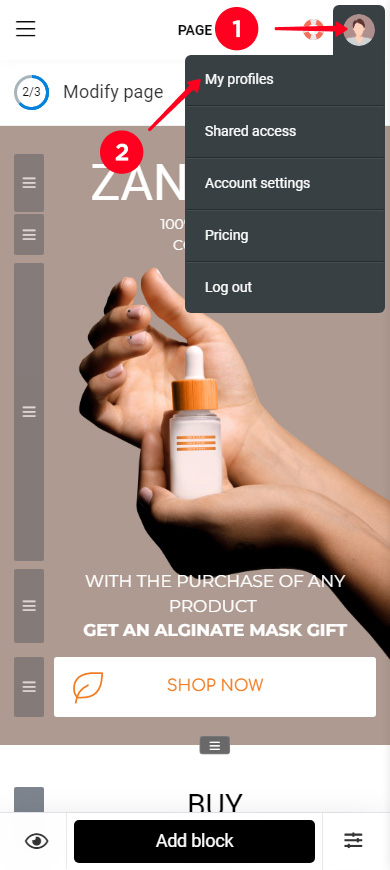
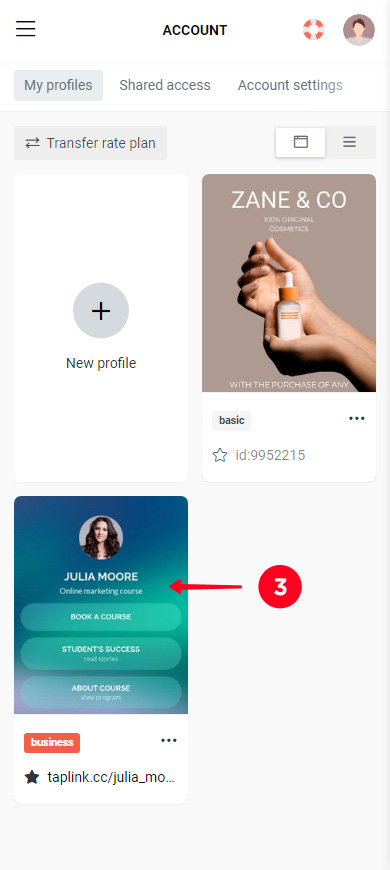
Now, you will see this profile when you open your Taplink account. When you need another profile, follow the same three steps to switch to it.
When you sign up for a paid plan it is applied to your current profile.
If you create a second profile, you can transfer the paid plan from the first profile to the second.
In this case, the profile that gets the paid plan receives all the paid plan features. The profile that initially had the paid plan loses these features. Paid plan blocks become unavailable for this profile both on the editing page in your account and on the published page.
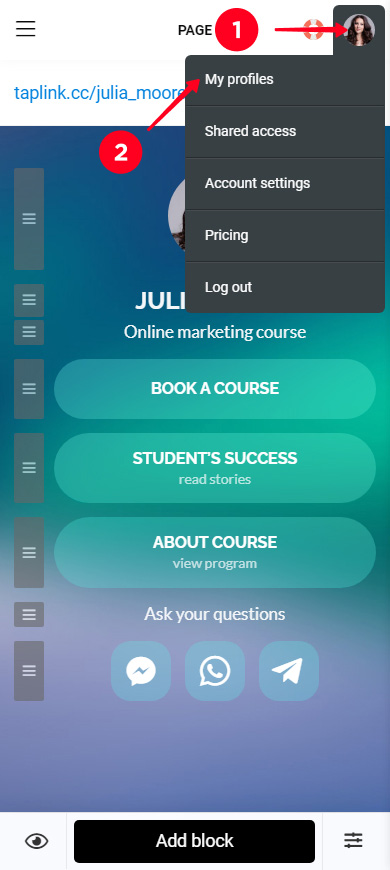
Here's how to transfer a paid plan from one profile to another:
- In your account, tap the profile photo.
- Select My profiles.
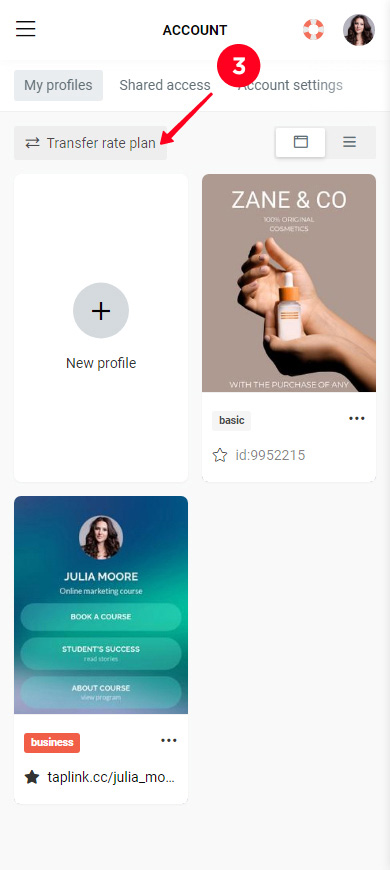
- Tap Transfer rate plan.
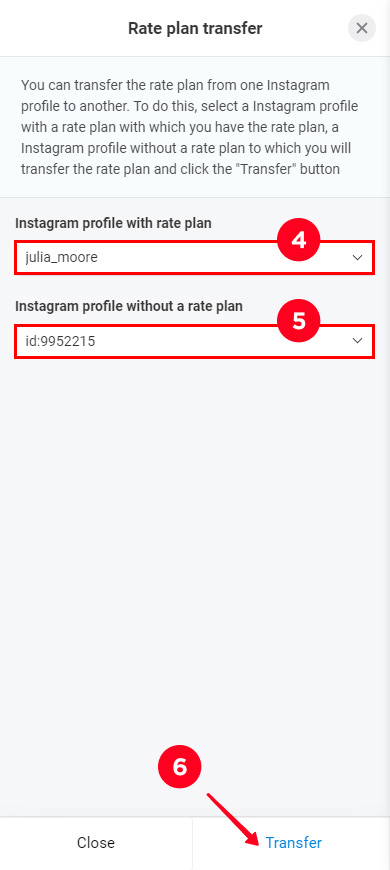
- Select the profile that has a paid plan now.
- Select the profile that you want to have the paid plan.
- Tap Transfer.
That's it, a paid plan has been transferred to another profile.
You can share access to your profile with another Taplink user. And you can choose what the user can do with the profile.
Note that you first need to switch to your profile that you want to share. Then follow the steps:
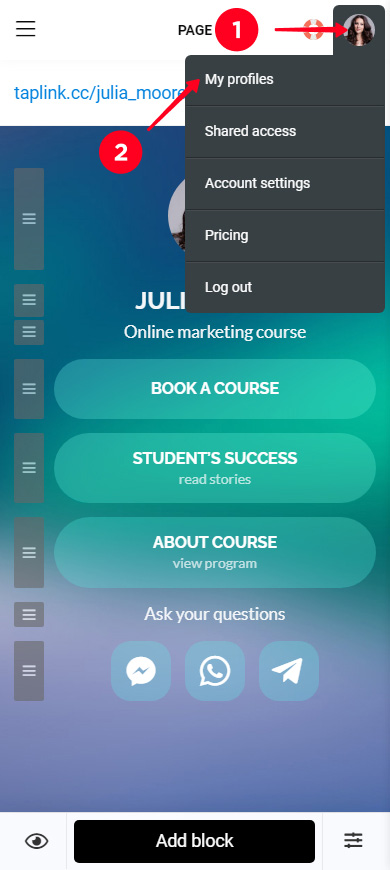
- Tap the profile photo.
- Tap My profiles.
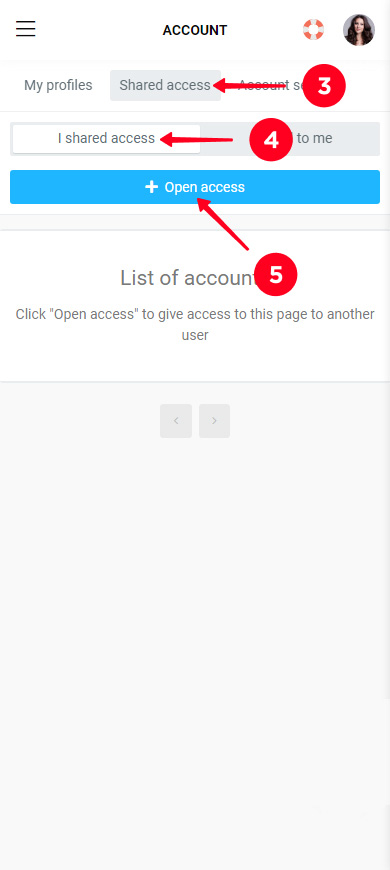
- Select the Shared access tab.
- Select the I shared access tab.
- Tap + Open access.
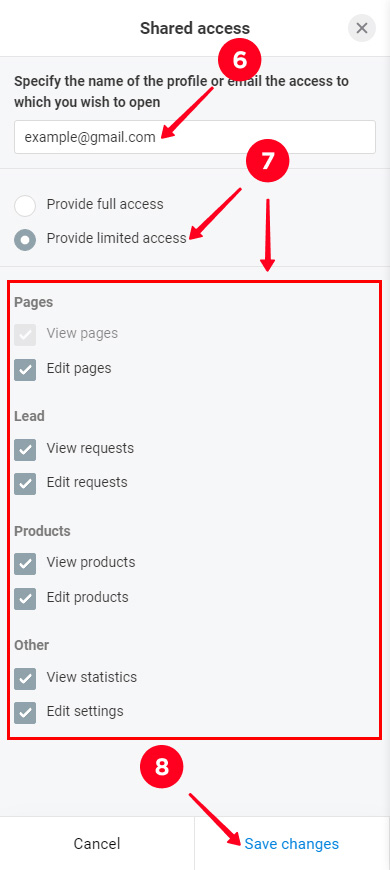
- Enter the email of the user who you want to share access to. This should be the email linked to their Taplink account.
- Optionally, limit what the user can do with your profile. Select Provide limited access for this first. And then check the boxes next to the actions you want to allow to the user.
- Tap Save changes.
Now the user can work with your shared profile.
The user can find the profile that you have shared with them in the Shared to me tab. The user can get there from their account. There, the user can also switch to this profile to start working with it.
This is how the user can switch to your shared profile:
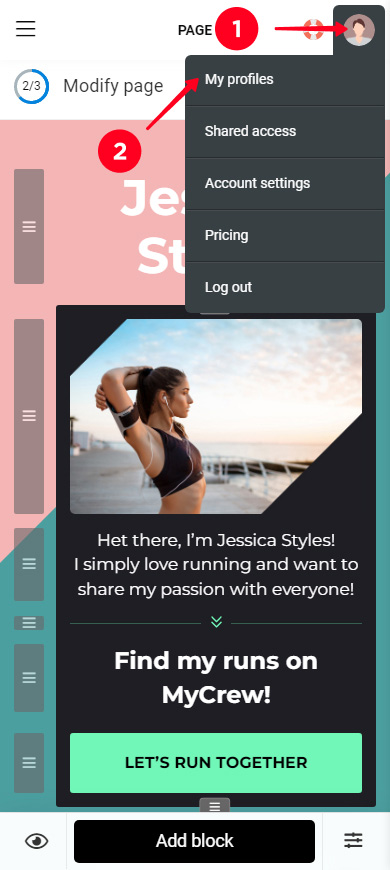
- Tap the profile photo.
- Tap My profiles.
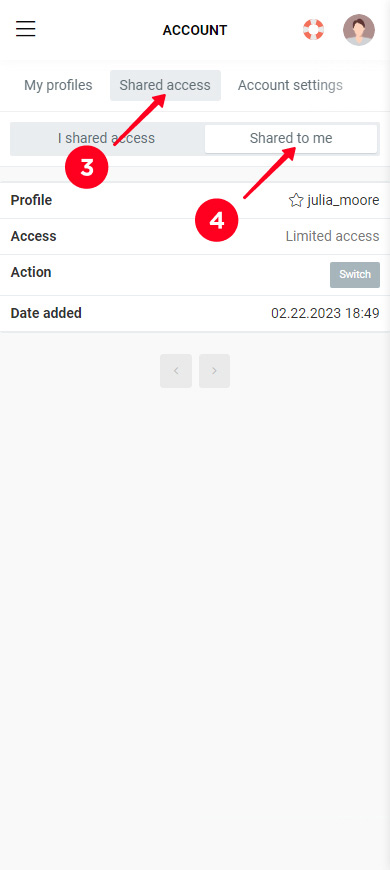
- Select the Shared access tab.
- Select the Shared to me tab.
- Tap Switch.
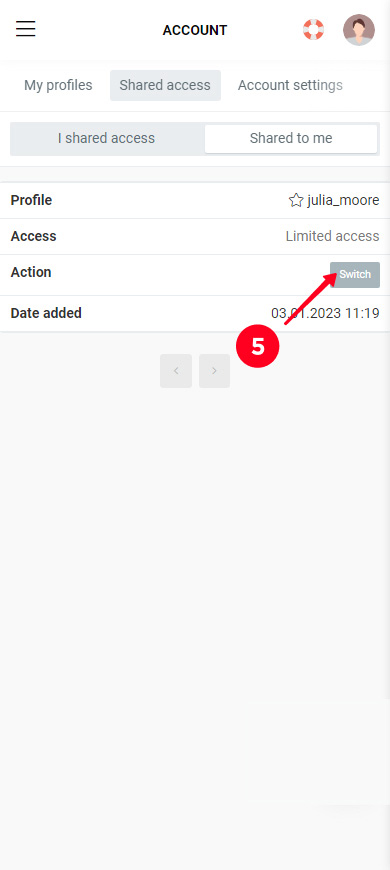
Now once the user opens their account, they see your shared profile.
You can revoke a user's access to your profile at any time:
- Tap the profile photo.
- Tap My profiles.
- Select the Shared access tab.
- Select the I shared access tab.
- Tap Revoke access next to a profile.
- Tap Yes.
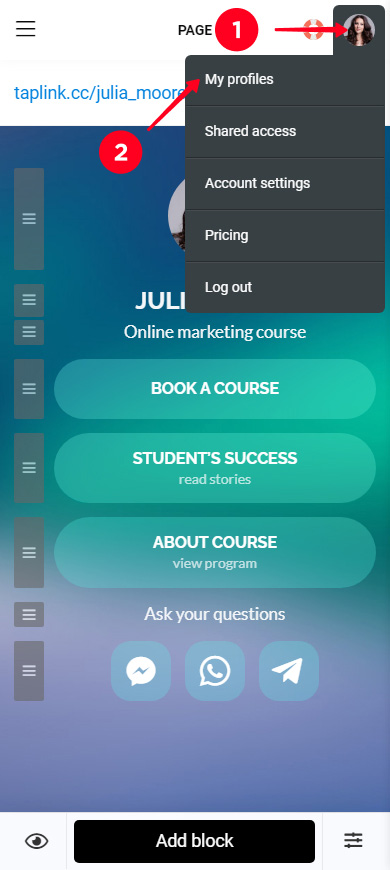
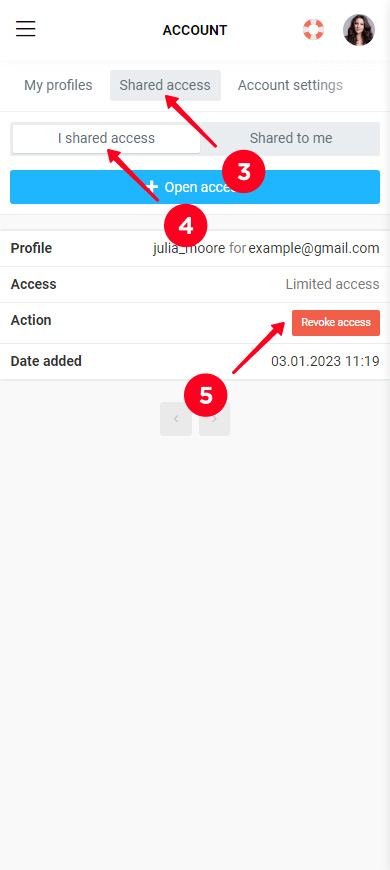
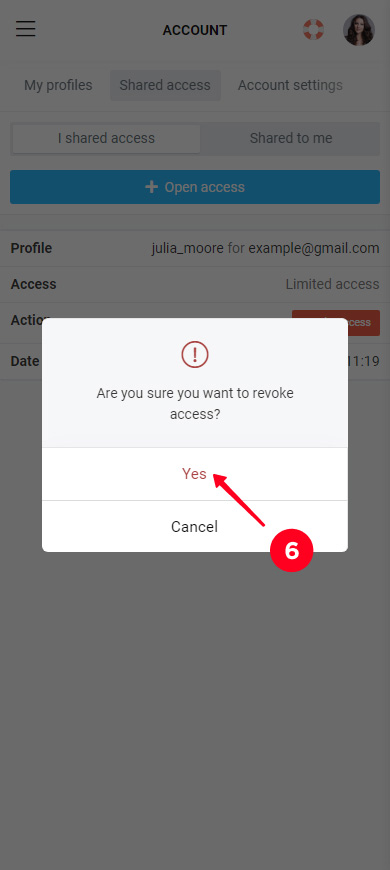
Now the user will not be able to work with this profile, it has disappeared from their Shared to me tab.
You can permanently transfer a profile to another user's Taplink account. Then, this profile will belong to this user's account, and this profile will disappear from your account.
Transfer a profile:
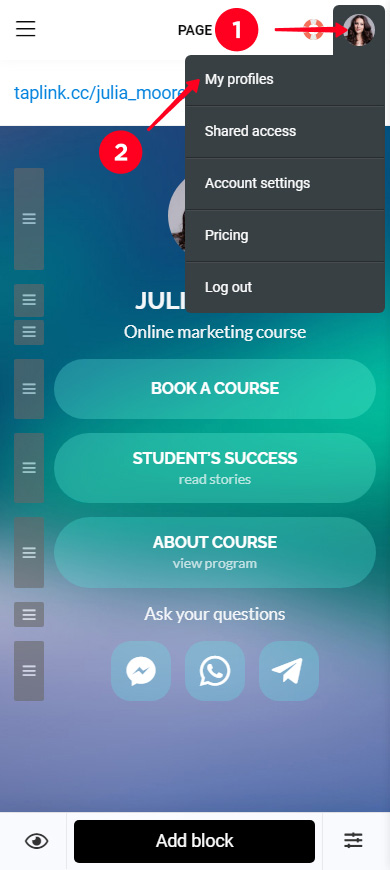
01. In your account, tap the profile photo.
02. Select My profiles.
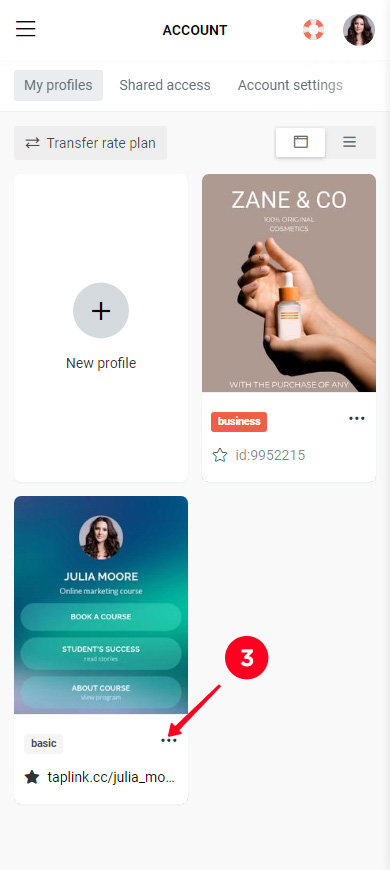
03. Find the profile you want to transfer and tap the three-dot menu near it.
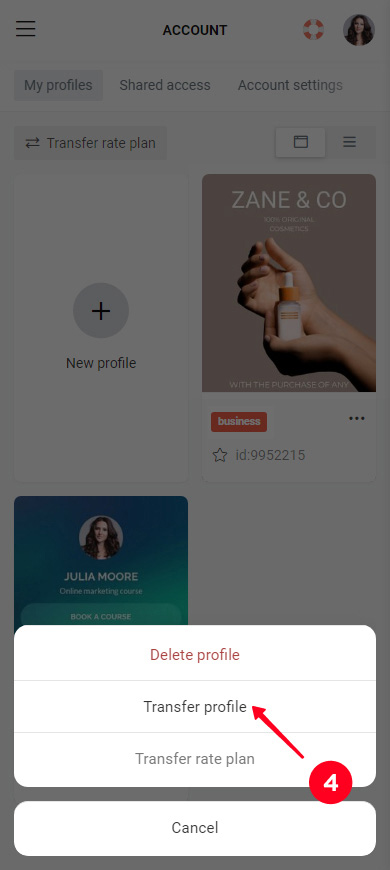
04. Select Transfer profile.
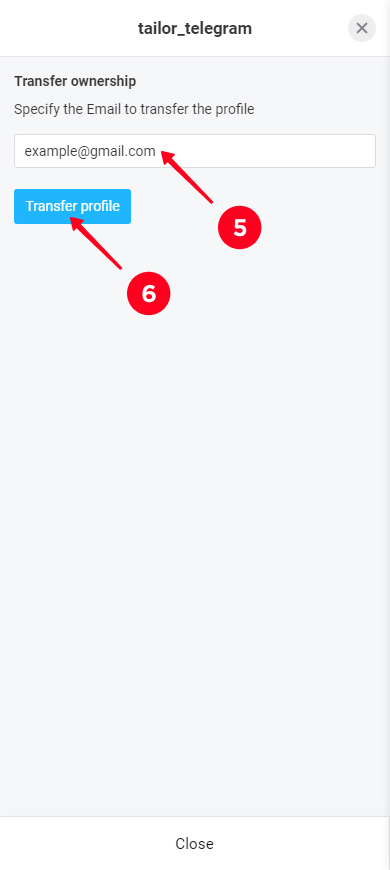
05. Enter the email of the user who you want to give your profile to. This must be the email linked to their Taplink account.
06. Tap Transfer profile.
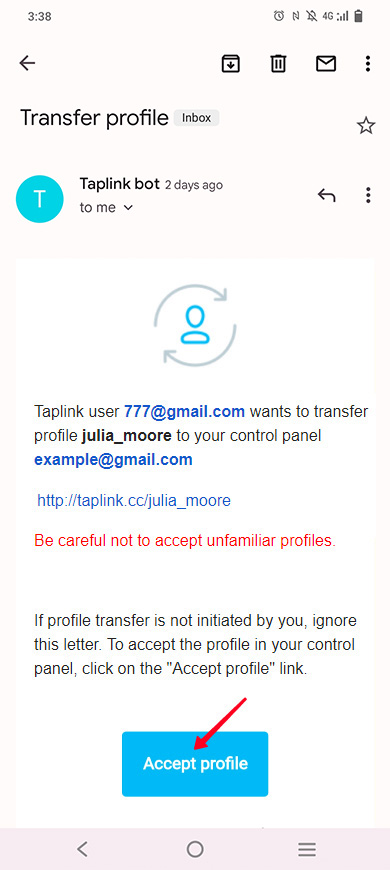
Next, the user needs to confirm that they accept the profile. The user gets an email for this, it is sent to the email address that they have specified when signing up on Taplink.
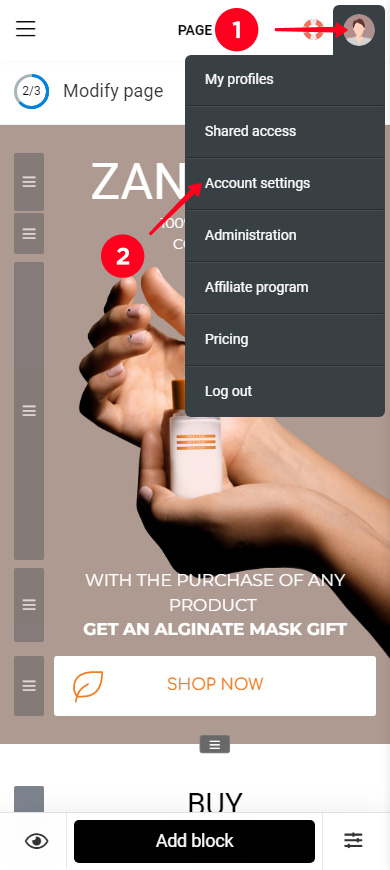
Tip: If the user doesn't remember the email set in their Taplink account, they can see it in the account:
- Tap the profile photo.
- Select Account settings.
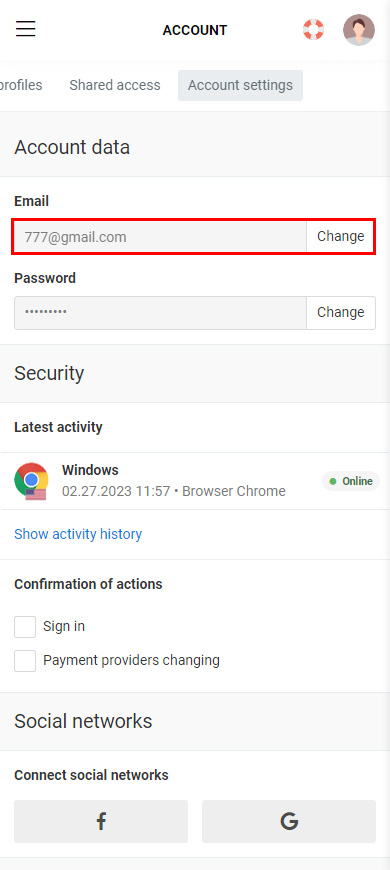
The user gets the Accept profile link in the email, they need to tap it.
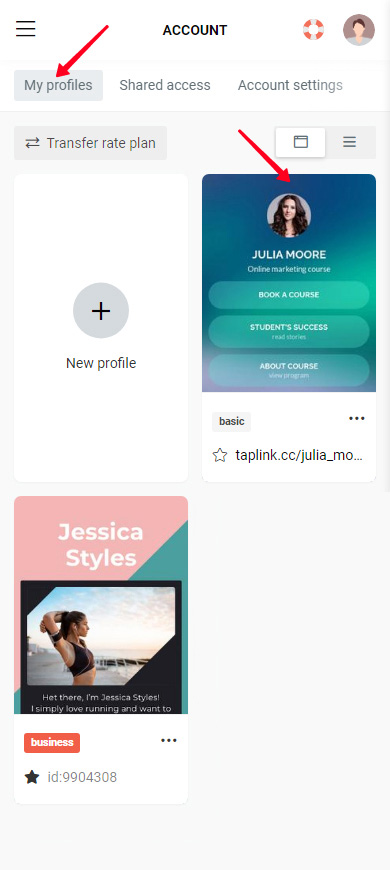
After that, the profile appears in the My profiles tab in the user's Taplink account.
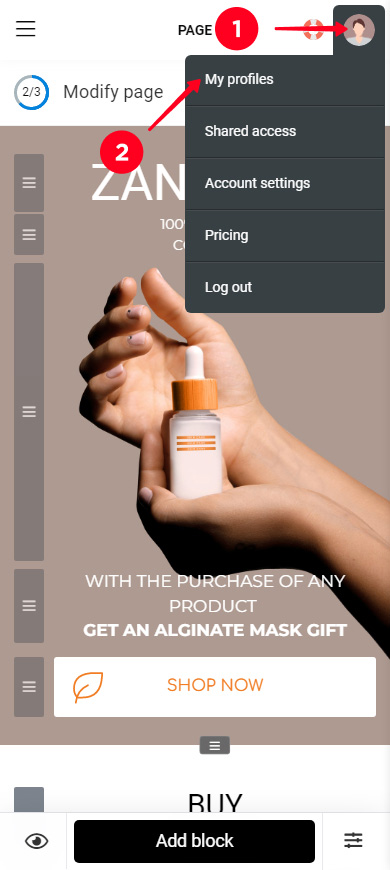
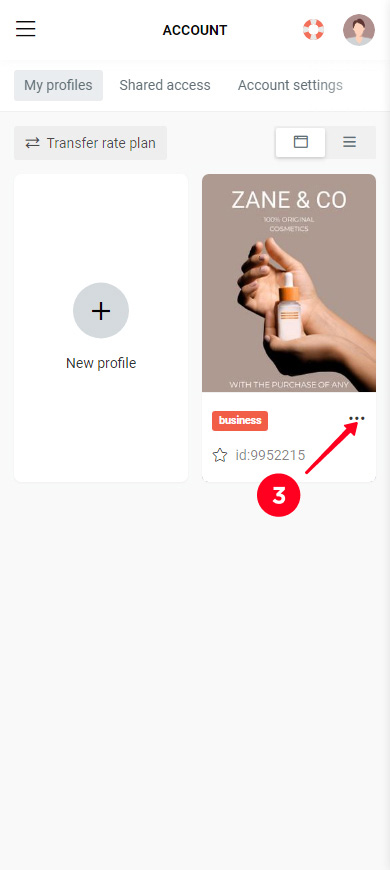
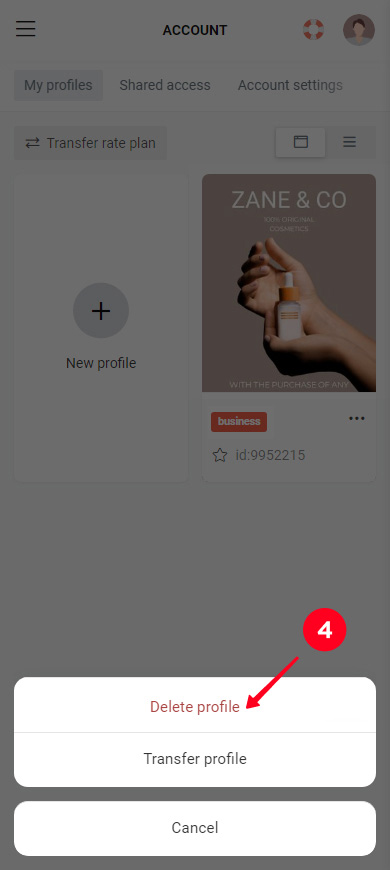
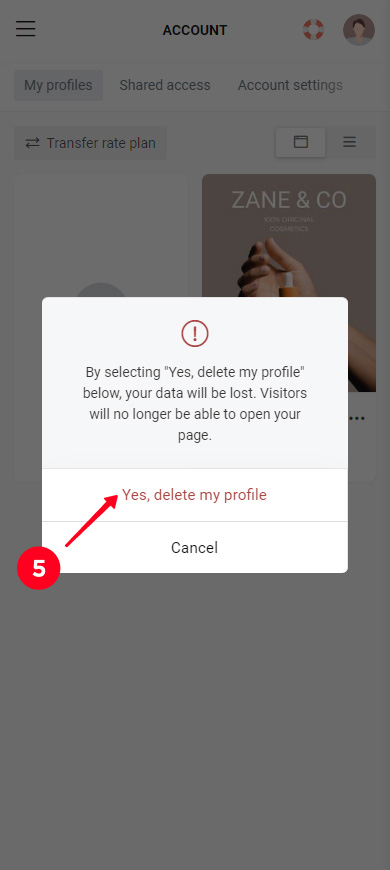
You can delete your profile. Go to your Taplink account for this, and then:
01. Tap your profile photo.
02. Select My profiles.
03. Find the profile you want to delete and tap the three-dot menu near it.
04. Select Delete profile.
05. Tap Yes, delete my profile.
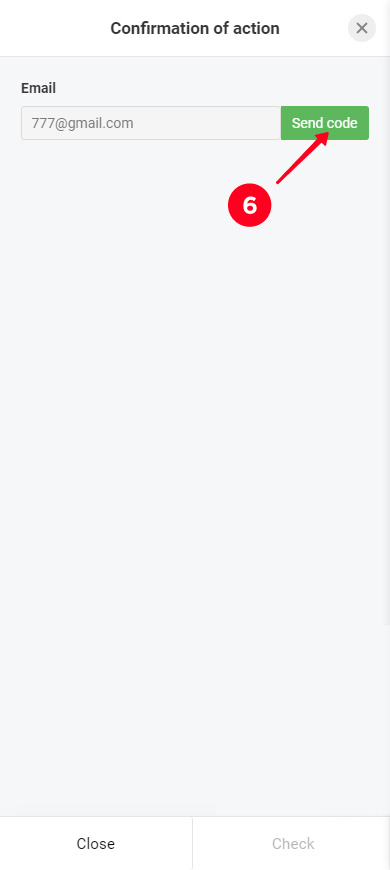
06. Tap Send code.
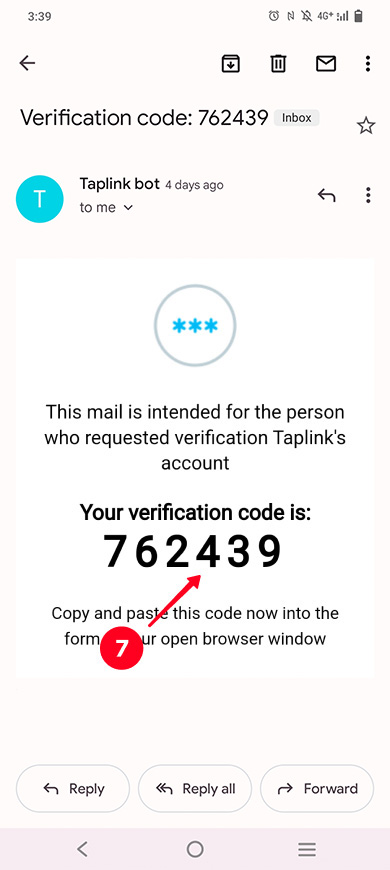
07. Copy the code that you get in an email. It is sent to the email address that you have specified when signing up on Taplink. If you don't remember the email address, read how to see it in the previous part.
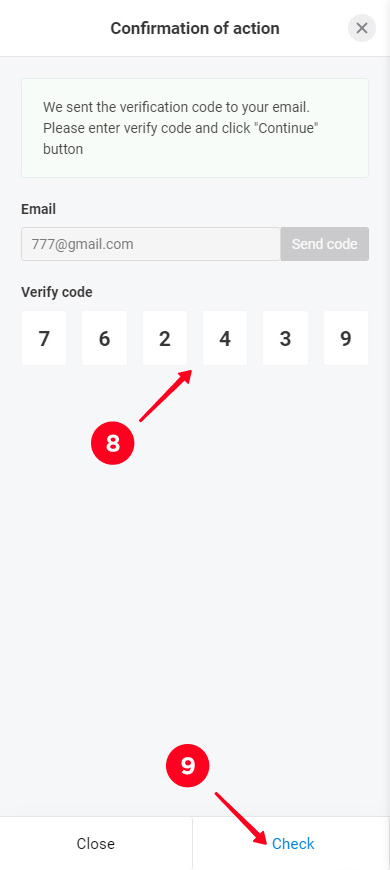
08. Enter the code on the Taplink website.
09. Tap Check.
The profile has been deleted from your account.
Now you know everything about multiple profiles on Taplink.
And do you know that you can create QR codes for your profiles so that you can share them not only online but also offline? You can read everything about the profiles' QR codes here.