How to create a wedding website: step-by-step guide + 5 tips

- 5 tips on how to create your perfect wedding website
- 1. Choose a good website builder
- 2. Use your wedding party theme as the website theme
- 3. Fill the wedding website with useful information
- 4. Enable the email newsletter for the RSVP form
- How to create a wedding website: step-by-step instructions
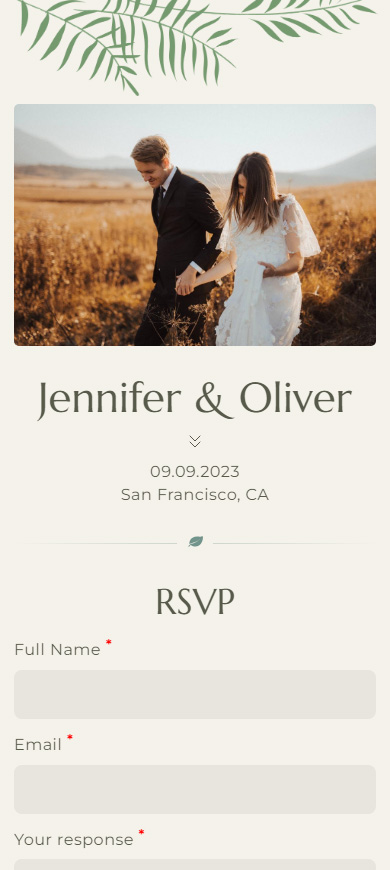
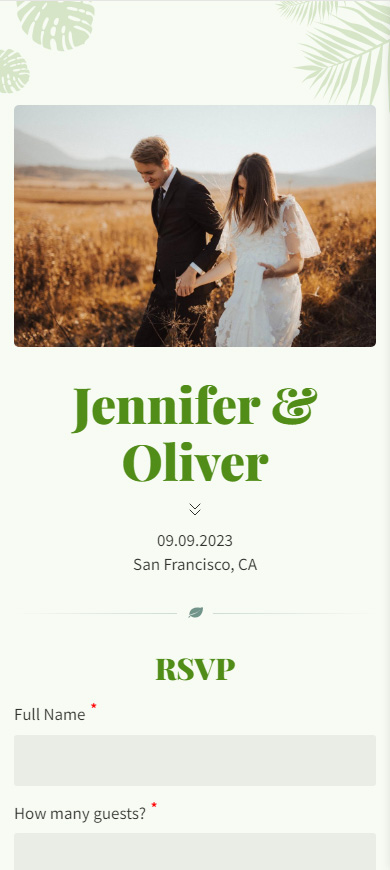
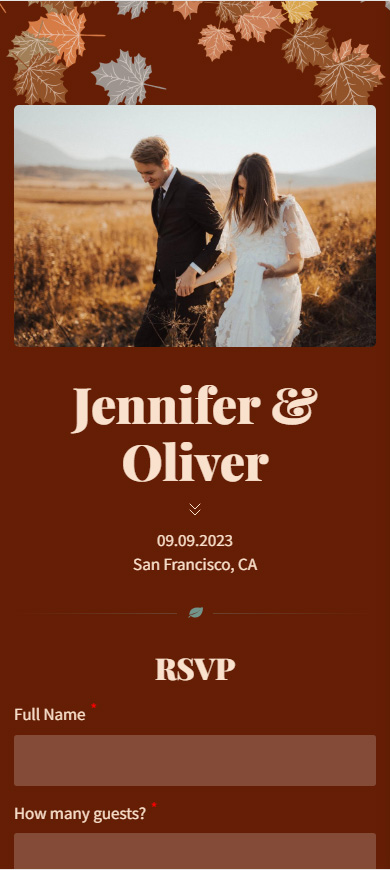
- Step 1 — Select a wedding website template
- Step 2 — Customize the wedding website template information
- Step 3 — Add more elements when you create your wedding website
- Step 4 — Remove unnecessary elements
- Step 5 — Choose a design theme for your wedding website
- Step 6 — Publish the wedding website you've created
- How to share your wedding website
- FAQ
- How much wedding websites cost
- How to create a wedding RSVP website
- How to create a wedding website with your own domain
- How to write your love story for your wedding website
- How to say no plus ones on your wedding website
- How to word the dress code on your wedding website
- How to ask for money on your wedding website
- How to make a QR code for your wedding website
- The bottom line
Follow the tips to create a wedding website that will help you to throw the celebration party. It'll be a help at all the stages from inviting guests to sharing wedding photos.
You can create a wedding website in a website builder. Whichever builder you choose, make sure it:
- is mobile-first. Then your guests will see the website displayed correctly and have it loaded quickly. Remember, 60% of the worldwide traffic is mobile. In addition, you will find a mobile-first builder way more convenient if you want to create a wedding website from your cell phone.
- offers website templates. Then you can create a wedding website quickly and be sure it is convenient and beautiful.
- allows you to add links, RSVP forms, photos, and more. Then you can create a wedding website that is really useful.
- sends emails. You need to send replies with gratitude and confirmation to your guests who fill out the RSVP form. But you don't need to get your head around a third-party newsletter mailing service if your website builder has the emailing feature.
- lets you choose your wedding website URL. It is more romantic when you add your names to the URL.
- creates the QR code. Choose a builder that automatically creates the QR code for sharing your wedding website. Even better, if the builder lets you customize the code to make it match your website theme.
If you don't want to spend time searching for a good website builder, create your wedding website using Taplink website builder. It has everything described above. We are sure of this because we created websites on it. Also, this is the builder that we use in the step-by-step instructions below.
You may also want to create a wedding website on one of the AI website builders.
If you have already chosen a theme for your wedding party, stick to it when you create your wedding website. Choose the same colors, patterns, fonts, and so on.
Your website is the first part of the whole wedding event that your guests see. If you create your wedding website with the theme of the whole event, then it sets the right vibe from the very beginning.
If you create your wedding website on Taplink, then you can change the theme of the entire page in a couple of taps. You only need to choose a design theme. There are more than 300 themes so you definitely can find the one that'll work for you. Read more about setting up a theme here.
Create a wedding website that is not only a beautiful part of the celebration but also a useful one. You can do this if you add:
- information about you and your spouse. Write your names and describe yourselves in 1–2 sentences when you create your wedding website.
- the RSVP form. Then you will know exactly who's coming. Moreover, you can use the form to collect information about preferred food and drinks, allergies, and so on.
- your story. Your friends and family want to know your love story even if they have already heard and seen most of it or they even took part in it. Describe the key moments that were crucial.
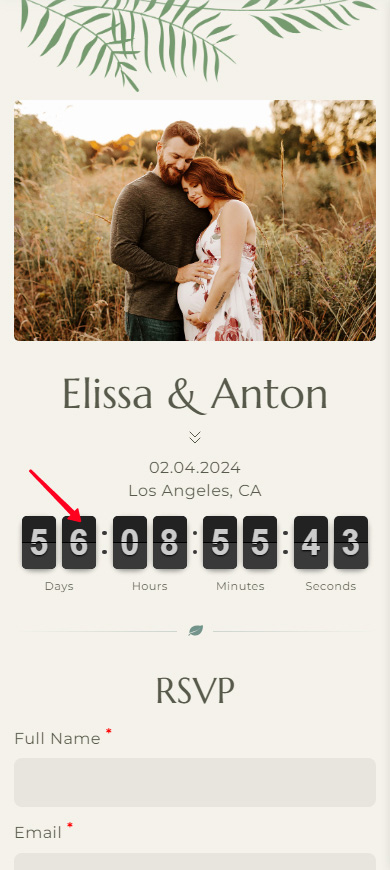
- wedding date and time. If you have already decided on the date and time, add them to the site. Then guests can plan their schedule in advance and include your wedding party in it. You can also add a countdown timer to the wedding event when you create a wedding website.
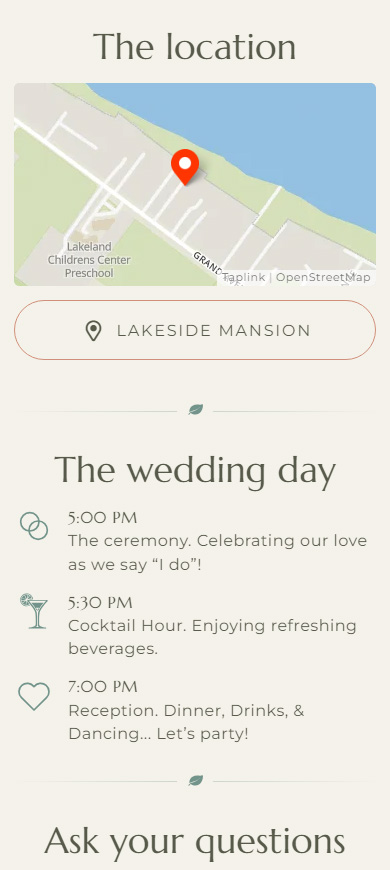
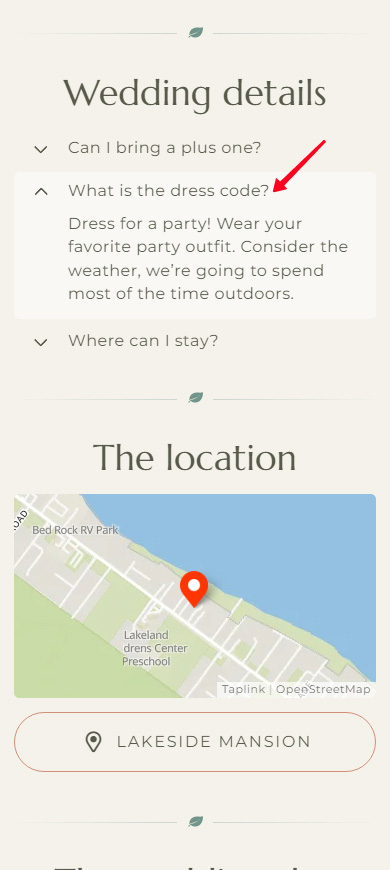
- the venue. Write the exact address. You can add details like the floor or entrance. An interactive map helps guests to understand the location clearly. Links to a map app help them to build the route.
When you create a wedding website, you may also need to add:
- celebration schedule if your celebration continues for several days or has several locations. Tell the guests what to expect.
- dress code if it is important to you. For example, when you want all the guests to be dressed in the same color or the same style.
- the list of bridesmaids, groomsmen, etc. These are important guests at your wedding so honor them by being introduced.
- gift information if you have specific requirements. For example, add a honeymoon fundraising button or a link to your wish list when you create your wedding website. Then your guests can nail the gift for sure.
- accommodation info if you are celebrating in the countryside or inviting guests from other cities. Make it clear whether you provide accommodation or you don't. If you don't provide it, then give links for booking a room in nearby hotels.
- your wedding hashtag so that guests add it to the photos and videos they make on your wedding day and post on social media. So, you and the guests can easily find these photos and videos.
- links to wedding albums. When the photographer sends you the photos and videos made on your wedding day, post them in one album. Add the album link to your wedding website. Thus, you can give the photos and videos to all your guests at once.
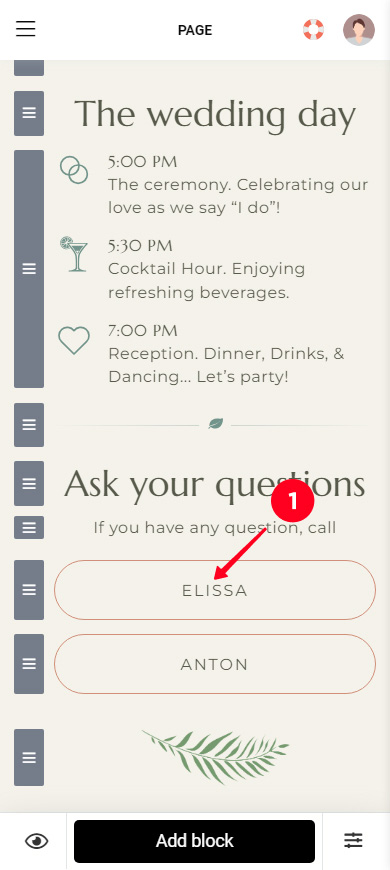
- contact details. Specify the preferred way to contact you on wedding matters on your wedding website. You can as well add the contacts of the maid of honor and best man, or your wedding planner. They may answer guests' questions too.
On the screenshots you can see some examples of what to add to your wedding website. View more examples here on the website, which we create in the instructions below.
Turn on the email newsletter in the RSVP form settings when you create your wedding website. Then, each user will receive an email after filling out the form. The email can be a thank you for accepting the invitation or a confirmation of inclusion in the guest list.
Here is an instruction on how to activate an email newsletter in the RSVP form settings if you create your wedding website on Taplink.
You can create a wedding website in a website builder. Above, we listed the criteria that a builder should meet. We chose Taplink as an example because it meets all the criteria.
First of all, you need to sign up on Taplink to create a wedding website.
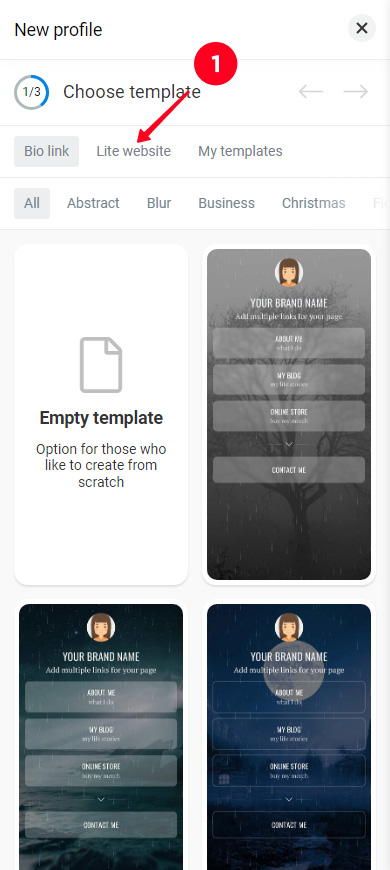
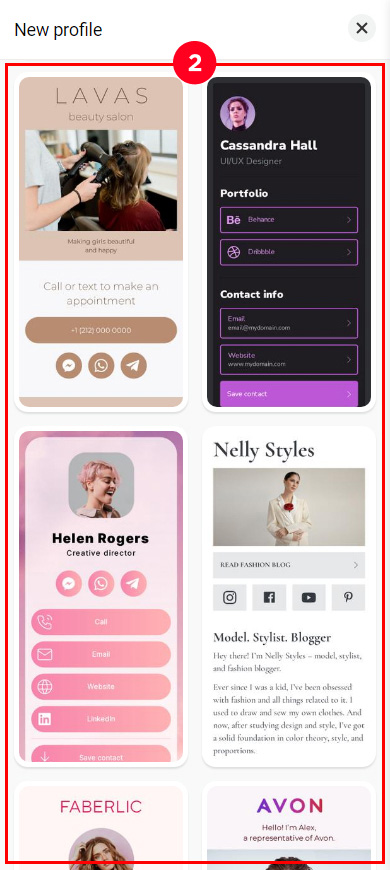
After that, you can create a wedding website from scratch or use a template. We choose a template to show an example.
- Tap Lite website.
- Select one of the templates, which you find suitable. We use this one.
- Tap Choose.
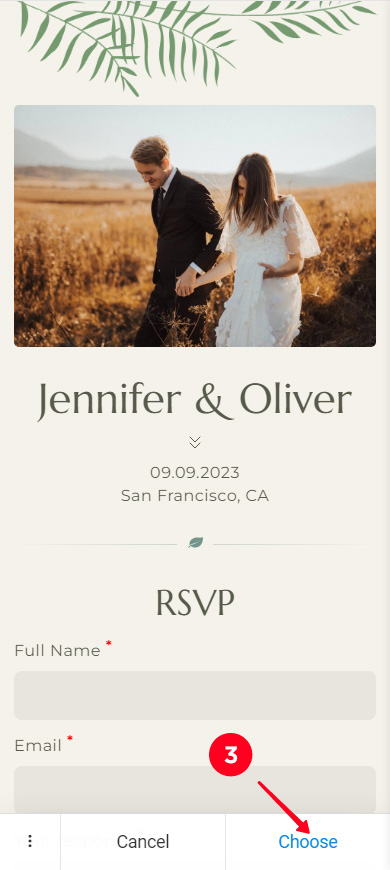
Then, you will be taken to the website editing page.
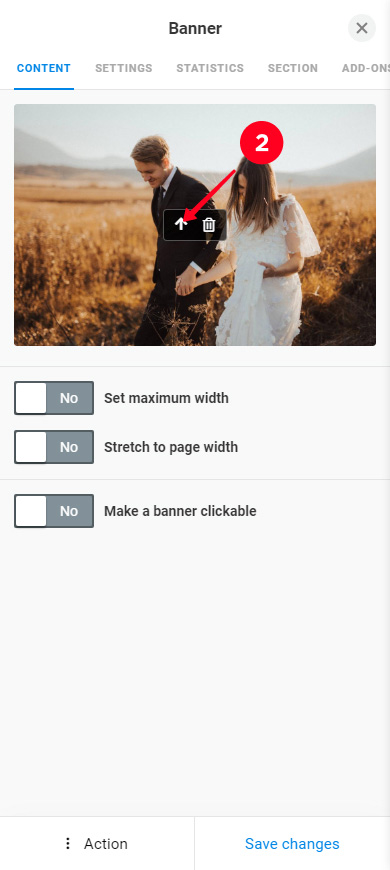
You can edit texts, photos, and videos on the wedding website template. You must edit all the elements with the exclamation mark, editing other elements is optional.
Edit an element on your wedding website:
- Tap the element.
- Fill in the fields, upload a new photo, and paste a video link, if necessary.
- Tap Save changes.
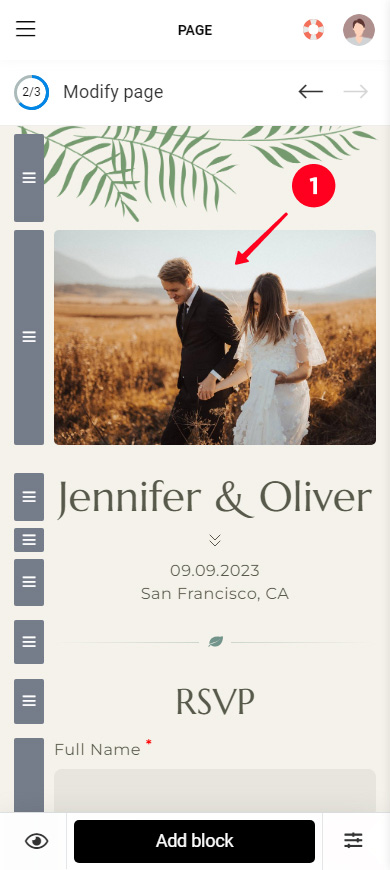
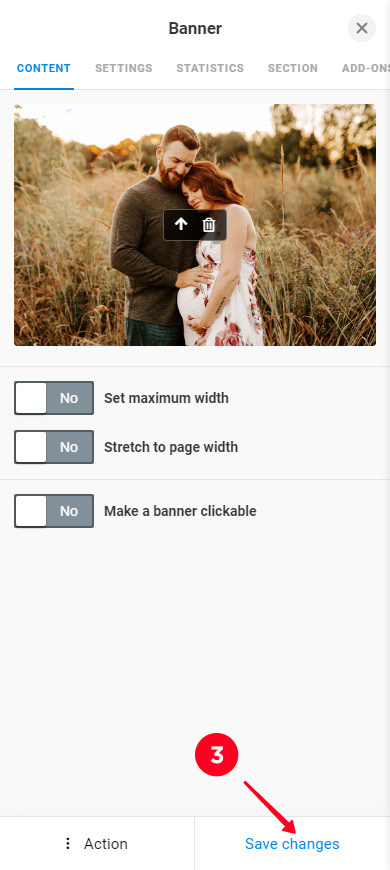
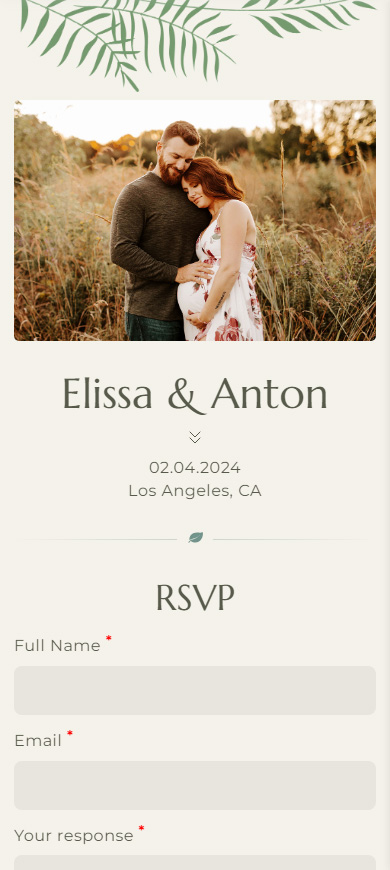
Done. Edit other elements on your wedding website in the same way. This is how our page looks after some editing:
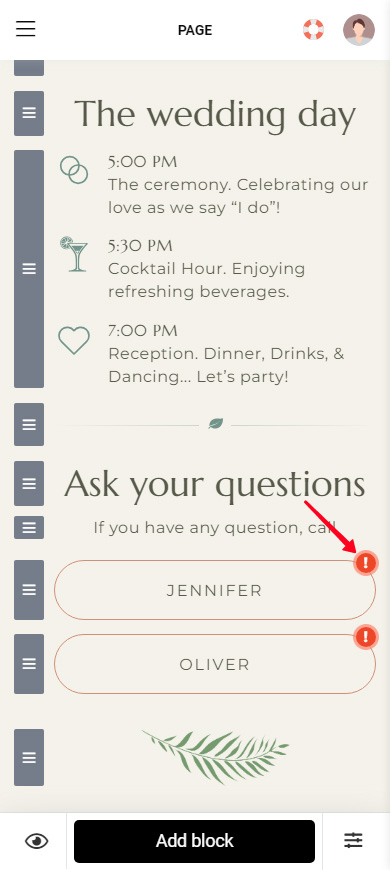
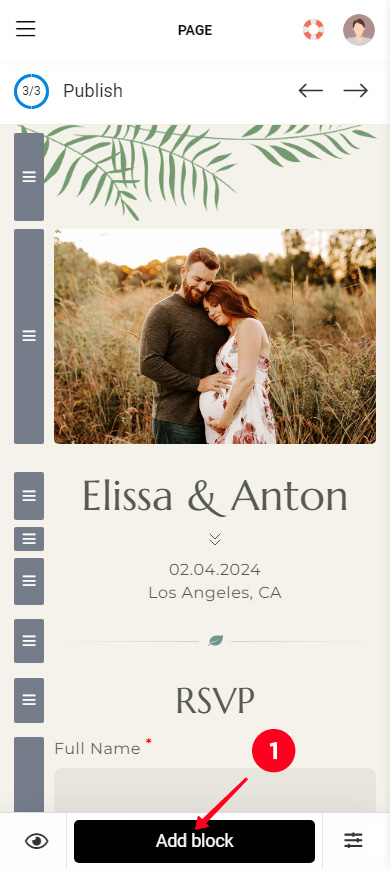
If there is something you need that the template doesn't contain, add it. There are 18 blocks on Taplink that you can use to add text, photos, videos, links, and much more when you create a wedding website.
Here is how to add a block on your wedding website:
- Tap Add block.
- Select a block.
- Adjust the block. The settings depend on the block. For example, we are adding a timer, so we need to fill in the time field. Here you can find detailed instructions for other blocks.
- Tap Save changes.
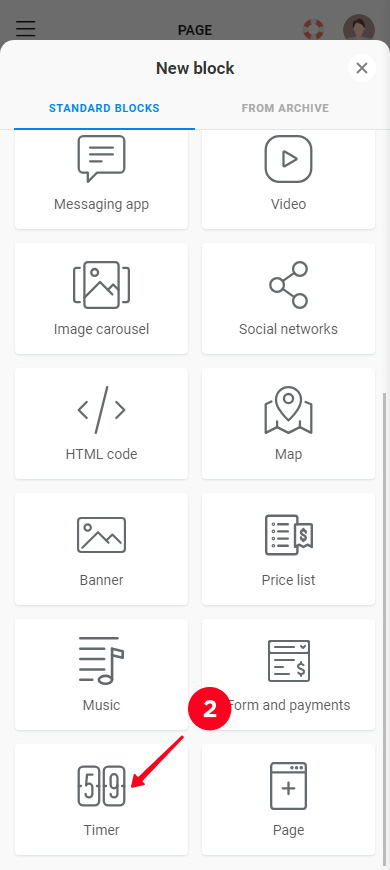
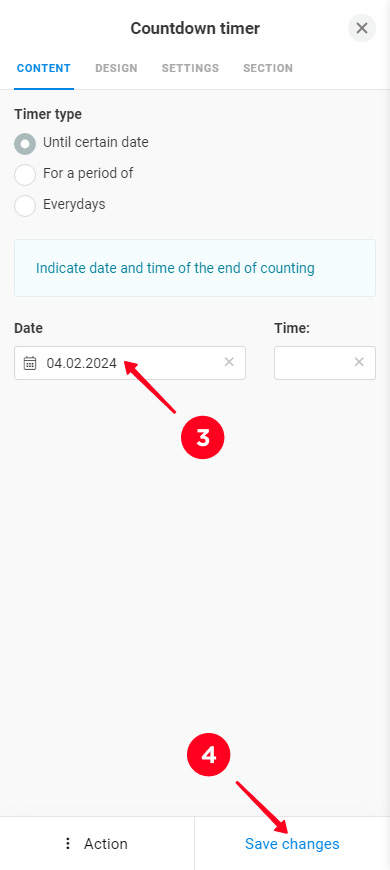
That's it, now there is a timer on the wedding website. This is what it looks like:
Add more elements in the same way if you need.
If there is an element on the wedding website template that you don't need, delete it:
01. Tap the element you don't need.
02. Tap Action.
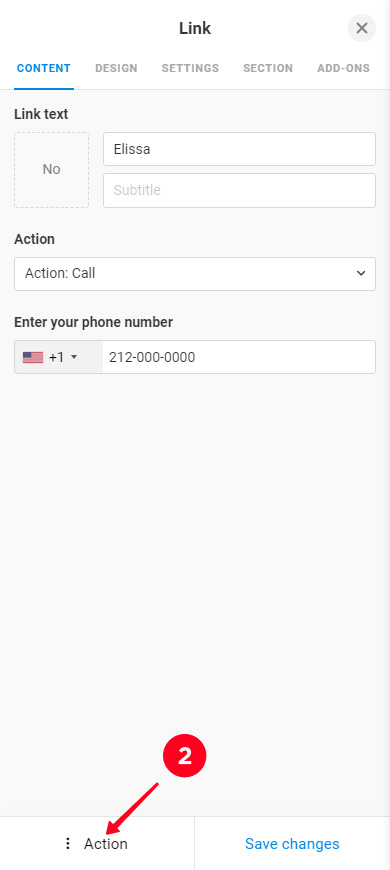
03. Tap Delete.
04. Tap Delete to confirm the deletion.
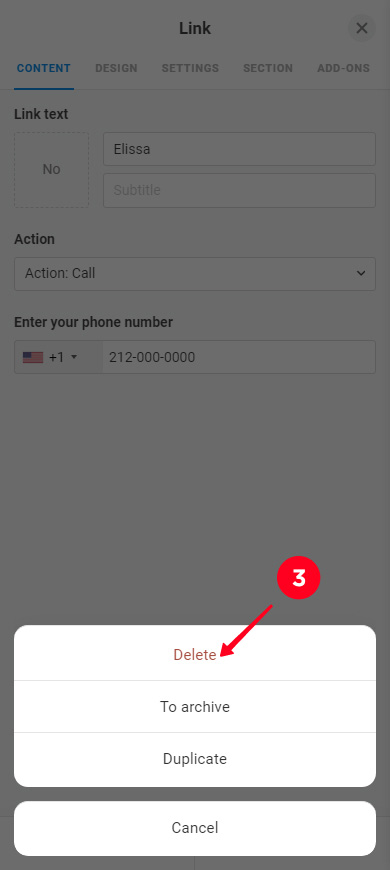
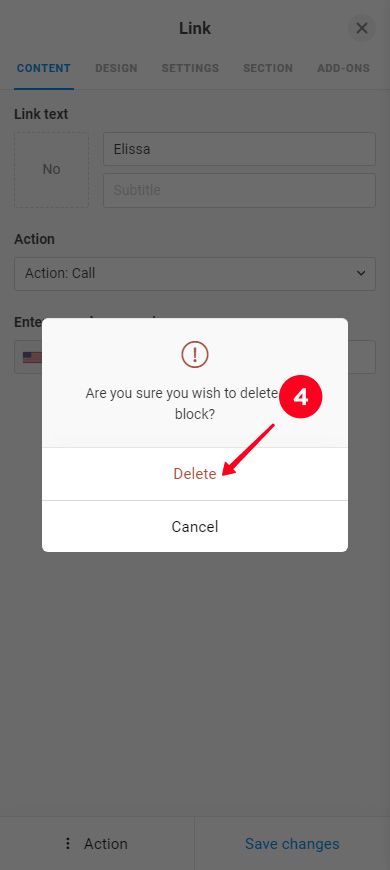
You can delete other elements in the same way.
You have created a wedding website that has everything you need. Now you can adjust its theme to make it similar to the whole wedding theme. Choose colors, fonts, roundings, and so on.
On Taplink, you can customize the design theme for:
- the whole wedding website at once. Use a ready-made theme or create your own. Instructions are here.
- several elements. Create a theme setting combination and apply it to the elements you want. Instructions are here.
- a single element. Set the exact design settings for an individual element. Here, for example, is how to customize the design of an RSVP form.
We did not change the design theme for our wedding website.
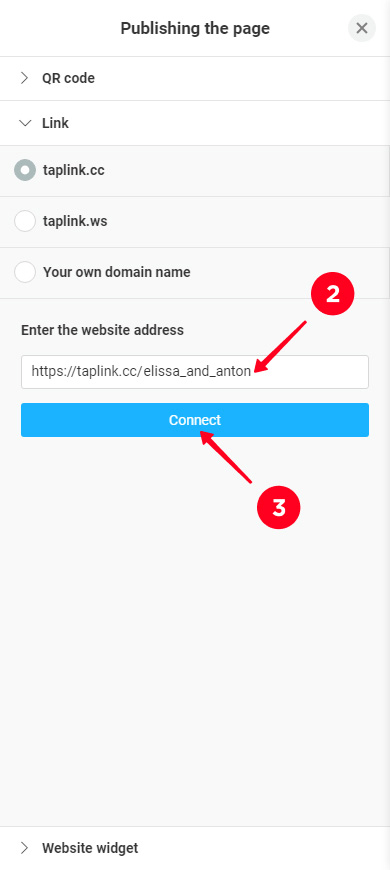
The last step left is publishing the wedding website you've created so that your friends and family can visit it:
- Go to the website publication.
- Complete the URL.
- Tap Connect.
- Tap Copy link to save the link to the clipboard.
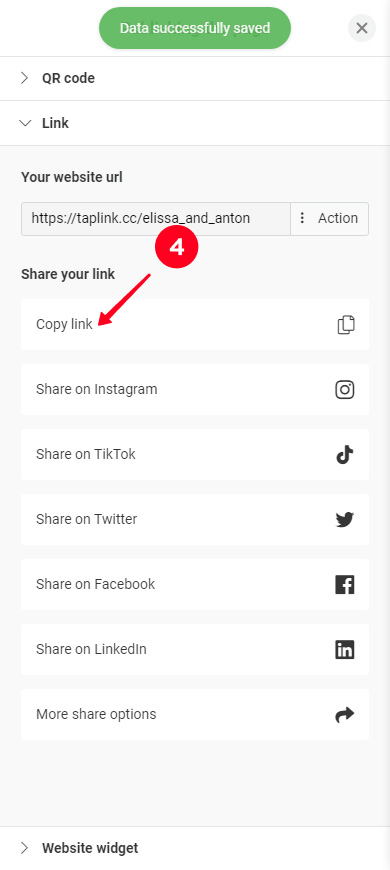
Congratulations, you have created a wedding website. A real one! Your friends and family can visit it and register as guests.
And here you can see the wedding website we have created.
Invite friends and family to the wedding website you've created. Say that you need to fill out the RSVP form. So more of them will pay attention to the form and fill it out. And you will have an accurate guest list.
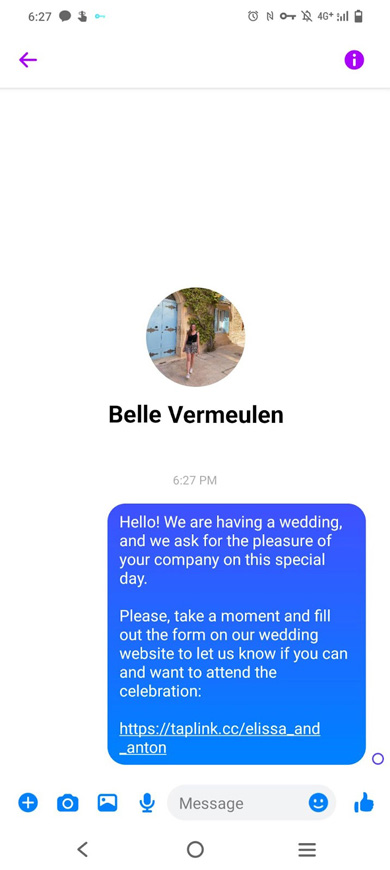
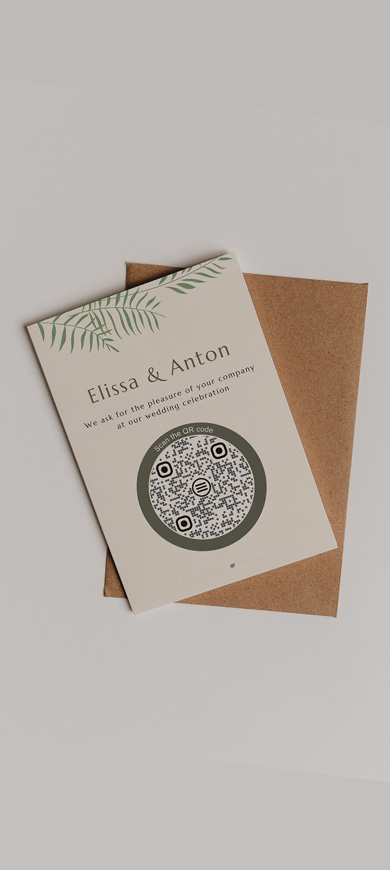
There are two ways to share your wedding website, you can send its:
In this section, you can find answers to the questions that may arise when you create a wedding website.
The cost of a wedding website depends on:
- the builder. Different website builders have different pricing.
- your website idea. The more variety you want on your wedding website, the higher the pricing.
Here is an example of specific pricing: on Taplink, you can create a wedding website for free. If you want to add photos or videos, you need to pay from $3. If you also want to add an RSVP form or timer, you need to pay from $6. More information about the pricing is here.
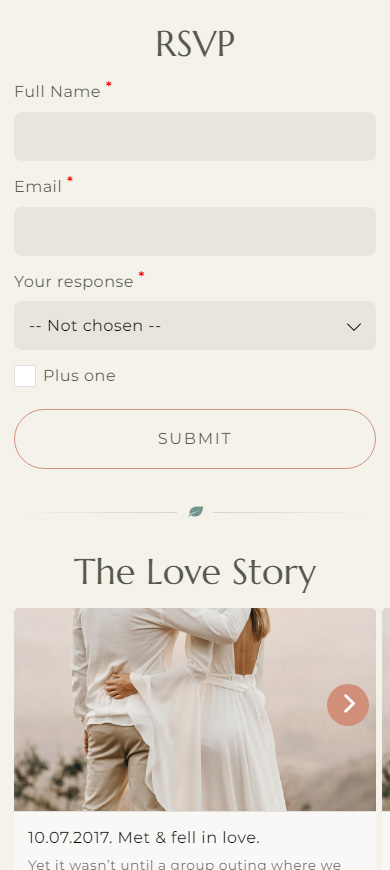
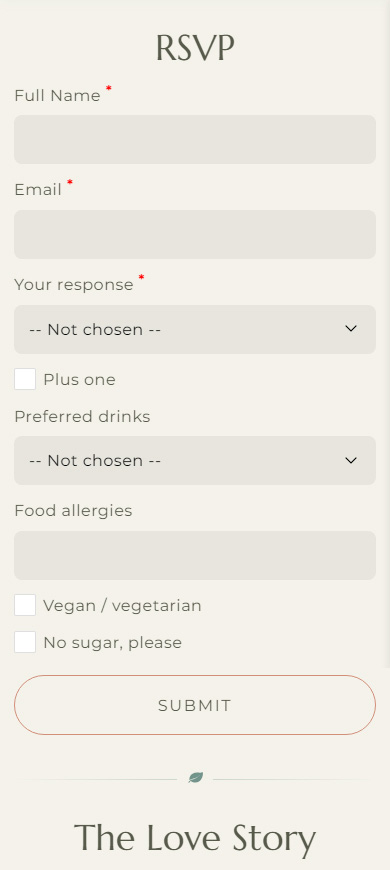
If you want to create a wedding RSVP website, you need to make sure that there is an RSVP form on it. Wedding website templates usually have it added. However, you can also add it manually.
You can choose what fields an RSVP form includes. It can include not only the answer "yes, I'll come" / "no, I won't come" but also a choice of food and drinks, and so on.
Here is an example of an RSVP form made on Taplink:
All the data you collect through an RSVP form is stored in your Taplink account. You can view, sort, and process it. Here you can read a detailed guide about it.
For example, you can find out the exact number of guests who will come. Enable the filter that makes it show only the answer "yes, I'll come".
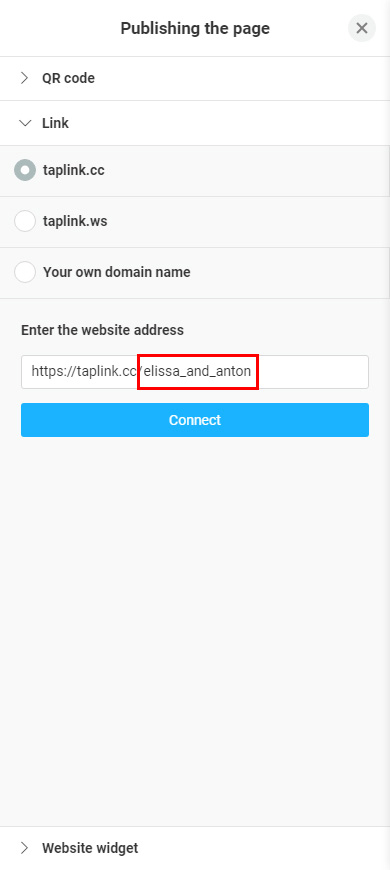
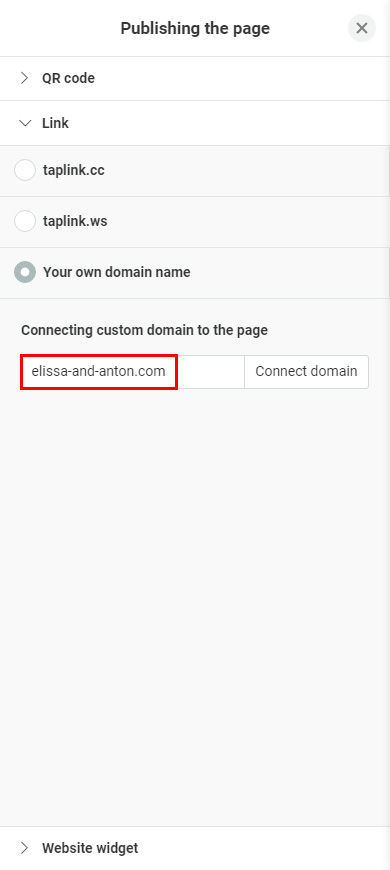
If you want to create a wedding website with your own domain, first of all, you need to choose a website builder that provides this opportunity. You also need to purchase a domain.
Taplink provides two options for a custom wedding website URL:
- a partially unique URL. You host your site on the Taplink domain and you write the URL's unique part, which can be any words or numbers (the first screenshot).
- completely unique URL. You buy a domain on a specialized service. Then you create a wedding website on Taplink and connect the purchased domain to the website (the second screenshot).
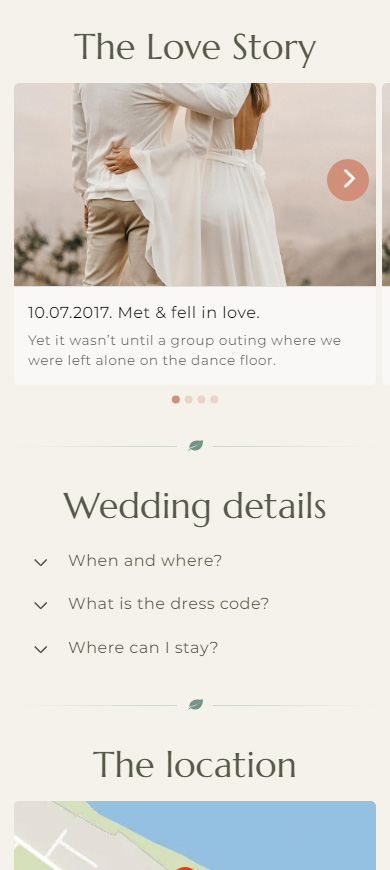
Describe your key relationship milestones in your love story when you create your wedding website. Be sure to write how you met, started dating, and how you (were) proposed. If there were other significant milestones, describe them as well.
Here are 4 main tips on how to write a love story for a wedding website:
- Keep it chronological. Describe the relationship milestones in the same order in which they occurred.
- Divide the milestones visually to write a love story for your wedding website that is easy to read. You can arrange them in a list, in which each milestone is an individual list item. Also, you can write a text, in which each milestone is described in its own paragraph. Or, as we do in the example, your love story can be an image carousel, in which each milestone is a slide.
- Add emotions. The love story you write on your wedding website will set the party mood only if it is a romantic novel rather than a history article. So write about your feelings and emotions in addition to the dates and facts.
- Describe each milestone in 1–2 sentences. This is enough. A bigger text only exhausts guests. If you want to write a love story on your wedding website in all details, create a separate page for it.
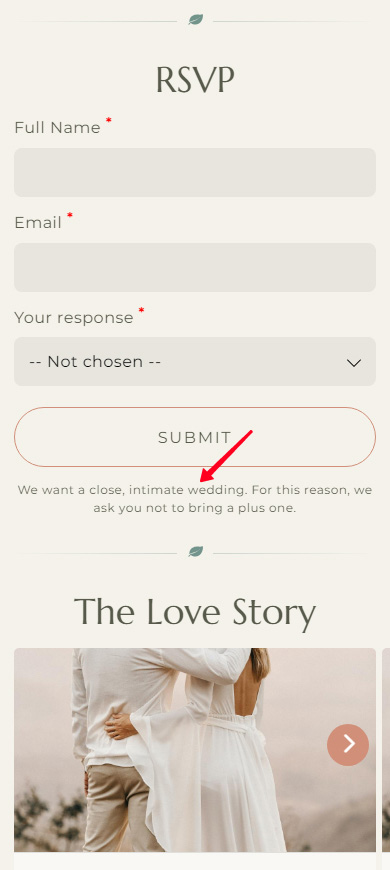
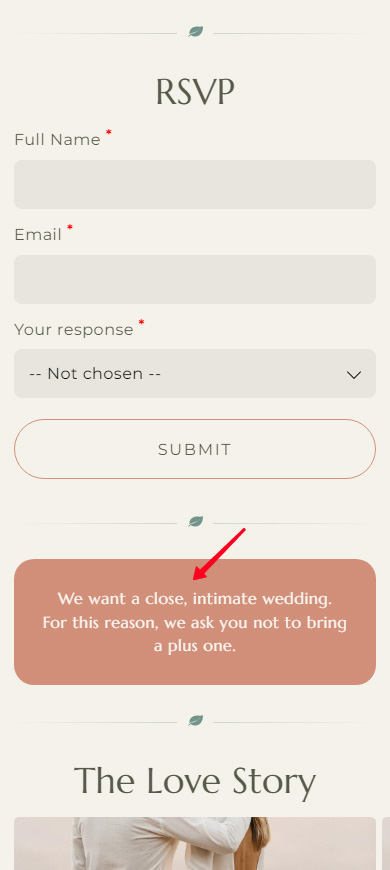
If you don't want extra quests, then you should say no plus ones on your wedding website clearly. And no "plus one" checkbox in the RSVP form is not enough.
Explain why extending the guest list is not possible. For example, there is a limit on the budget or on the seats in the venue. Or you may want to spend this day only with your most close friends and family members.
If you create your wedding website on Taplink, you can add the explanation after the RSVP form or write a paragraph and highlight it using a Section. You can also say no plus ones on your wedding website in a FAQ part. Here are examples:

Keep your requirements reasonable when you word the dress code on your wedding website. After all, guests will have fun only if they feel comfortable and beautiful in their clothes.
Avoid strict clothes requirements like "floor-length yellow dress with sleeves" or "a white tuxedo with one gold button and a flower in the pocket".
More general requirements are quite appropriate. For example, you can write "formal attire" or "cocktail attire" to word the dress code on your wedding website. Or word it a little more specifically: "wear a dress" or "wear a collared shirt".
Be polite when you word the dress code on your wedding website. Avoid short and harsh phrases like "no jeans allowed". Instead, use phrases like:
- "cocktail attire is preferred".
- "cocktail attire is recommended".
- "please, wear a cocktail attire".
Say straight that you would prefer money as a wedding gift when you create your wedding website. No need to feel awkward because of asking for money. Guests will be glad that they don't have to think about what to buy.
Explain what you are going to buy when you ask for money on your wedding website. Guests will be more willing to give money if they believe that they are investing for good. For example, you can ask for money to pay honeymoon or house renovation bills.
Tell your guests that gifts are not obligatory and that their presence is most important. For example, you can ask for money on your wedding website by writing something like "Cash gifts are welcome if you'd like to contribute to our honeymoon. But your presence is what's most important to us."
Add the fundraising button. If you create a wedding website on Taplink, you can connect to PayPal and fundraise money right on your website. It'll take only a couple of taps from guests to give you money.
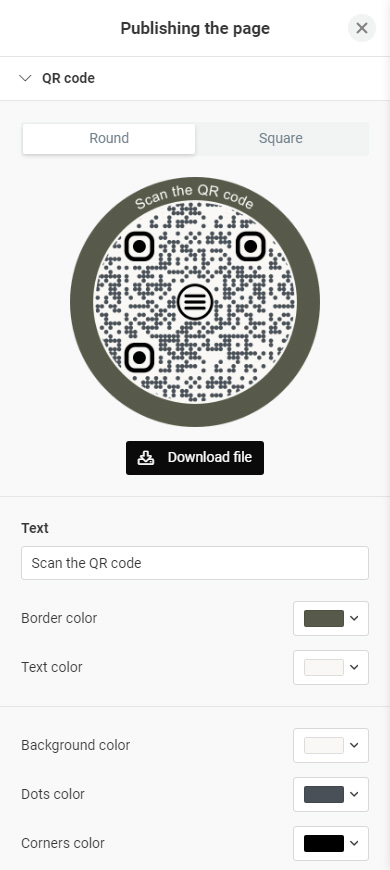
Most site builders can make a QR code for sharing your wedding website. For example, Taplink creates it automatically for every website. You can customize the code's appearance and then download it.
Here is a detailed guide on how to make a QR code for your wedding website on Taplink, adjust its appearance, and download it.
Now you know everything about how to create a wedding website. You need to choose a good website builder, choose a template and edit it. After that, you can share it with your friends and family: send them the link or QR code.
If you want to create a wedding website that is useful and beautiful, then:
- Add all the information about the event.
- Add an RSVP form.
- Keep to the wedding party theme on the website.
Create a wedding website right now on Taplink.