How to create a fitness trainer website in 15 minutes

- What benefits you’ll get from building a fitness trainer website
- How to build a fitness trainer website
- 1. Identify your audience’s pain points
- 2. Select a website builder
- 3. Choose a template
- 4. Customize your website
- 5. Set up payments
- 6. Publish your fitness trainer website
- 7. Add your website link to your social media profiles
- How to promote your fitness trainer website
- Use paid online advertising
- Be active on social media
- Collaborate with influencers
- Create a newsletter
- FAQ
- Can I add a video to my Taplink website?
- I already have a custom domain. Can I use it on Taplink?
- How can I write an Instagram bio calling my followers to visit my website?
- What are the most common mistakes to avoid when building a website?
- The bottom line
A personal fitness trainer website is a powerful marketing tool, as it has the following benefits:
- Reaching a wider audience: Most people do research online before making their purchasing decisions. According to PowerReviews, 42% of consumers always consult the internet before making a decision, and almost 45% do so regularly. Building a personal trainer website allows you to reach these 87% of consumers and convert some of them into your customers.
- Single source of information: Your fitness trainer website allows you, as a trainer, to collect all important information for customers in one place. On your website, you can gather info about yourself, your services, customer testimonials, a booking form, contact information, and links to other social media. Your customers can learn everything about you and take the necessary actions in one place.
- Convenient booking: A booking form, a call button, and a button to pay for services on your website simplify booking for your customers. They can call you right from your site instead of searching for your contact details on social media. Or they can fill out a booking form and provide you with all the information you need about them immediately.
- Product sales: You can use your fitness website to sell products such as guides, workout programs, or meal plans. They are available for sale 24/7, which allows you to generate additional income, even when you’re not working.
- Building trust: Social proof, such as customer reviews and testimonials, can create a positive impression of the quality of your services. Providing information about yourself, your experience and qualifications also helps potential customers know you better and solidifies your reputation as a professional.
Based on the information above, personal trainers have many benefits from having a website. And in the following section, we’re going to tell you how you can create a website for a personal trainer.
The steps for building a fitness trainer website include:
- Identifying your audience’s pain points.
- Selecting a website builder.
- Choosing a template for your future fitness website.
- Customizing the site to fit your needs.
- Setting up payments.
- Publishing your fitness trainer site.
- Adding your website link to social media profiles.
Let’s start with the first step.
The primary goal of your personal trainer website is likely to attract as many customers as possible. One of the factors in achieving this goal is identifying your target audience and their pain points.
For example, imagine that you focus on people looking to get bigger muscles. Your audience might be worried about doing exercises wrong, have difficulties in creating a training and nutrition plan, and struggle with maintaining consistency.
Let’s look at a certain example of how a personal trainer addresses these pain points.
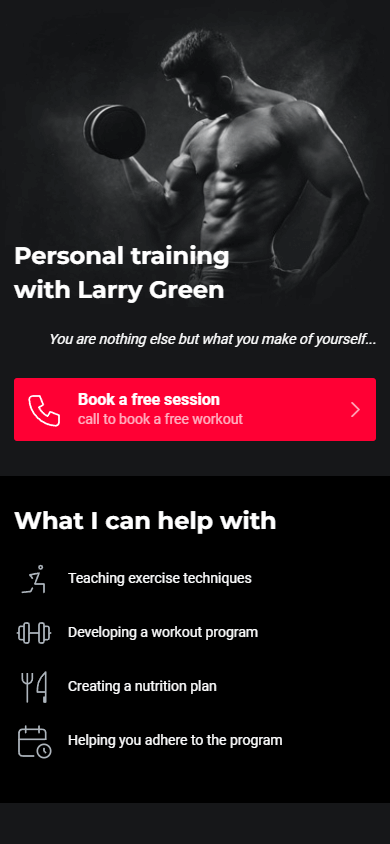
The trainer placed information about solving pain points under the What I can help with heading. As we can see, he added it right on the first screen of his website so that his audience would notice it immediately.
Telling the audience about what he can help his customers with, the trainer emphasized that he can explain the exercise technique to his customers, create customized workout and nutrition plans, and offer ongoing support to help his customers stick to their routines.
Customers who face the above-mentioned difficulties are more likely to use the trainer’s services as he knows how to solve their difficulties.
Check out the full website of this trainer by following the link. In this article, we’ll guide you step-by-step through creating the same website for a fitness trainer.
Now you know your personal trainer website’s goal and the pain points that need to be addressed. It’s time to decide on how you’re going to create your website for a fitness trainer.
The fastest way to create a website for a fitness trainer is to use a website builder. Taplink is great for building websites for fitness trainers because it offers:
- No-code creation: You can build a full-fledged site for fitness trainers, even if you’ve never built websites and have no programming or web design skills.
- Rapid building: Using ready-made templates in the library, you can build a website for fitness trainers in just 15 minutes.
- Extensive customization: Taplink allows you to customize every value of the elements on your site, including border weight, element transparency, line spacing, and more.
- Affordable pricing: Taplink offers three pricing plans, including a free option. The cost of its paid plans starts as low as $3.
- Digital product sales: You can sell your digital products, like guides, nutrition plans, or workout programs. Taplink lets you choose any payment provider from 58 different options. Moreover, unlike many other website builders, Taplink doesn’t charge fees for the sale of your digital products.
- Built-in analytics: Taplink lets you track key metrics such as views, clicks, and conversions. You can also enhance your analytics capabilities by integrating Google Analytics or other analytics add-ons.
Since Taplink provides everything you need to quickly create a full-fledged personal training website, we’ll show you how to create a site for a fitness trainer using Taplink as an example.
To start building your fitness website using Taplink, sign up and select a pricing plan. You can select a free Basic plan, Pro plan, or Business plan depending on your needs.
In this guide, we’ll tell you how to create a personal trainer website shown in the screenshots below.
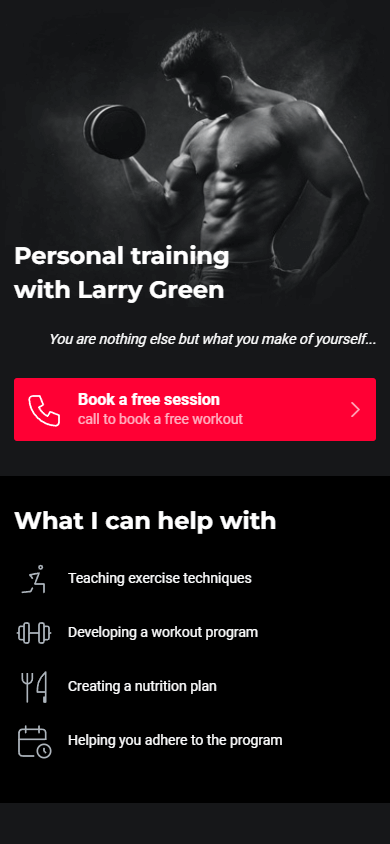
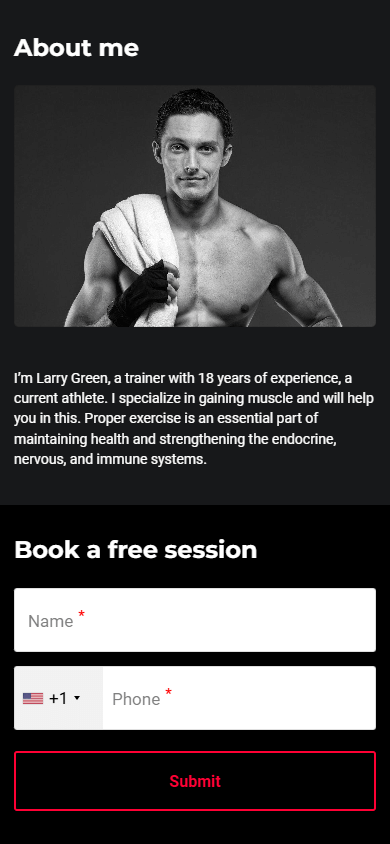
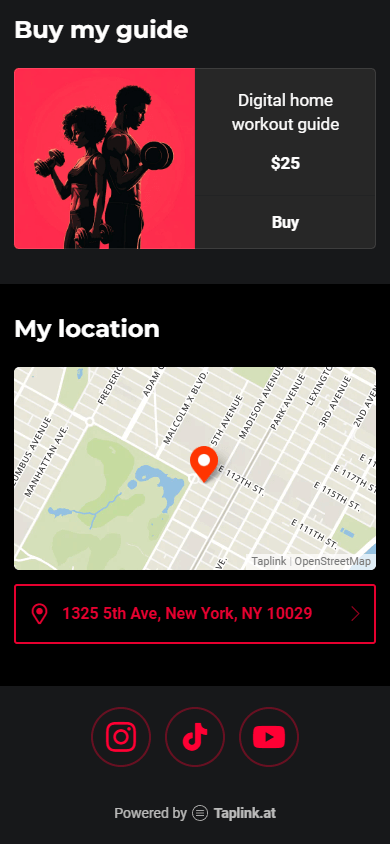
To build it, we’ve selected the Business plan as it allows you to:
- Select any template from the library
- Add images and videos
- Add buttons to call or text you
- Create internal pages
- Create forms to collect leads
- Sell digital products
- Get notifications about new leads and payments
- Utilize maps to indicate your location
- Activate Google Analytics and other add-ons
And much more.
To build our website for a fitness trainer, we used this template. It already has all the parts a fitness trainer might need. First, we’ll show you a screenshot of how they are designed and then we’ll explain how each of these parts might help you.
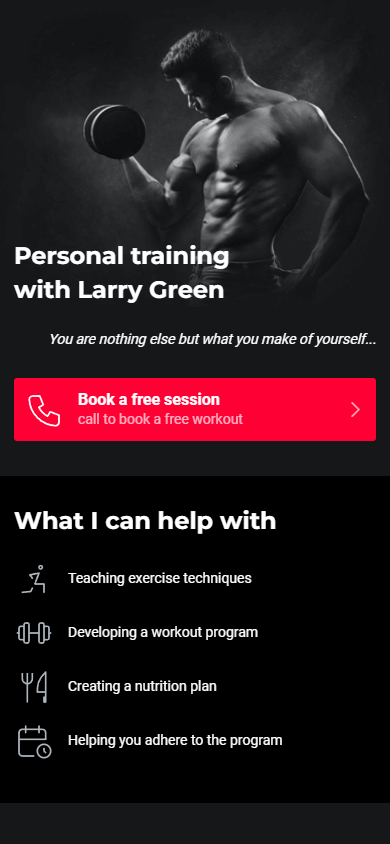
- Headline: A strong headline immediately grabs visitors’ attention and clearly communicates who you are and what you offer.
- Book a workout button: This button at the top of the site lets customers who came to your site to book a workout do it right away. It can be designed as a call button or a message button. The button at the top of the site contributes to a higher conversion rate, as customers don’t need to take additional actions to find your contacts.
- What you can help with: This website part aims to address the customers’ pain points that we talked about above. Listing how you can solve your customers’ pain points makes it clear to them that you are exactly who they need and that you have the solution they require.
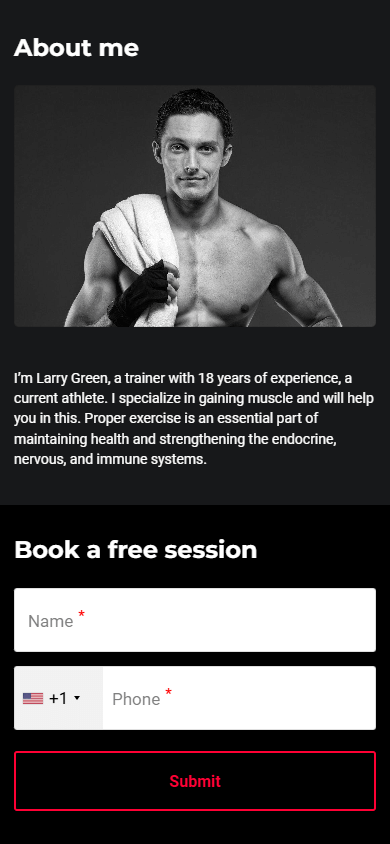
- About you: In this part, you can tell about your work experience, achievements, and approach. It will help you build trust with your audience and create the image of a professional.
- Booking form: This form simplifies the booking process for both you and your customers. Using it, you can request any information you need from the customer, including their name, phone number, age, training goal, experience, or anything else.
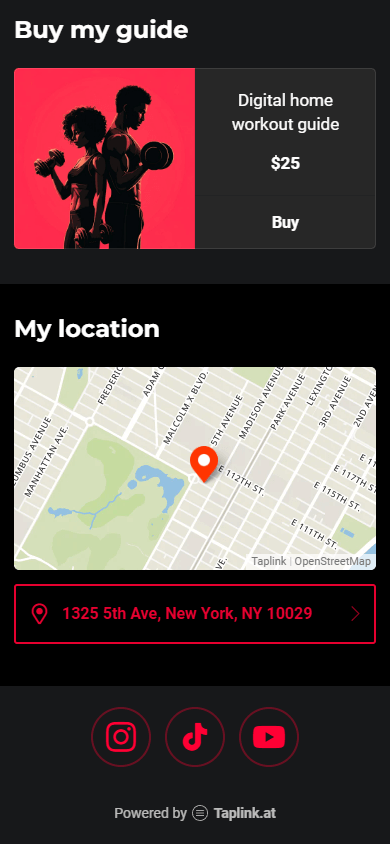
- Digital products: Selling digital products is an additional way to earn income. You can sell workout programs, meal plans, or guides. Selling digital products allows you to get customers who aren’t able to work with you in your gym, for example, from another city or even country.
- Map with your location: A map with your address allows customers to quickly understand where you are and how close or far they need to get to you. By tapping the address under the map, customers can immediately plot a route from their location to you.
- Social media links: Links to your social media will help your customers learn your content in different formats. If you have a YouTube channel, your customers can watch your workout videos. If you have an Instagram profile, they’ll check before and after photos of your customers or your life and hobbies. Seeing your life in different formats will help boost your audience’s loyalty and trust in you.
If you want to see what the full site with all the parts looks like, follow this link.
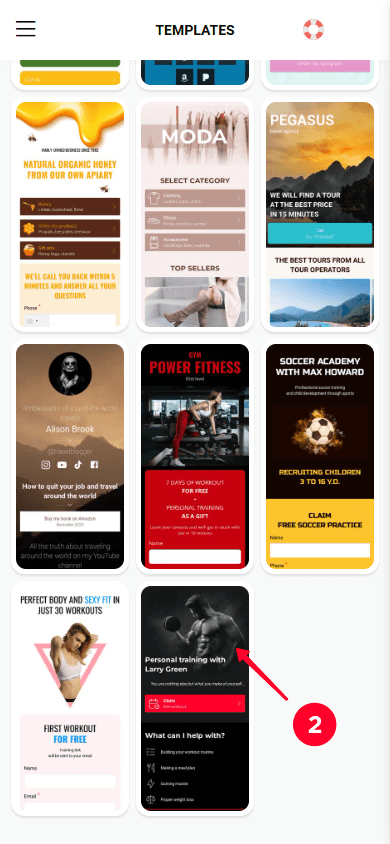
If you want to use another template, you can choose any you like from the Taplink library. To do this, follow these steps:
- Go to the Landing pages tab.
- Scroll down the page and select a template.
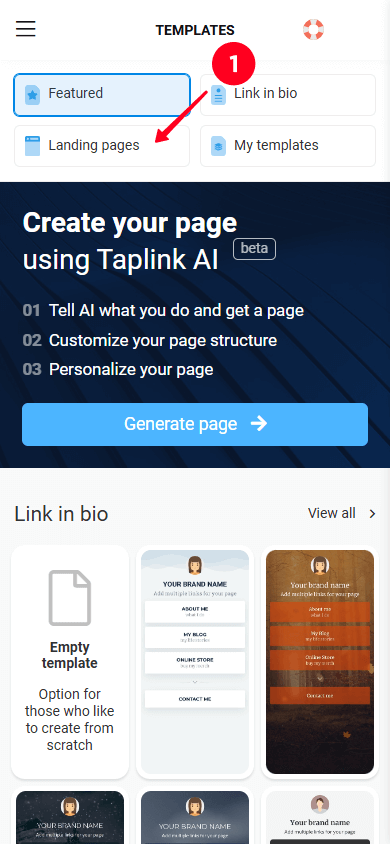
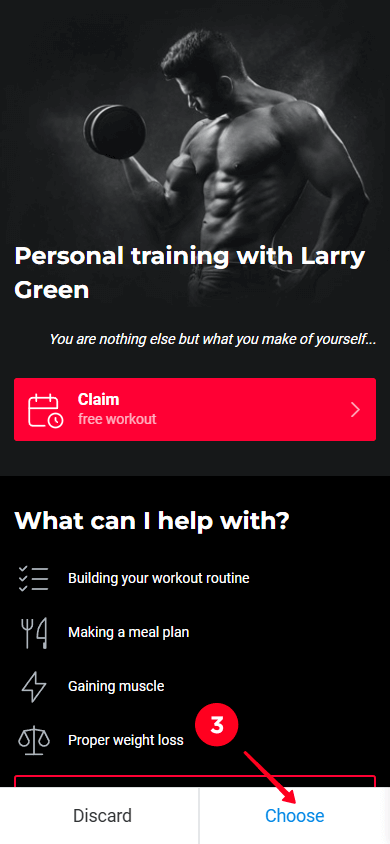
03. Tap Choose.
04. Tap Yes.
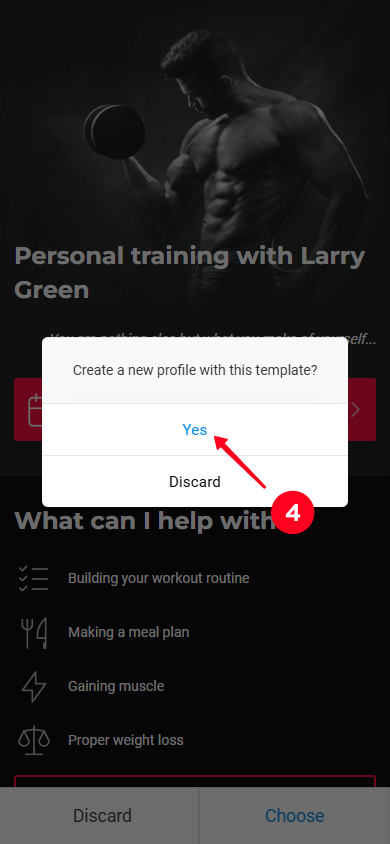
After choosing a template, you’ll see that it comes with pre-made blocks with information and images. See below what blocks look like.
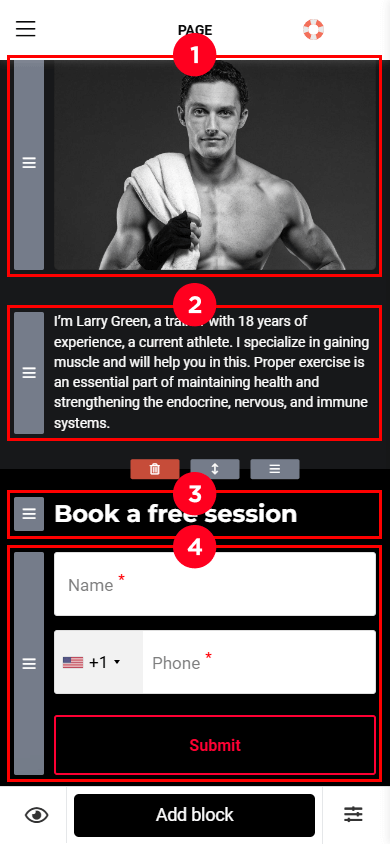
In the screenshot, you see the following blocks:
- An image block.
- A text block with plain text.
- A text block with a heading.
- A form block.
Customizing your personal training website involves changing the content, adding blocks, removing blocks, and rearranging them. Below, we’ll tell you about all this.
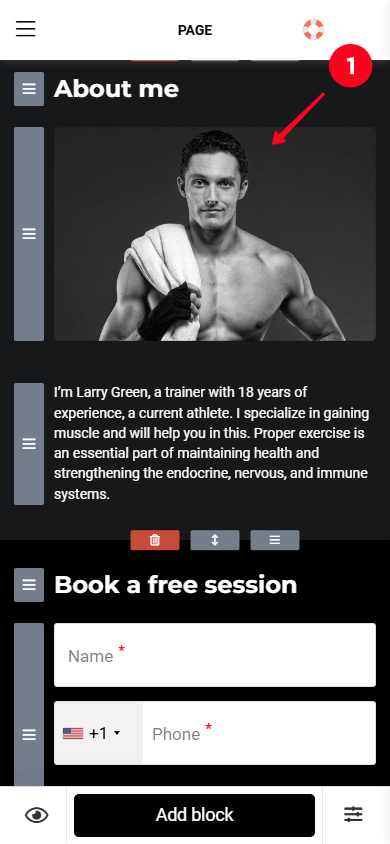
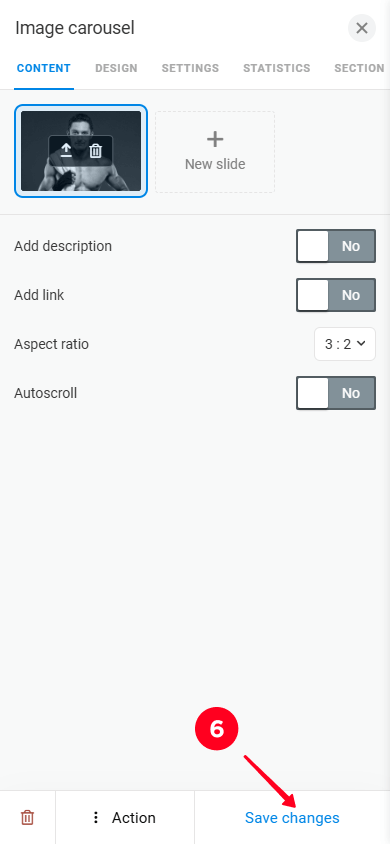
The process of changing the content on your site is consistent, whether you’re changing an image, text, form, or other block. To do so, tap the block the content of which you want to change, make your changes, and then save.
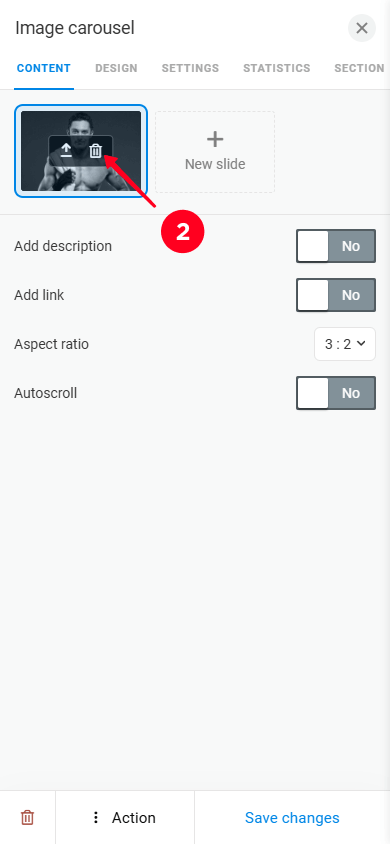
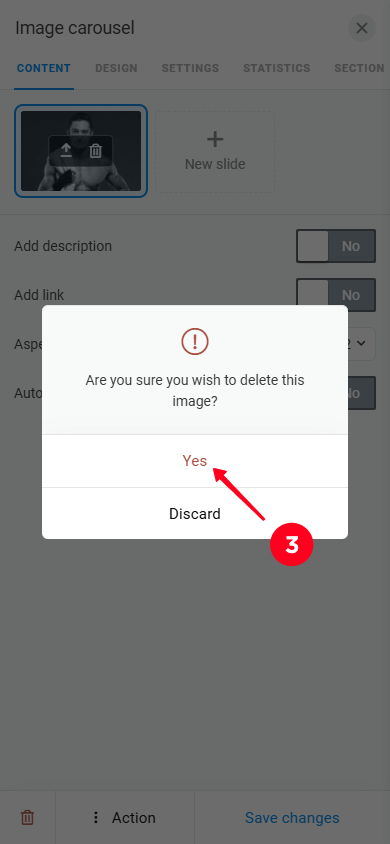
To illustrate this process, let’s use an Image carousel block as an example.
- Tap the block.
- Tap the trash icon.
- Select Yes.
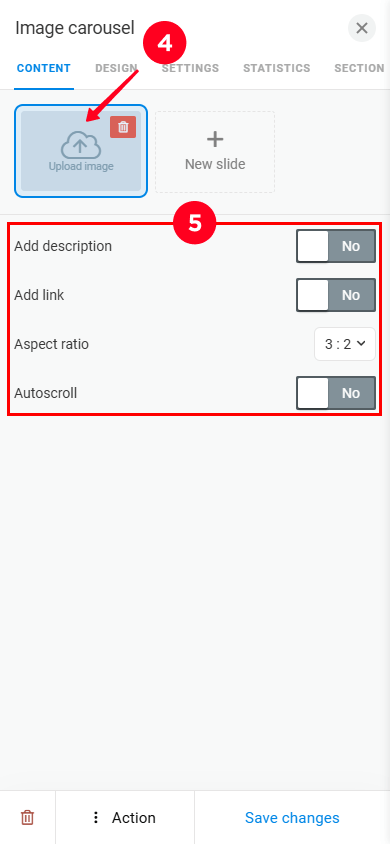
04. Tap Upload image and upload a new image from your device.
05. Optionally, adjust settings like Add description, Add link, Aspect ratio, and Autoscroll.
06. Tap Save changes.
We cover the carousel setup on Taplink in more detail in a separate article.
If you need more assistance on customizing content in different blocks, please read the How to edit page elements section of our guide.
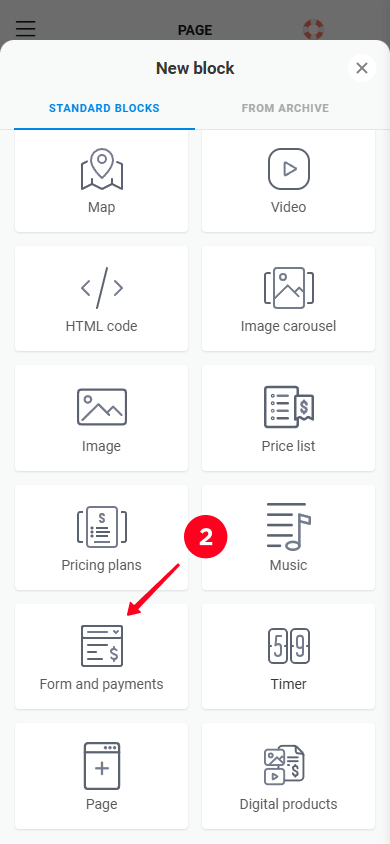
The template you chose already has all the necessary blocks. But if you want to add more, you can select ones from 20 blocks available for any purpose. The screenshot below shows the blocks you can add to your fitness trainer website.
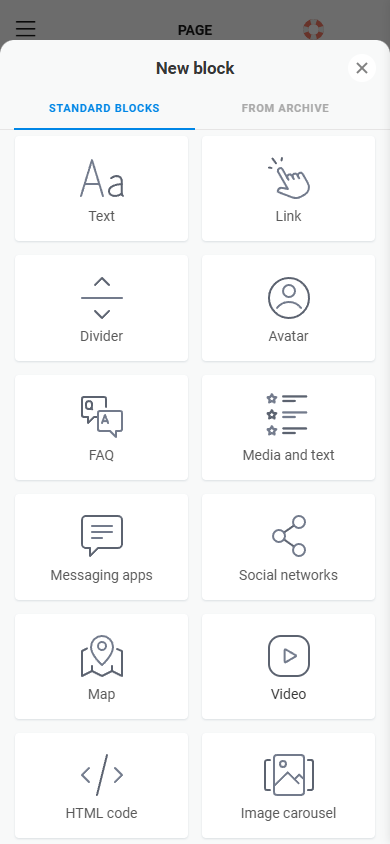
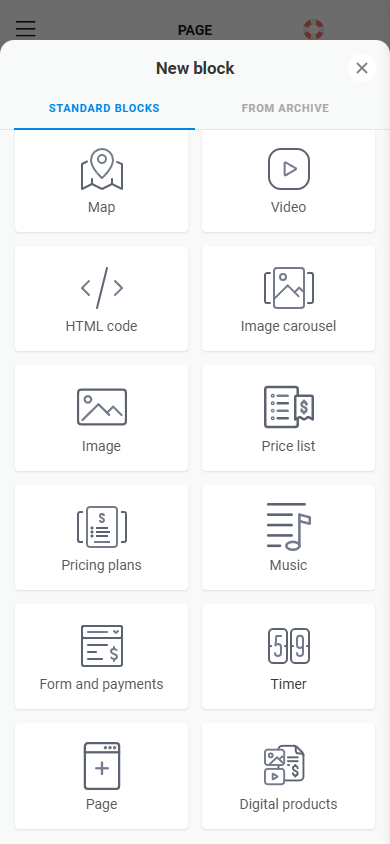
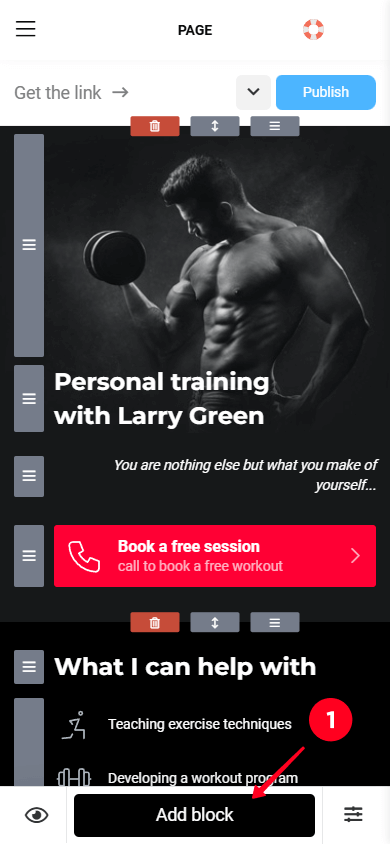
Follow the steps below to add a new block.
- Tap Add block.
- Scroll down and select the block you want to add. We’ve chosen Form and payments.
- Add and change the information in the fields.
- Tap Save changes.
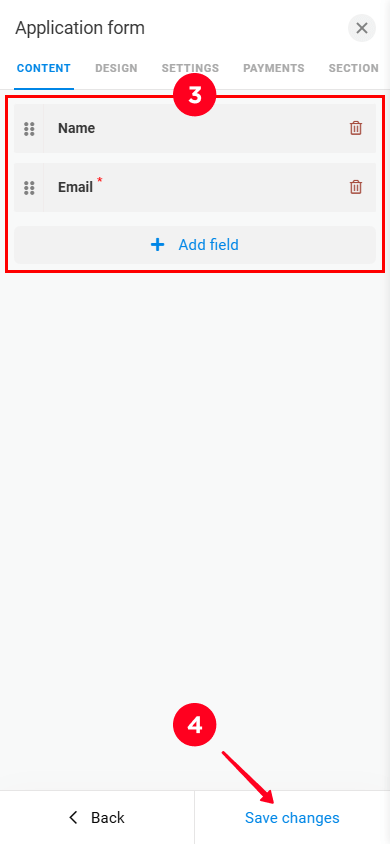
Check out our guide on customizing the Form and payments block if you want to customize the block in more detail.
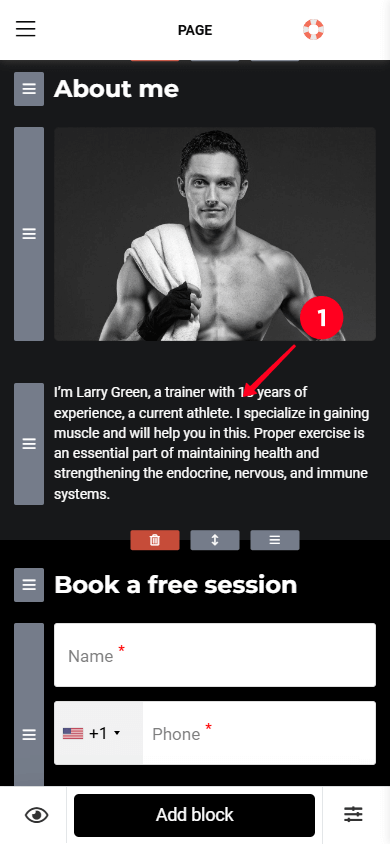
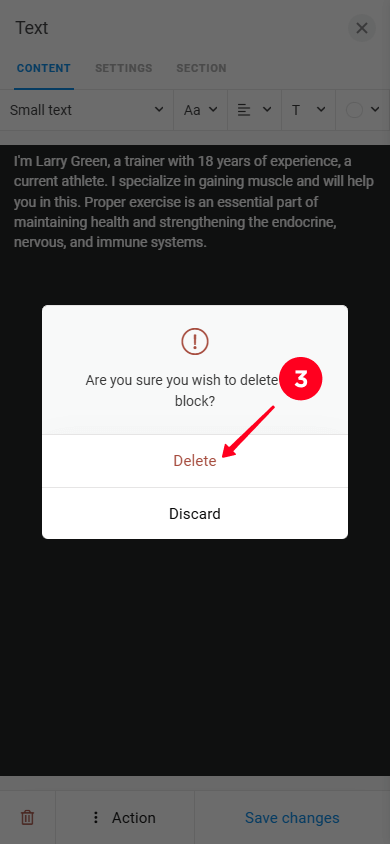
If you don’t need certain pre-made blocks on your fitness trainer website, you can delete them. To do this:
- Tap the block.
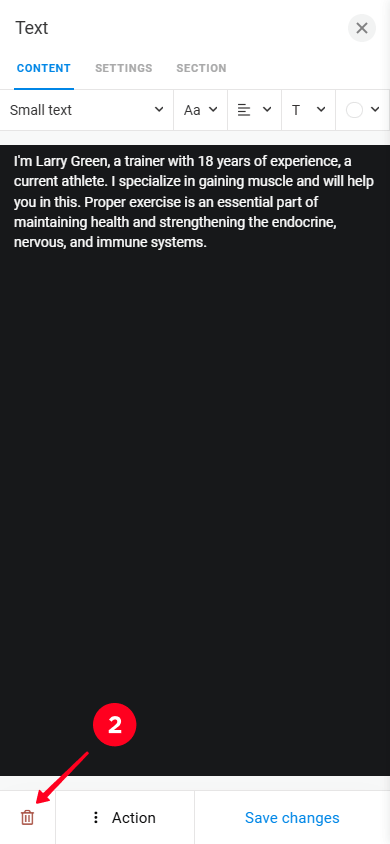
- Tap the trash icon.
- Confirm the deletion by tapping Delete.
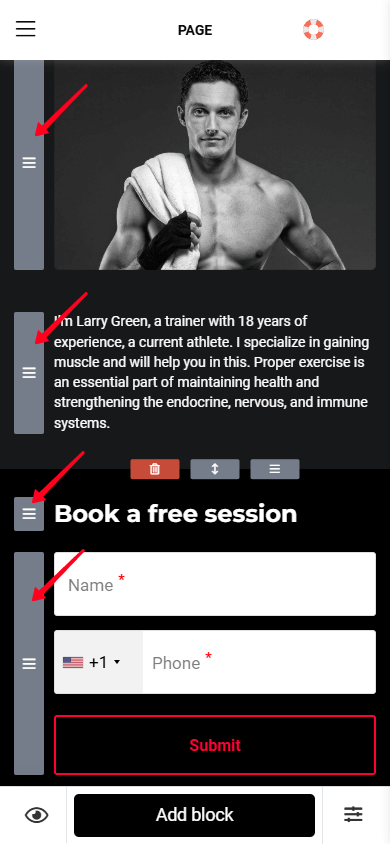
Once you’ve finished changing the content, adding and deleting blocks, you can rearrange the blocks if needed. Next to each block, you’ll see a gray drag icon. To move a block, hold and drag the drag icon up or down depending on where you want to put the block.
If you’re going to sell digital products like workout plans, you’ll need to set up payments on your Taplink website. Otherwise, please proceed to the next step.
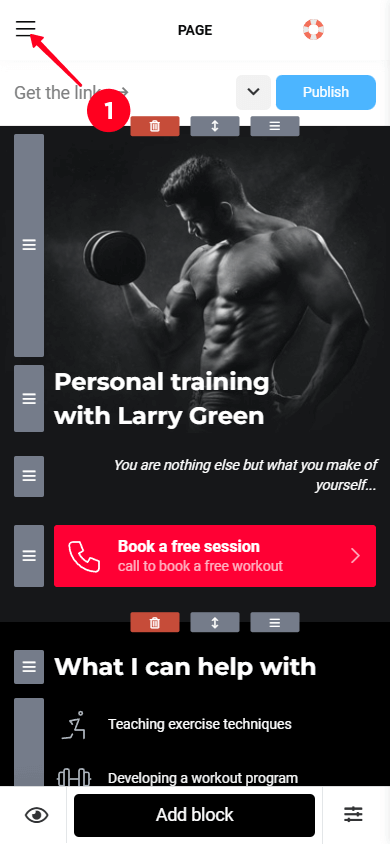
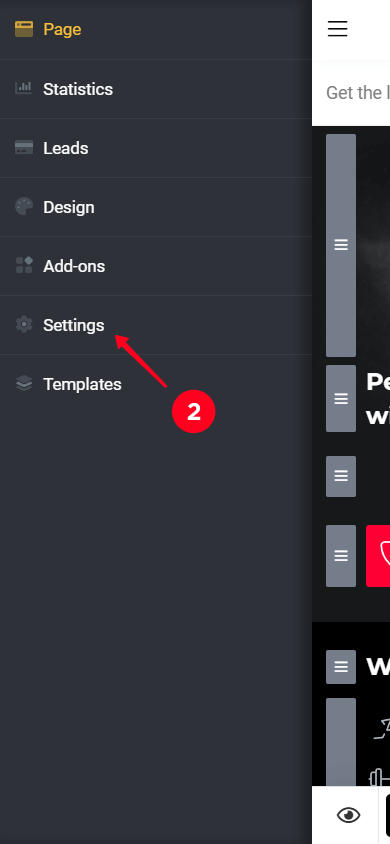
Taplink lets you choose from 58 different payment providers. Here’s a guide on how you can connect one:
- Tap the Hamburger menu.
- Go to the Settings tab.
- Tap Accept payments.
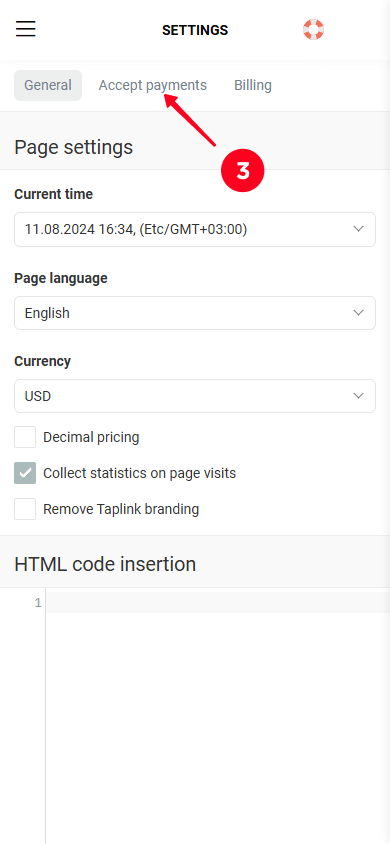
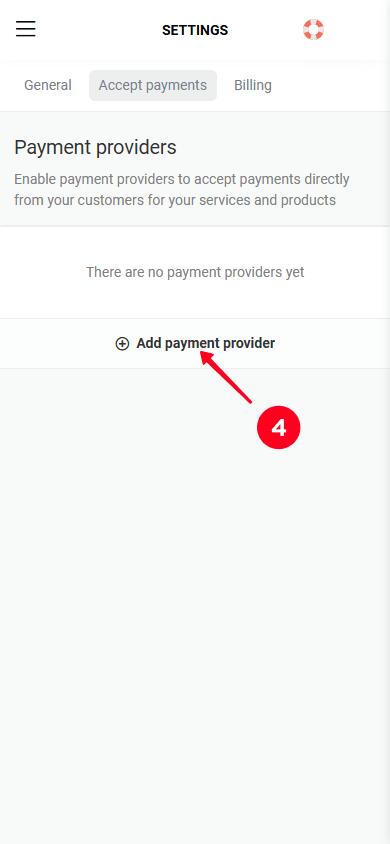
04. Tap the Add payment provider button.
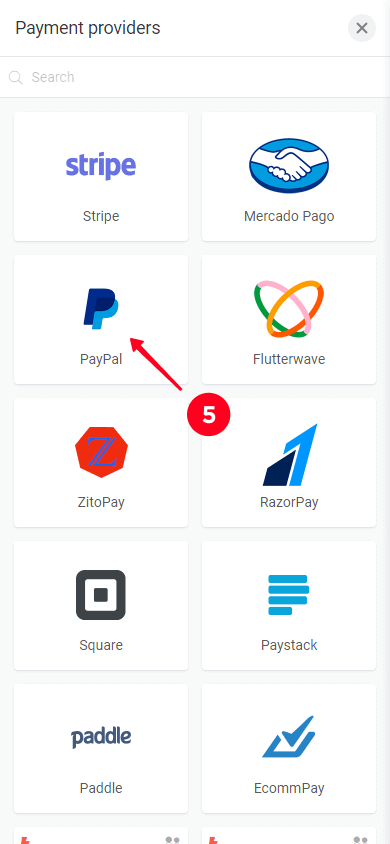
05. Select a provider. We’ve selected PayPal as an example.
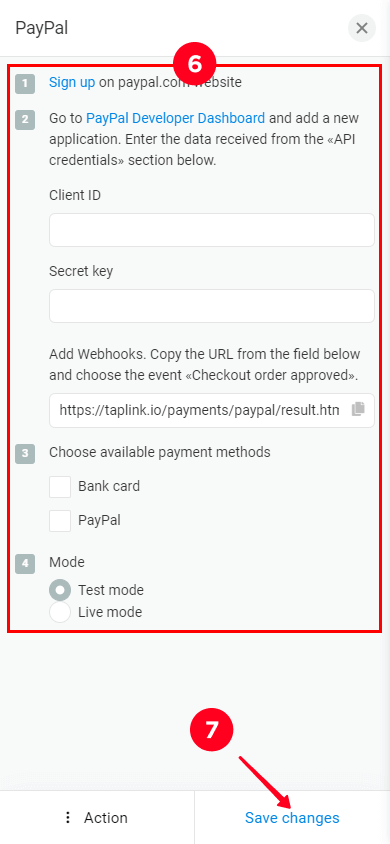
06. Enter data required by the provider. The screenshot below shows the form to fill out for connecting PayPal.
07. Tap Save changes.
For more detailed information, please refer to our guide on setting up a payment provider.
Additionally, if you require further assistance with the Digital products block, please consult our guide on customizing digital products.
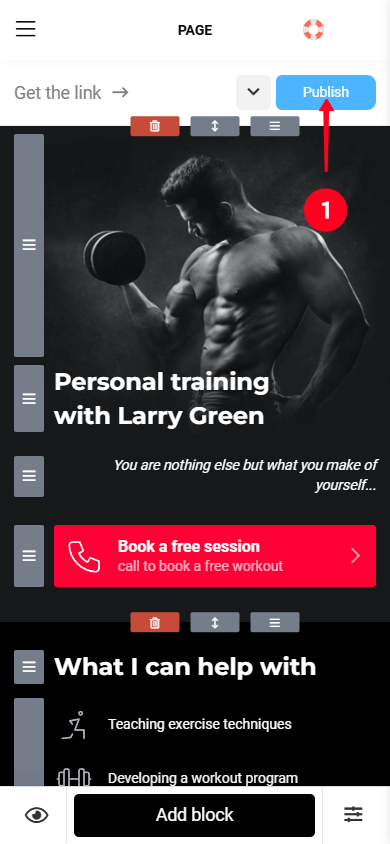
You’ve learned how to create a full-fledged fitness trainer website and now you need to publish it. Publishing a website on Taplink is easy.
- Tap the Publish button.
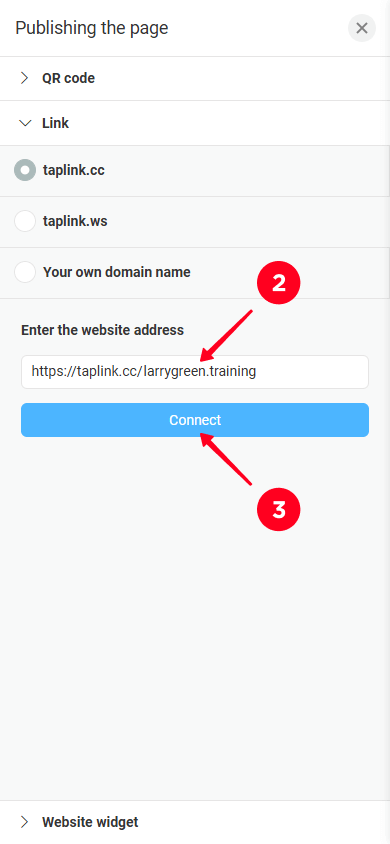
- Enter a username in the Enter the website address field. Choose any username you like more. For example, you can use your social media username.
- Tap Connect.
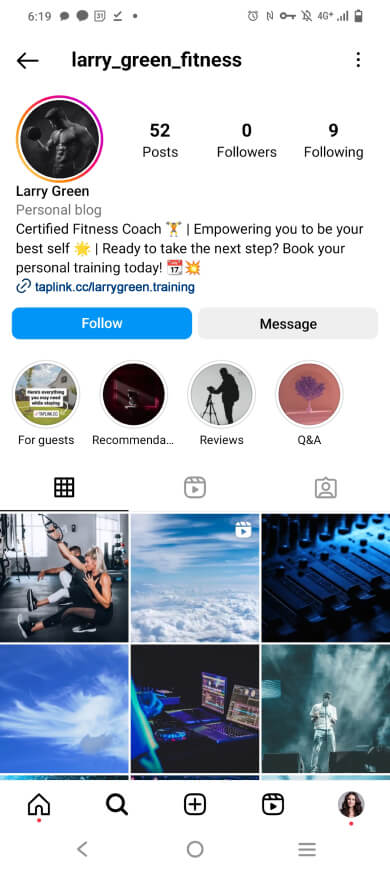
You’ve built your own fitness trainer website, but no one knows about it yet. To let your audience know about your site, add a link to it to all your social media profiles where you’re on.
Here’s how a Taplink link looks in an Instagram bio.
Once you’ve added your website link to your social media profiles, you’ll start seeing some traffic on it. However, you can do a few more things to increase your traffic even more. Let’s look at them.
Set up targeted advertising on search engines or social media to attract potential customers.
Define your target audience for your ad campaign. If you only offer training locally, set up your ad to reach only people in your city. You can also segment your audience by age and gender and run different ads for each segment.
Experiment with different advertising platforms, including Google, Facebook, Instagram, and others. Also, try different formats like video, text only, text with images. Alter the text, images, and calls to action in your ads. Analyze the performance and track which platforms and ads bring in more customers.
Regularly post content on social media that would be of interest to your audience.
To grow your fitness account on social media, use different formats and types of content. For example, share training videos on YouTube, motivational posts and photos of customers’ achievements on Instagram, and short funny videos on TikTok. Read our article if you want to get inspired on social media post ideas for fitness trainers. When sharing content on social media, keep these things in mind:
- Add a link to your website in captions or descriptions when you promote something. However, you can’t add a link to your fitness caption on Instagram, for example. In that case, as we mentioned above, add your website link to your profile bio if you haven’t done that yet.
- Regularly encourage your audience to tap your website link, whether you’re offering them to book a workout or buy a guide. For example, if you post before and after photos of your customers on Instagram, encourage your followers to tap the link in your bio to book a session and get the same results.
Another way to be active on social media is to interact with your followers and actively engage them with your content. Respond to comments and personal messages from them, like their posts, and comment on their content.
Work with bloggers and influencers who share content related to your field. These could be fitness enthusiasts, wellness bloggers, or even those who actively talk about a healthy lifestyle. Offer the influencers to tell their followers about you and encourage their followers to use your services by visiting your website.
Consider various terms of cooperation. You can simply pay influencers for advertising, offer them your products or services in exchange, or consider getting a commission from your sales for a certain period.
Don’t forget to track the performance of advertising with an influencer. For example, let the influencer offer their audience a promo code for your services. This way, knowing how many customers used this particular promo code, you can calculate how many customers you got from the influencer.
Taplink lets you add a promo code field so your customers can use discounts when booking your services or buying your digital products. Learn more about this in the How to set up promo codes section of our guide.
Once you've created your Taplink page, you can start using it to build an email list. Simply add a Form block with an email field to let people subscribe to your newsletter. To encourage sign-ups offer free guides, discounts, or promo codes to the new subscribers.
After you start collecting first subscribers, use Taplink’s email marketing add-ons or a free SMTP Server to send concise, visually appealing emails with workout tips, client success stories, and exclusive offers (e.g., promo codes).
Always track and analyze open rates and button clicks to update and get the most out of your emails. And finally, stay consistent—weekly emails will keep you relevant without overwhelming your subscribers.
Yes, you’ll need to use the Video block for this. There, you can easily embed videos from platforms like YouTube, Vimeo, TikTok, and Twitch into your Taplink website. We’ve explained how to do this in more detail in the How to add a new block section. For more advanced Video block customization, please refer to our comprehensive guide.
Yes, you can use a custom domain on Taplink if you already have one. You can add it when you publish your page. For more detailed instructions on setting up a custom domain, please refer to our guide.
We have a separate article with 160 ready-made Instagram bios for fitness trainers that meet the recommendations for creating an effective Instagram bio for fitness trainers. Simply copy and paste the bio you like into your Instagram profile.
If you want to write an Instagram bio on your own, you can also find recommendations in the article on creating a proper bio for a fitness trainer.
Here are the most common mistakes when building a website:
- Failing the blink test: People decide whether to stay on a website or not in seconds. Use clear and catchy headlines, appealing visuals, and put the most important info at the top of the site.
- Too much text: People don’t like to read a lot on sites. Plus, a text-heavy page makes it hard to find the main information. Remove unnecessary sentences and leave only what’s important. When listing things, use bullet points or numbered lists instead of a solid block of text.
- Too many fonts: A large number of fonts also makes it difficult to perceive information. Choose two fonts for your website and stick to them.
- Easy-to-miss main buttons: Your main buttons, such as “Book a session” or “Get a consultation,” should be clearly visible to your audience. Use contrasting colors for these buttons to immediately attract people. Taplink also allows you to activate button animation to make them even more eye-catching.
Now you know how to create an attractive personal training website. The most important steps include:
- Identifying your audience’s pain points.
- Selecting a website builder.
- Choosing a template.
- Customizing the site.
- Setting up payments.
- Publishing your fitness trainer site.
- Adding your website link on your social media profiles.
Sign up for Taplink to create a full-featured mobile-first fitness trainer website in just 15 minutes.