How to sell digital art online

- Can you actually make money selling digital art?
- What types of digital art can you sell online?
- How do I sell digital art products online?
- 1. Prepare your digital artwork
- 2. Choose a platform to sell digital art
- 3. Create a digital art store
- How can I protect my digital artworks?
- FAQ
- Should I sell digital artwork as NFTs?
- How much should I charge for my digital art?
- How can I promote my digital art?
The market for digital art has seen significant growth in recent years. In 2021 alone, global sales of digital art reached $13.6 million, nearly double the previous year’s figures. This growth is attributed to factors such as increased digital literacy, optimized marketplaces, and the rise of blockchain technology and NFTs.
As we see, there are opportunities for artists to earn an income selling digital art, whether doing it as a full-time job or as a side hustle. However, to succeed, you’ll need to develop a well-thought-out strategy. This involves determining which digital art downloads you want to sell, choosing the best place to sell your specific products — whether it’s a website, social media platform, or a marketplace — and effectively marketing your digital offerings.
This section will introduce you to 7 types of digital artwork. If you already know what you want to sell, proceed to the next section. Otherwise, let’s keep exploring your options.
2D artwork: 2D artwork is two-dimensional images created using graphic design software such as Adobe Photoshop or Procreate. 2D graphics offer a wide range of styles for creating art, including illustrations, concept art, comics, anime, and more. You can find customers in various industries. Advertising agencies use 2D art to create ads, designers integrate ready-made graphics into their designs, while game developers buy high-quality 2D assets to facilitate game production.
3D artwork: 3D graphics refer to three-dimensional static images or animations. One of the biggest advantages of 3D models is their ability to represent real-world lighting, shadows, and reflections all over the object. The most popular software for creating 3D art is Blender, Maya, and 3ds Max. Just like 2D images, 3D art is used in many fields. Your target market includes gaming companies that need 3D objects for their games, or architectural and real estate agencies that use 3D models to visualize buildings.
Fonts and typefaces: Fonts and typefaces differ in the fact that a typeface is a family of fonts, while a font is a specific style within that family, differing in size, weight, or slant. Fonts are one of the key components of a company’s visual identity. They are utilized by branding agencies, graphic designers, web designers, marketers, and publishing houses.
Graphic design assets: Graphic design assets are ready-made elements like icons, textures, vector graphics, brushes, and backgrounds. The most popular programs for creating graphic design assets are Procreate and Adobe Illustrator. Advertising agencies that make banners and posters or web designers who build websites, user interfaces, or mockups are the biggest buyers of graphic design assets.
Twitch badges and emotes: Twitch badges and emotes are unique small images used to facilitate interaction between users. They’re in high demand among streamers looking to enhance their presence and make it more unique. As of April 2024, there were over 7 million active content creators on Twitch worldwide. Consequently, creating and selling emotes and badges for Twitch is and will remain a profitable endeavor.
Desktop and phone wallpapers: Wallpapers come in all sorts of styles, including landscapes, abstract patterns, portraits, or technology-themed designs. Tech enthusiasts, gamers, art lovers, or pop culture fans who want to personalize their phones or desktops are frequent buyers of wallpapers. Businesses also purchase wallpapers and put them on company devices to foster a unified brand identity, while manufacturers pre-install wallpapers on the devices they produce.
Templates: Ready-made designs are used to create business cards, websites, social media posts, Notion, presentations, and more. Both small businesses and large corporations purchase templates to save time and money on creating materials from scratch.
These are just a few examples of digital art niches. If none of these options are right for you or you’d like to explore other types, please read our article about 180+ digital product ideas.
This section will walk you through how to start selling your digital art and making money on it. We’ll explain to you how to prepare and format your artwork, create an online store, and ensure the safety of your artwork. Read on to get comprehensive instructions and recommendations.
Start by ensuring your artwork is of high quality and formatted appropriately for online sales. For example, if you sell images, export them in popular formats such as JPG, PNG, or SVG, and keep the resolution high.
Creating previews or mockups is also essential. For example, if you sell brushes for a graphics app, create a few simple drawings using those brushes to show their functionality and give buyers a clear understanding of what they are purchasing.
You’ve got lots of options for selling your digital art, like marketplaces, social media, or your own website.
If you’re just starting as a digital artist, promoting your work on marketplaces can be challenging. These platforms are packed with other artists and designers, so it’s hard for authors who don’t have reviews to stand out and attract customers.
Many social media lack the necessary tools to facilitate product sales. For example, TikTok doesn’t let you show images or detailed descriptions of your products. Similarly, X limits posts to just 280 characters, making it difficult for sellers to fully describe products.
Some social media may not have pre-built payment options, so digital artists have to redirect customers to external websites to pay. This extra step disrupts the purchasing process, potentially leading to abandoned transactions. Customers may encounter technical difficulties or lose interest, especially if their purchases are impulsive.
Tracking statistics also becomes more complex. Sellers need to gather data from various platforms, which requires additional time and effort.
The best way to sell digital art and avoid all the limitations we’ve talked about is to build your own website. Of course, developing a website from scratch can be time-consuming and costly, but there’s an easier way — website builders. They enable you to create a fully functional website without requiring technical expertise and in a short time.
While you’ll find lots of website builders on the market, we recommend using Taplink due to its following benefits:
- No transaction fees: Unlike other website builders such as SendOwl or Gumroad, Taplink lets you make money selling digital art without any extra transaction fees.
- Rapid setup: You can create your digital product store in just a few minutes. Typically, it takes between 15 and 30 minutes.
- Built-in payment systems: Taplink offers over 50 payment providers that artists can connect to their stores. This makes it easy for digital artists to receive payments from their customers worldwide.
- Statistics tracking: Taplink offers a built-in tool for tracking basic analytics such as clicks, views, and orders. You can also activate add-ons like Google Analytics or Hotjar for more advanced analytics at no extra cost.
Once you’ve decided to sell your digital products through a website, you’ll need to create it. Below, we’ve provided a step-by-step guide on how to set up a digital art store using Taplink as an example. Below, we will outline the basic steps to creating an online store for digital products. For a more in-depth look at store setup and customization, please refer to this guide.
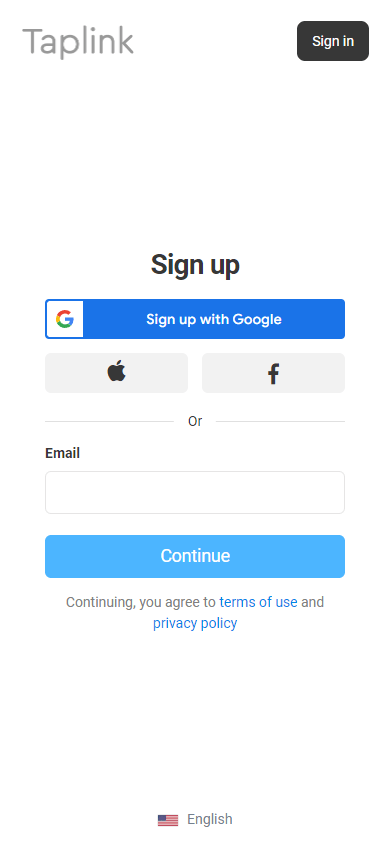
To get started with Taplink, you need to create an account. You have two options: sign up using your Google, Apple, or Facebook credentials, or create an account using your email.
Once you’ve signed up, a page with templates will appear on your screen. But first, we need to choose a pricing plan. For a digital art downloads store, you need to select the Business plan. It enables you to add digital products to your store, accept payments, get notified when someone buys your products, collect customer emails for future marketing, and much more. Here’s how to purchase the Business plan:
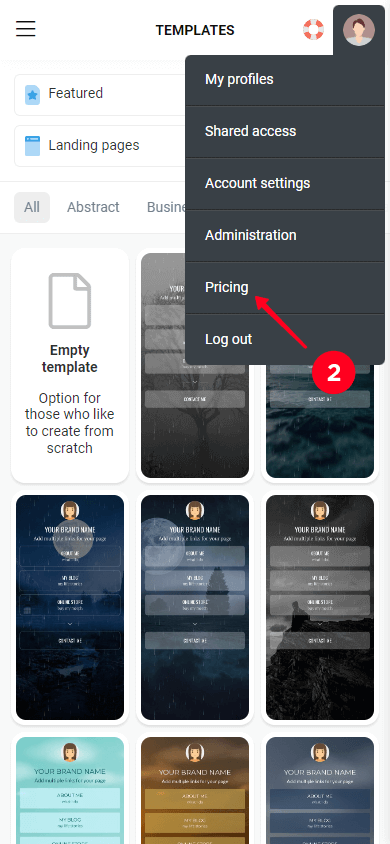
01. Tap the profile icon in the upper-right corner.
02. Select the Pricing tab.
03. Select Business.
04. Tap Pay for Business.

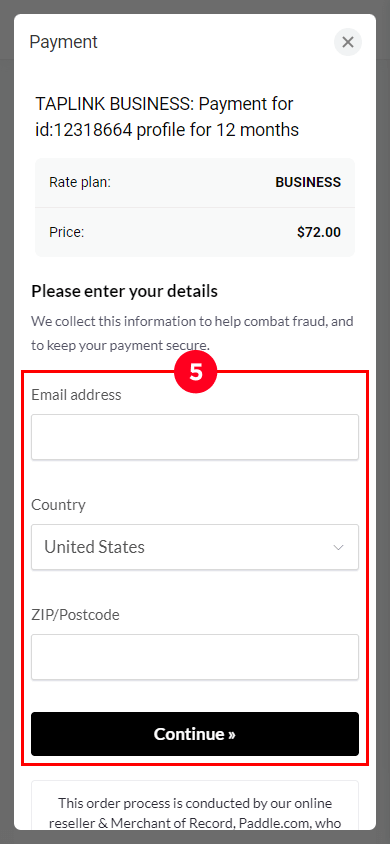
05. Enter your email address, select your country, and type ZIP code; then tap Continue.
06. Fill in the payment details to pay the plan. Payment methods and required details may vary depending on your country. In our case, we can pay the plan via PayPal or credit card.
Now it’s time to create your digital art store. You can build it from scratch, customizing every detail. Alternatively, you can streamline the process by using pre-designed templates. Taplink has over 100 templates in various styles. They have pre-designed elements such as text, images, avatars, buttons, and more. You can customize these elements to suit your specific business needs by editing, adding, or removing them as required.
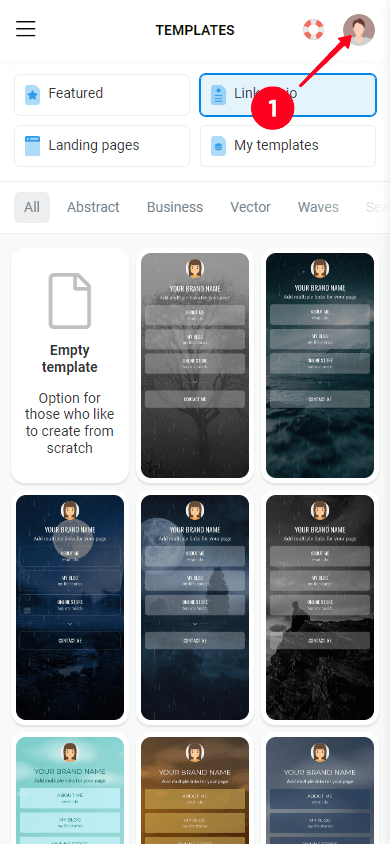
Let’s create a digital product store together. We used this template for our store, but feel free to pick a different one. Here’s how to choose a template:
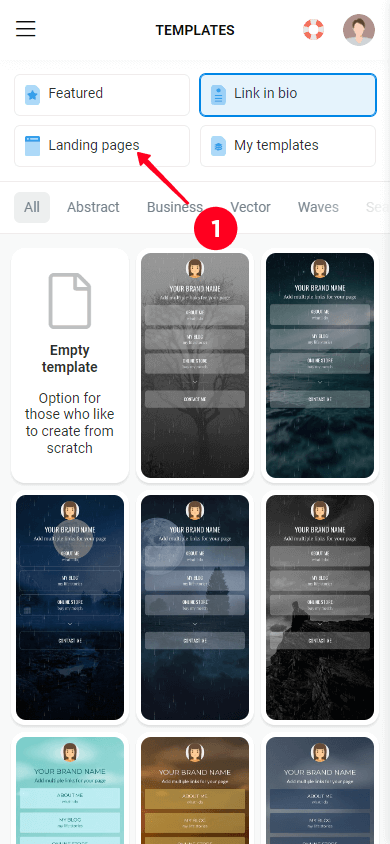
01. Tap the Landing pages tab.
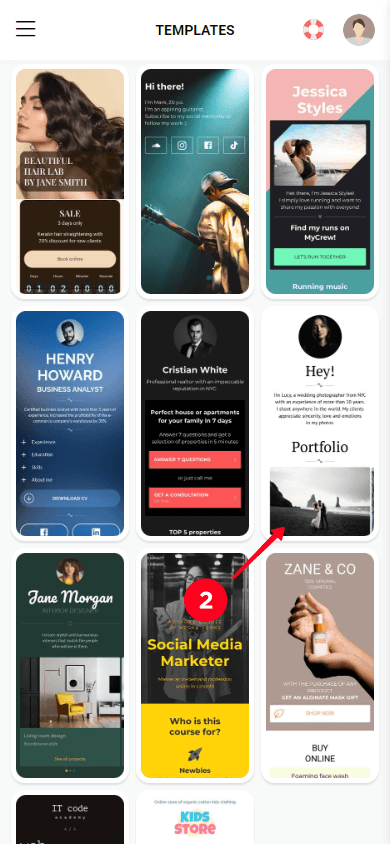
02. Scroll down the page, pick the template you like, and tap on it.
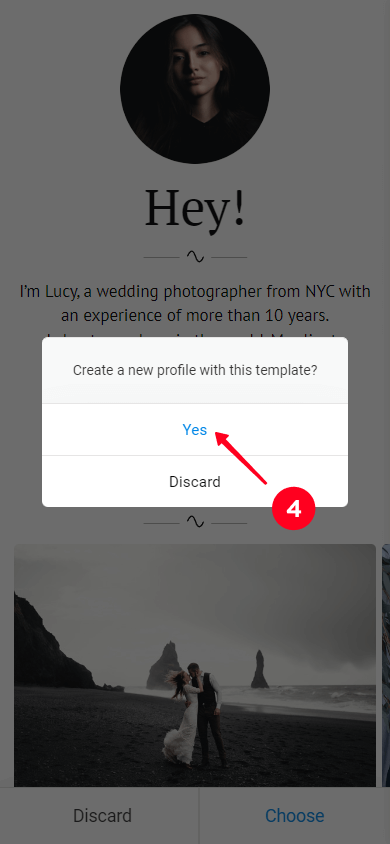
03. Tap Choose.

04. Tap Yes to create a new profile.
So, we’ve picked the template to build our future online store. Now we need to customize it so that it meets the specific requirements of our digital art downloads store.
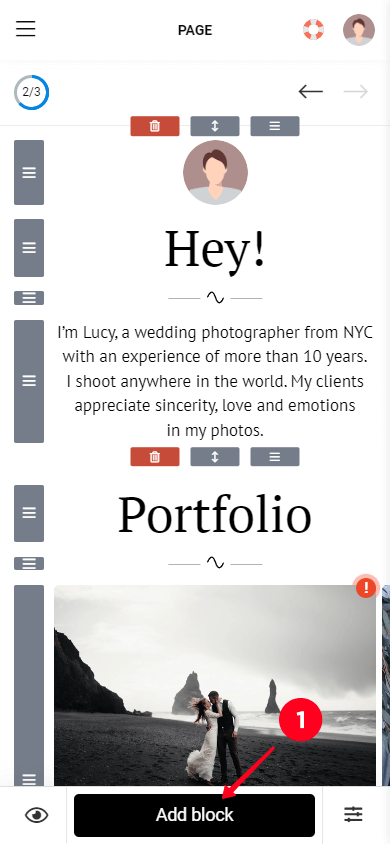
You need to add a Digital products block to your future store to sell digital products. Here’s how:
01. Tap the Add block button.
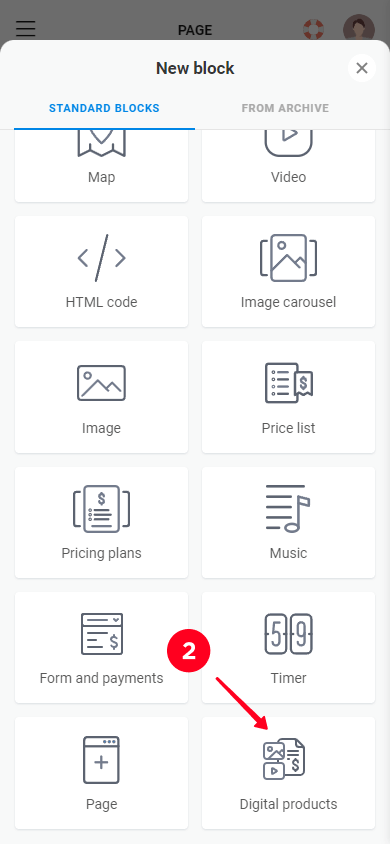
02. Scroll down the page and select the Digital products block.
03. Tap New product.
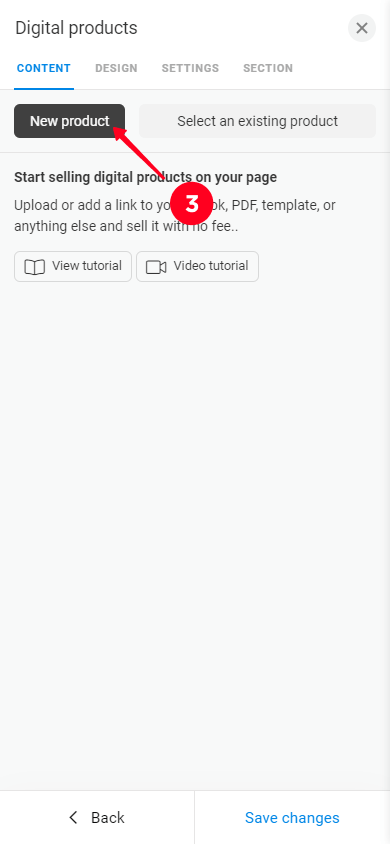
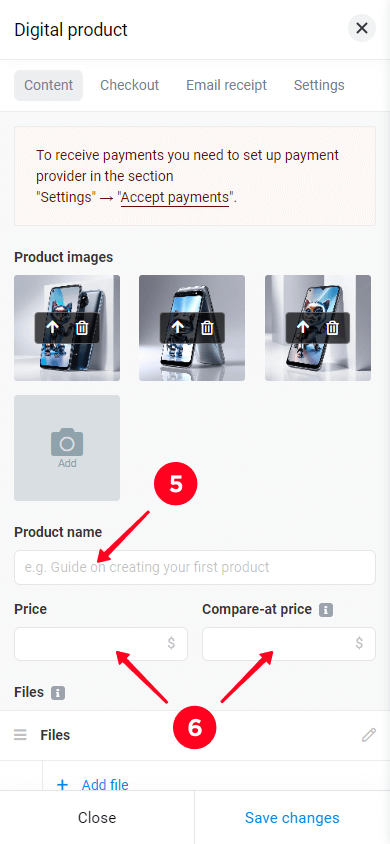
04. Add an image of your digital product.
05. Add the name of your product.
06. Set a price and, optionally, a compare-at price.
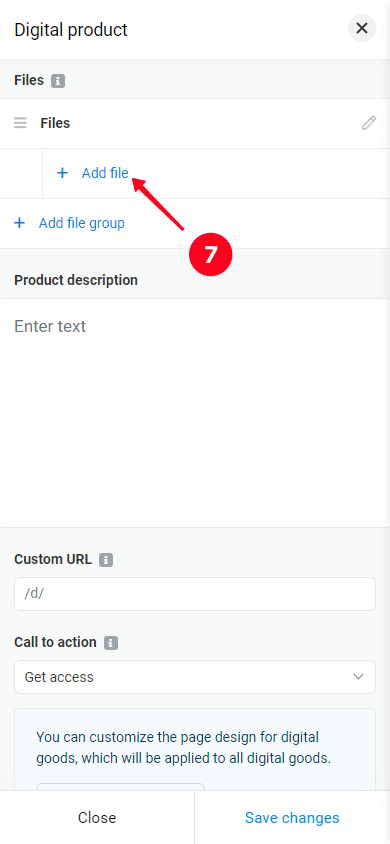
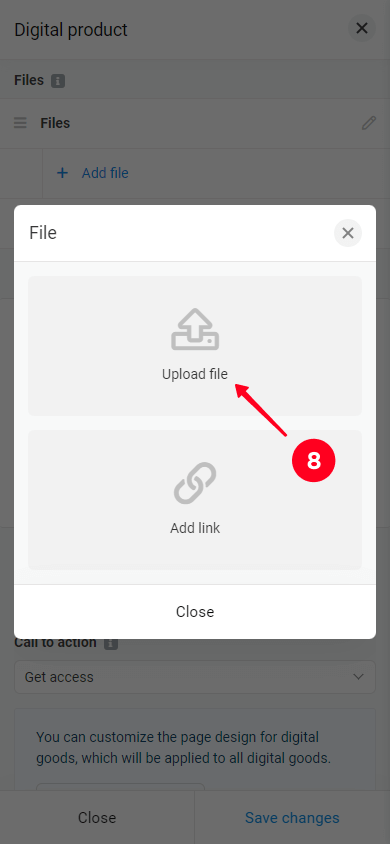
07. Tap Add file to upload the file you want to sell.

08. Tap Upload file.
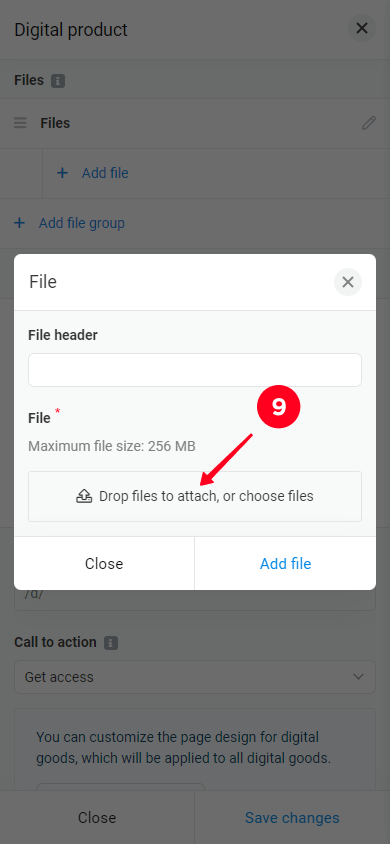
09. Tap the Drop files to attach, or choose files button and upload a file from your device.
10. Optionally, enter a file name in the File header field.
11. Tap Save changes.

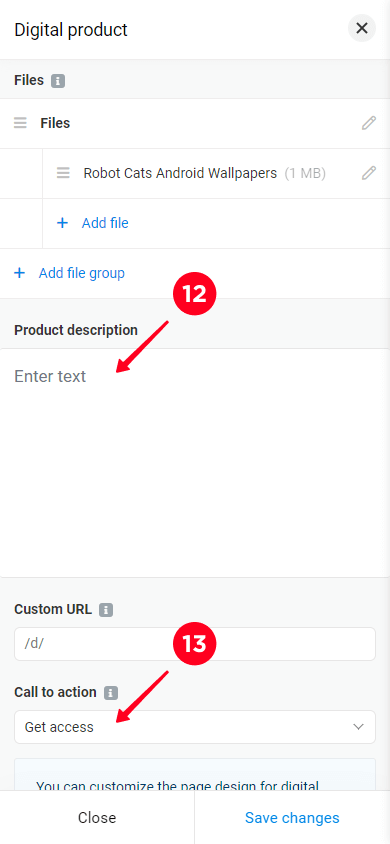
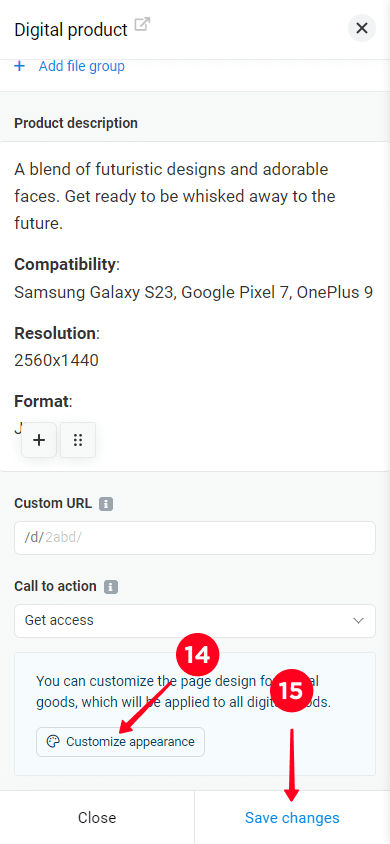
12. Add a description of your product. In addition to text, you can add headlines, lists, quotes, tables, videos, dividers, or notifications. To add them, select the plus icon that appears when you’re tapping the Description field. For example, we’ve bolded “compatibility”, “resolution”, and “format” to make it easier for potential customers to read and understand the specifications of our digital product.
13. Optionally, change the Call to action button text. You can also type your own text by tapping the button, deleting the existing text, and entering your own.
14. Tap Customize appearance for more detailed customization of the Digital products block appearance. Read this guide to find out how you can customize the appearance of your digital product.
15. Tap Save changes once you’ve finished.
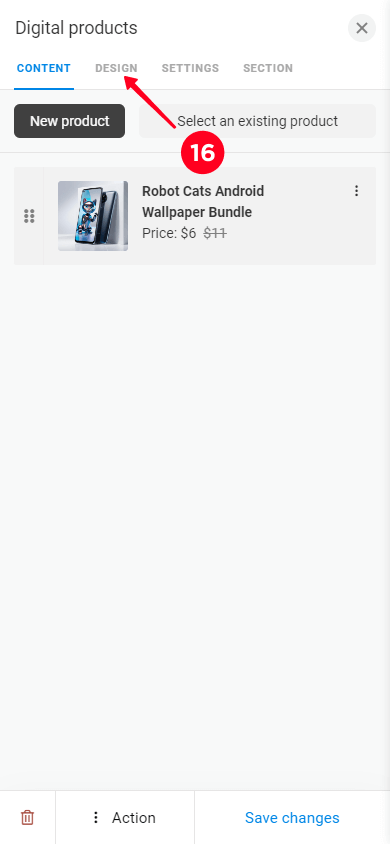
16. Go to the Design tab to customize how your product is displayed in your store.
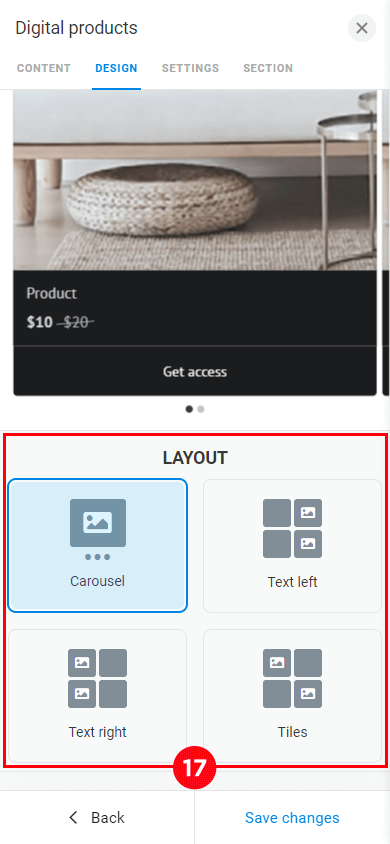
17. Select a layout for your product in the Layout field. Layout lets you customize how your product image looks in relation to its name and price.
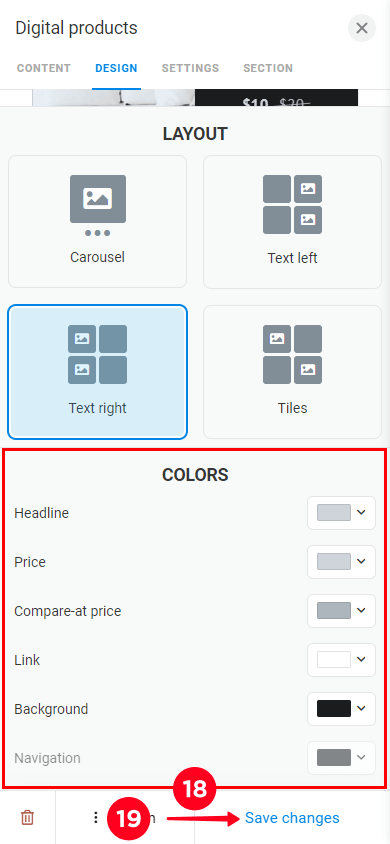
18. Optionally, change the colors for the headline, price, compare-at price, link, background, and navigation in the Colors field.
19. Tap Save changes once you’ve finished customizing the design.
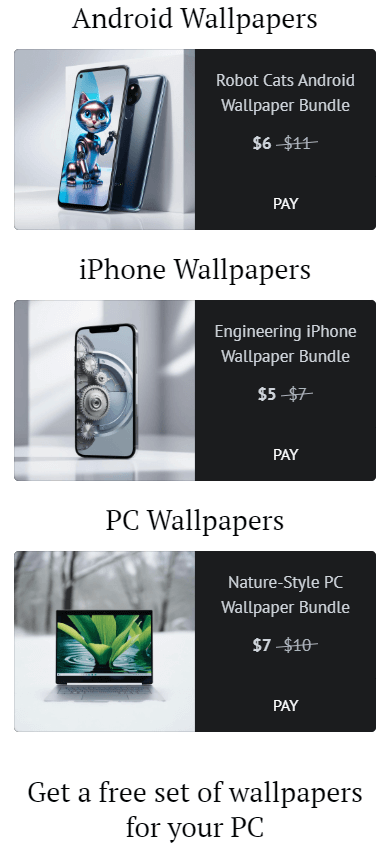
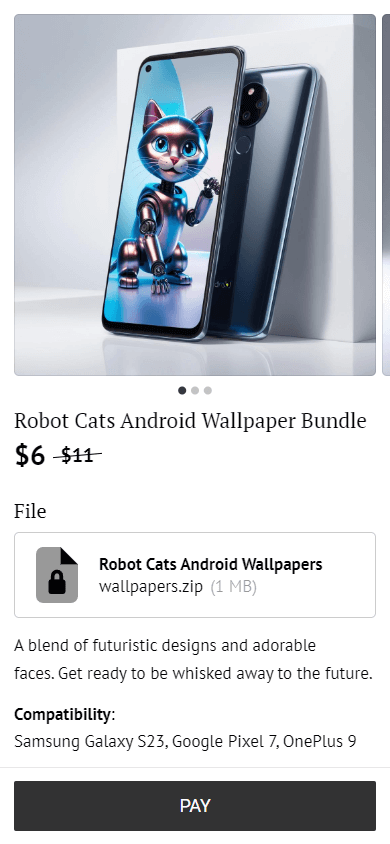
Following the steps above, we’ve made three Digital products blocks. The first screenshot below displays these three blocks, offering wallpapers for Android, iPhone, and personal computers. The second screenshot shows the screen you see when you visit the product page.
The main part of your store is done. Now, let’s make it unique. As previously mentioned, you can customize your Taplink store page by editing, adding, or removing blocks to tell about your business only.
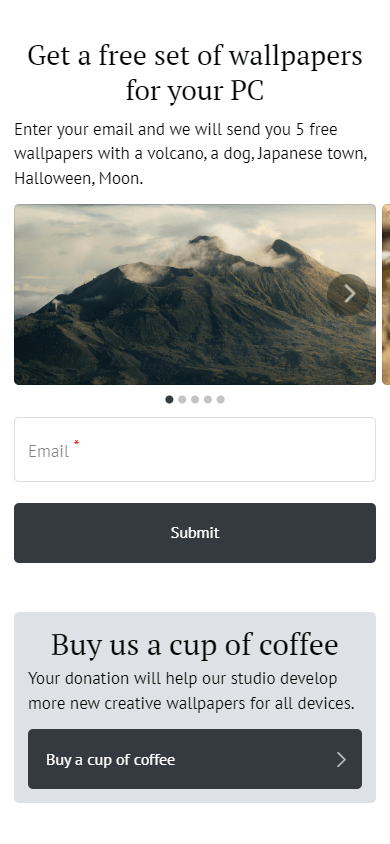
In addition to digital products, we’ve added a block offering free wallpapers in exchange for email addresses for future newsletters. To learn more about how to add and customize an opt-in form in your store, please read this detailed guide.
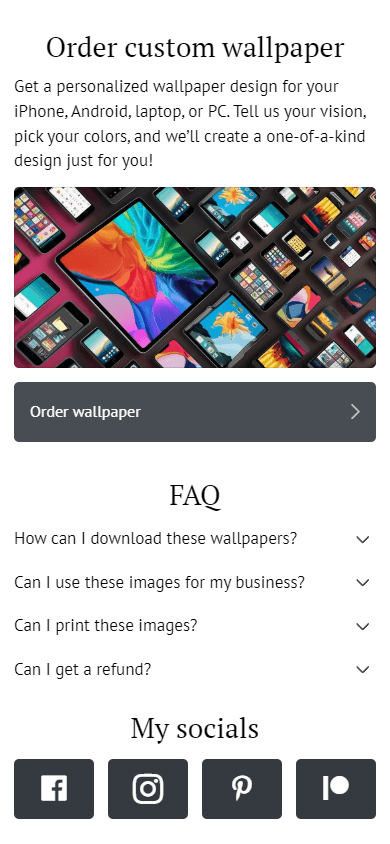
We’ve also added a block asking for donations and a block where customers can order unique wallpaper designs. We’ve updated the FAQ block with questions people usually ask about our wallpapers and changed the social media links to our studio.
Click here to explore the digital product store we’ve created in more detail.

Taplink allows you to accept payments through more than 50 payment providers worldwide. Read on to learn how to set up payment acceptance.
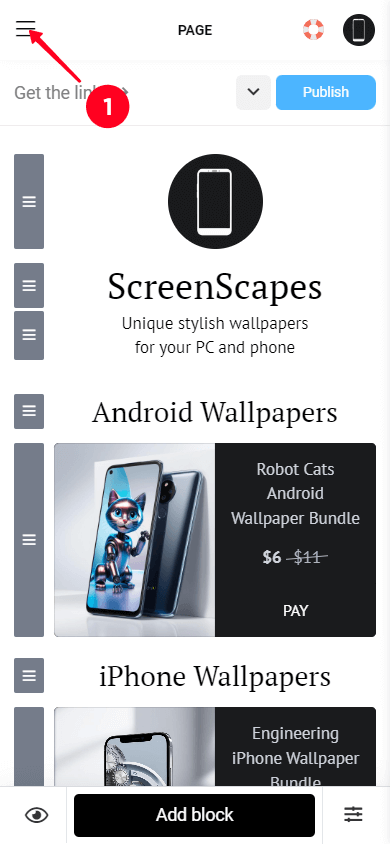
01. Tap the Hamburger menu in the left corner of the screen.
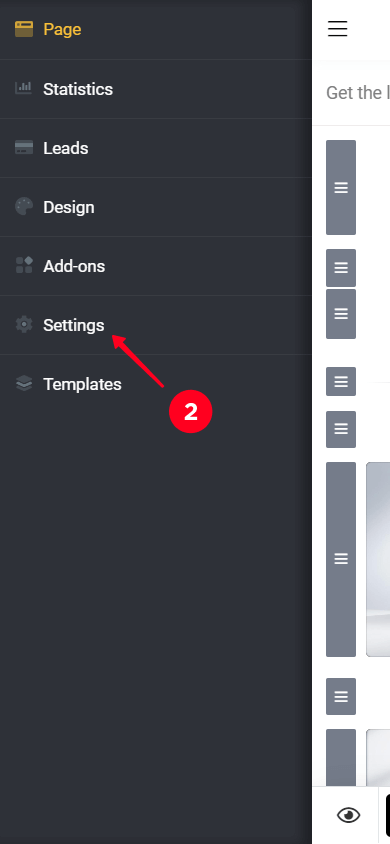
02. Select the Settings tab.
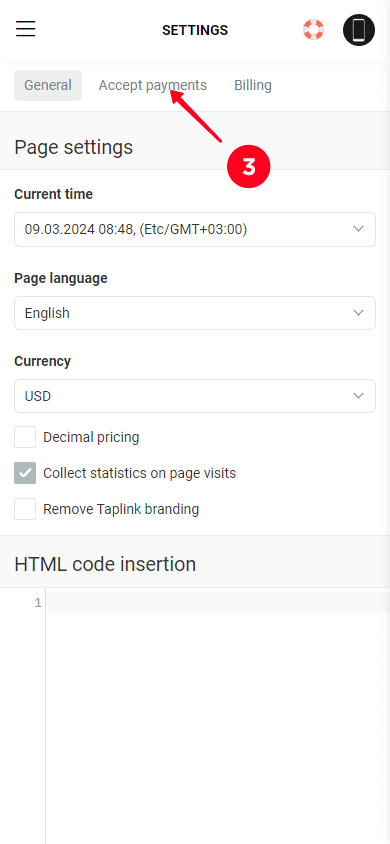
03. Go to the Accept payments tab.
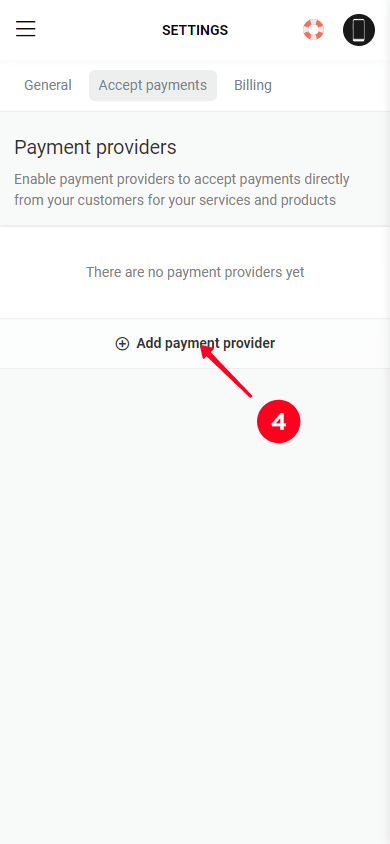
04. Tap the Add payment provider button.
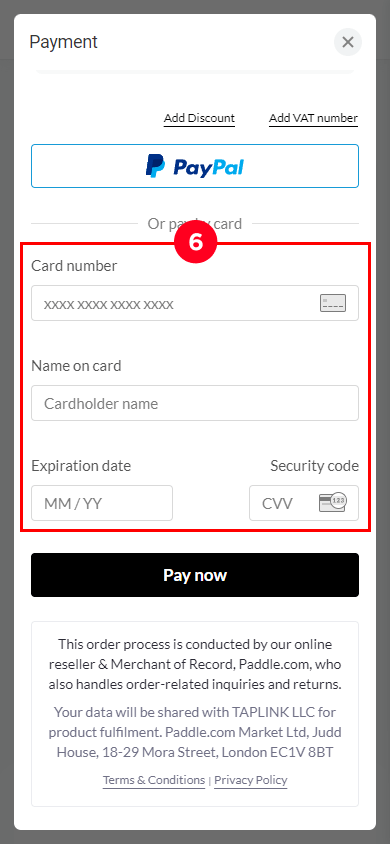
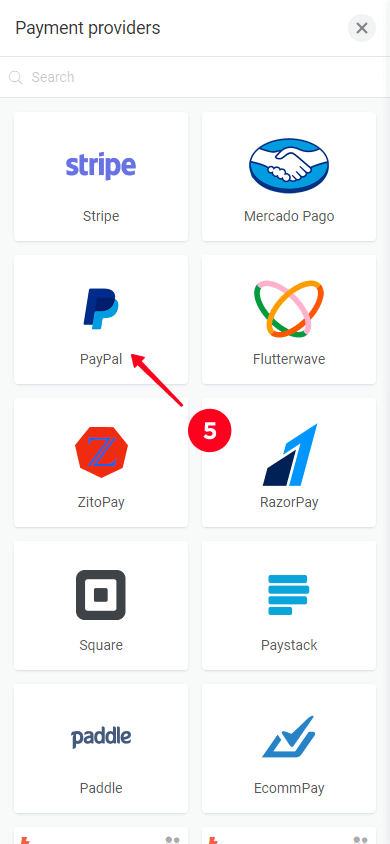
05. Scroll down the page to choose your preferred payment provider. We decided to choose PayPal.
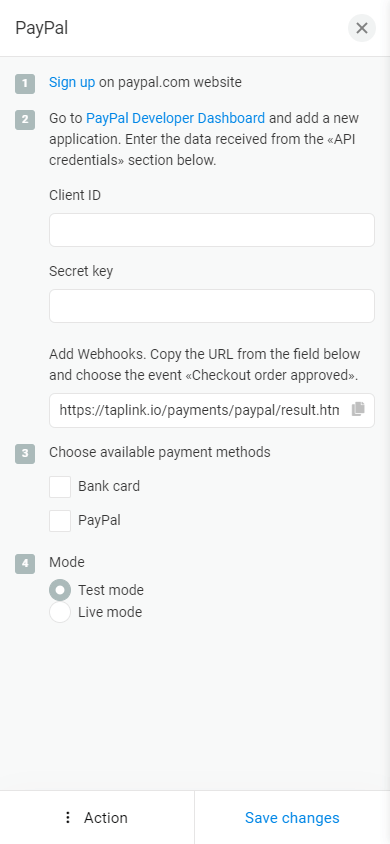
06. The data you need to fill out varies depending on each payment provider. The screenshot below shows an example of the PayPal data entry page. For more detailed information on filling out data for PayPal, please watch this video.
If you want to learn more about how customers purchase and receive digital products, please follow this link.
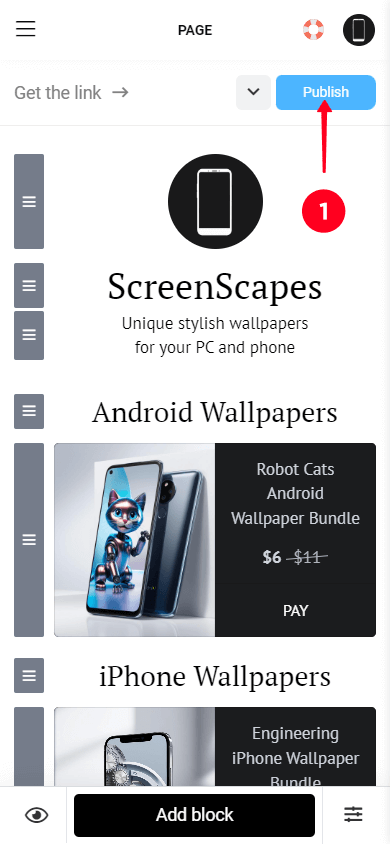
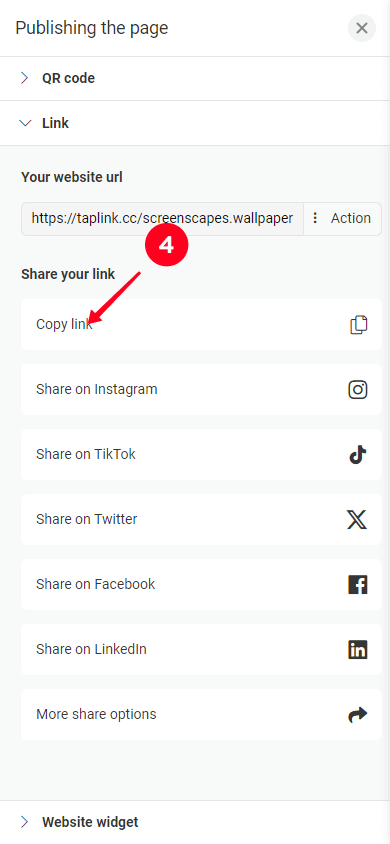
Our digital artwork store is almost ready. The last thing to do is create a link to share with potential customers.
- Tap Publish.
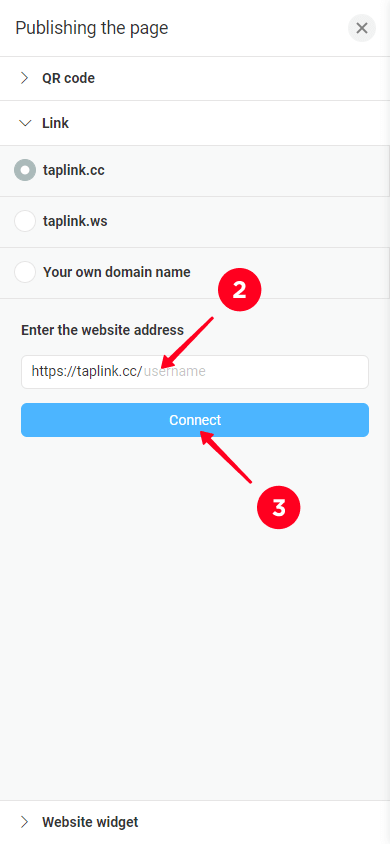
- Enter your username in the Enter the website address field. We recommend entering the same username you use for your social media or any other memorable name.
- Tap Connect.
- Tap Copy link to share your store link on the social media platforms you’re on, such as Instagram, TikTok, X, Facebook, or LinkedIn.
Like any other product, selling digital art online comes with certain risks, including fraud, theft, and privacy concerns. Here are some tips to help you protect yourself and your art:
- Use low-res previews: Showcase your work with low-resolution previews, good for viewing but impractical for high-quality theft. For example, if you sell digital paintings, an image of no more than 300 pixels might be enough to showcase the work, but not enough for a high-quality print.
- Watermark your art: Watermark your art previews, including templates, digital paintings, or wallpapers. Use semi-transparent elements that don’t obscure the main details of the image. Place watermarks in parts that are difficult to crop or remove using image editors without damaging the image itself.
- Specify your terms of service: Specify what buyers can and can’t do with your art and tell them about your refund policy. For instance, many sellers don’t offer refunds, as digital products can’t be returned in the same way as physical ones. That is, even if a customer gets a refund, they still have your digital product and can copy and distribute it.
- Use a strong password: Your password should be unique to each platform. It should consist of upper and lowercase letters, numbers, and special characters to make it as difficult as possible to crack.
- Enable two-factor authentication: Many platforms, including Taplink, offer two-factor authentication. This means that in addition to your password, you need to verify your identity using a second device such as a mobile phone. Even if someone knows your password, they won’t be able to access your account without this step.
- Hide your email: Consider hiding your email with tools like Apple’s Hide My Email. This feature generates a unique, random email address for each app or website you sign up for. It forwards emails directly to your main inbox, ensuring you don’t miss any important messages.
NFTs are a good way to sell digital art, whether it’s digital paintings or graphics assets. But there’s a lot to think about before jumping on the bandwagon.
The advantage of selling through NFTs is the transparency and security of transactions, allowing digital artists to avoid fraud. Artists also receive royalties on each resale, providing additional income compared to traditional sales.
On the other hand, you need to understand blockchain technology and cryptocurrencies, which can be challenging for those unfamiliar with these concepts. Plus, selling NFTs involves significant fees for minting, listing, and selling. This can be tough for artists selling cheaper works, as a large portion of their earnings may go towards these fees.
You need to think carefully about whether selling your art as NFTs is right for you. For instance, if you know how blockchain works, it’s easier for you to start using NFT. But if it all seems too complicated, consider selling your art through a website built on Taplink, for example.
There are a few things to think about when pricing your digital art:
- Time spent: Evaluate the time you spent creating the artwork and calculate a reasonable hourly rate. This can be a good starting point for setting the price.
- Your costs: If you incurred costs for software or equipment, factor these into your pricing.
- Market rates: Research what other artists with similar arts and experience are charging.
There are several ways to promote digital art that you sell on your website:
- Social media: Add your website link in your bio on all your social media profiles. Regularly post your artwork and examples of how it can be used on Instagram, Pinterest, or TikTok. Create tutorials or informative posts.
- Blogger partnerships: Find bloggers in your niche and commission them to advertise your store. You can also consider offering them free products in exchange for a positive review that they can share with their followers. This will help attract their followers to your store and convert a part of them into your customers.
- Email marketing: Build an email list and send regular newsletters. These can include updates on new products, promotions, informative content, or examples of art created using your digital assets. For example, in Taplink, you can gather emails with the Application form block, as we did this in the Customizing your store section. There, we offered free wallpapers in exchange for customer emails.
Selling digital art online can be a straightforward process when you have a clear starting point. First, figure out what kind of digital art you want to sell. Then, get your artwork ready for selling and create your own online store. Utilize Taplink to set up your store in a matter of minutes and begin monetizing your creativity.